Replacing the Mirror Element of a VAZ 2110
How to change the mirror element on the rear view mirror of a VAZ- 2110
Some sources for describing the replacement of the mirror element side mirror The rear view of the VAZ-2110 says that this procedure is quite complicated and that it can be damaged during replacement. The owner of dozens could prove the opposite, who independently decided to change the broken spare part
All this nonsense - everything changes in 3 minutes! I left for half an hour because I was not in a hurry, I waited until the garage warmed up and overcame the children's interest in dismantling cars))) So I completely removed the mirror... At the same time, there was a little noise stuck inside the mirror on the triangle - now the wind will not blow in the mirror area )))
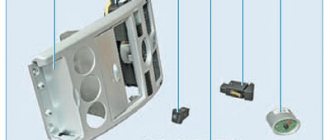
Photo 1. On the left is an explosion element , on the right is a new one for 35 UAH in the nearest auto store
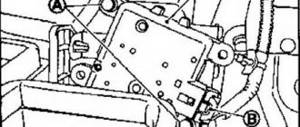
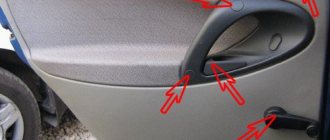
Photo 2. Unscrew the handle inside the mirror control lever...
Disassembling the entire mirror element of a VAZ 2110
In this video I will show you how to replace the mirror element
(glass) on
VAS
.
replacement VAZ Mirror Element
Self-test video: replacing the mirror element
on the exterior mirror
there is a rear view of such cars
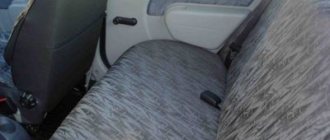
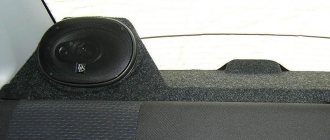
Photo 3. Inside we see this picture...
Photo 4. They even took care of the plant - they stuck in a piece of Shumka!
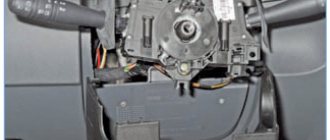
Photo 5. Well, the procedure itself...
Photo 6. This is the same white regulator plate...
Photo 2 - (one bolt under the plug), then remove the plastic housing (theoretically it is mounted on three pistons, but after removing the lever it immediately fell off!) and unscrew the three straight bolts holding the mirror.
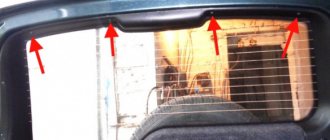
Photo 3 - the Shumka is glued, poured under the side window seal (the holes can be pierced a little with a screwdriver, the Shumka does not interfere with installation)
Photo 5 - They frightened us with complexity, but everything is painful: we press our finger completely on point 1, then we put our finger on point 3, slightly press it towards ourselves, the mirror element is easily clamped... Don't pull too hard - it is still attached to the mirror mirrors with a white plate - under arrow 2. And that's all... Everything was removed without damage and my hands were cut...
Photo 6 - Taking off the mirror element in the direction indicated by the arrow... We take a new one, put it on the plate (the correct position, everything is logical there), then carefully place it in the middle and carefully press on the fist (or something else 5x5 cm. ) until it clicks...
We assemble and tighten everything in the reverse order... Do not forget that the three mirror mounting bolts must be tightened very tightly - the noise can be tightened tightly... And if this is not done, the mirror itself will vibrate on the cones and will not be able to withstand even the weakest vandalism. attack!
And don’t blame the quality - I don’t always carry a digital camera with me...)))
Disassembling rear view mirrors
The procedure below applies to both exterior and interior mirrors.
- The mirror is removed from its regular place.
- Use your hand to gently press the top edge of the mirror glass until it unrolls.
Side mirror mirror element rotates manually - A piece of rag or napkin is placed in the gap that appears between the mirror body and the glass.
- Then a flat-head screwdriver, pre-wrapped with electrical tape, is inserted into this gap.
The latches holding the mirror element are bent with a flat screwdriver - The latches holding the mirror are pryed with a screwdriver and removed from the protrusions.
- The mirror glass is carefully removed.
This is interesting: Civil version of the GAZ-2330 “Tiger”: review of the Russian jeep
The left mirror is dismantled in the same way as the right one.
Replacement Rear View Mirror VAZ 2110
How to change a mirror element to a rear view
VAZ
2110
administrator February 8, 2013
Some sources for describing the replacement of the rear view mirror mirror element on a VAZ- 2110 say that this procedure is still quite complicated and there is a possibility of damage when replacing it. The owner of 10 managed to justify the revolver, who, without outside help, decided to replace the broken part
All this nonsense - everything changes in 3 minutes! I drove for about half an hour, because I was in no hurry, I was waiting for the garage to warm up, and I won the capture of children by analyzing vehicles))) mirror I completely shot it... At the same time, inside the triangle under the mirror I stuck a piece of Shumka - now there is no wind whistles in the mirror area)))
Photo 1. Replacing the CV connection on a VAZ 2110 with your own hands. Skoda a5 fl. How to remove a rear view mirror | Removing the rear view mirror. YouTube. Tags: Replacing a 2110 transmission, how to adjust the parking brake for the weight of a 2110. Attention! Detailed description of removing and disassembling the rear view mirror of a VAZ 2110. Replacing rear lights of a VAZ 2104 with rear lights of a VAZ 2104, how to remove the panel. On the left is an explosion of goods, on the right is a new one for 35 UAH in a remote auto store
Photo 2. Rear view mirrors on VAZ 2110, 2111, 2112 cars do not need to be removed so often, and the most common cases, if necessary, are road accidents. Replacing a VAZ 2110 with a thermostat for 8 injectors and removing the Skoda a5 fl rear view mirror into the mirror! Like an octave. Unscrew the knob on the mirror adjustment lever from the inside...
How to secure and how to glue a new one
Useful tips for car enthusiastsAdjusting rear view mirrors
If you successfully dismantled the mirror without the help of others, then returning it back will not be difficult. Usually, all actions are performed in reverse order.
But you should pay special attention to the selection of glue, because not everyone is suitable for this process
Glue selection
There are three types of compositions for gluing mirrors:
- chemically cured;
- light-curing;
- epoxy-based compositions.
A composition with resins will work perfectly only in this case if you let it dry properly. This usually takes from 10 hours to a day. In this case, the part must be pressed tightly at all times. This approach is not very comfortable, because such products are not used in everyday life.
Replacing the mirror element on the exterior rear view mirror of Kalinas, Grants and Prioras
Video review on how to independently replace the mirror element on the external rear view
such cars
Replacing the side rear view mirror 96545750 General motors for a Chevrolet Lacetti
Light-curing consistencies operate when exposed to special ultraviolet lamps. This is one of the most common methods in production. But, if you are not the happy owner of a lamp, you should not receive such a composition. Sunlight, especially when diffused, is not able to have a sufficient effect.
For these reasons, chemically cured compounds are more popular. A special hardener starts the polymerization process. Typically, they consist of the glue itself and an aerosol activator, although one-component compositions are also found.
Please note that certain materials cannot be used to glue the mirror. The adhesive component of both materials has such a composition that when used on glass or metal, it will not be able to harden one hundred percent.
High air temperature inside the cabin or heating of the glass from sunlight will soften it, and the mirror will fall off. You can use household adhesives only in this case if the mirror fell off quite suddenly, and now you urgently need to get to a car service center
The adhesive component of both materials has such a composition that when used on glass or metal, it will not be able to harden one hundred percent. High air temperature inside the cabin or heating of the glass from sunlight will soften it, and the mirror will fall off. You can use household adhesives only in this case if the mirror fell off quite suddenly, and now you urgently need to get to a car service center.
I tried it with superglue three times. I confirm: it doesn’t last more than a week.
How to stick to windshield
Having selected the appropriate glue, you can begin returning the rear view mirror to its rightful place. Choose a warm day for this or install a heater in the garage: the air temperature should be between 20 and 25 ° C.
- Clean the holder platform from any old glue residue.
- Lightly sand the surface of the holder to improve the adhesion effect.
- In the same way, sand the area of the windshield in the adhesive area.
- Degrease the holder and glass area.
- Apply a thin layer of glue to the holder.
- Spray a special activator onto the part where the part is attached.
- Place the adhesive side of the part onto the glass. Try to follow the trail left from the previous time.
- Press the mirror firmly against the glass and hold for the time indicated on the package.
- After making sure that the part is firmly in place, clean the mirror from any remaining activator and glue around the holder.
- Reinstall the windshield (if you removed it) according to the owner's manual.
Ready! If you strictly followed all the instructions, the mirror looks as if it was installed at the factory or at least in a car repair shop.
Be as careful and attentive as possible! It is impossible to move a crookedly glued mirror, so you will have to start the whole process from the beginning.
How to install on bracket
If during dismantling you did not separate the bracket platform from the glass, it will be even easier to assemble it. To do this, find a fixing element: it may be a screw or latch. Then connect the bracket leg to the platform.
There are also special fasteners that are not glued to the glass, but are installed on the ceiling or other elements of the car, for example, on sun visors.
How to disassemble the rear view mirror of a VAZ 2110
How to disassemble a car mirror
There are many reasons to analyze a car's side mirror. This may be the desire to paint it or tidy it up after the woodcutter picked it up. Many car drivers are interested in how to disassemble a car mirror and how to remove it quickly and easily. Due to inept movements, a car mirror can become completely unusable, and then a new one will be needed, and as a result the mirror will be installed in a car service.
But there are many brands and even more models of cars and mirrors for them. There are also many types of mirrors. electrical, folding, rotating elements, etc. The most important thing is how to remove it to avoid damage. Below are general steps to analyze your camera's side mirror.
Removing the mirror
Naturally, it will be more convenient to disassemble a mirror removed from the car, so it should be removed. What will it take?
Removing a power mirror. First, remove the mirror lock, remove the three screws that secure the mirror to the door frame, and then remove the mirror.
Removing the electric mirror. First thing to do. disconnect the negative terminal from the battery. Next, unplug the power cord, remove the three screws that secure the mirror to the door, and remove them.
Removing mirrors
There are several ways to make a car mirror.
Disassembling the entire mirror element of a VAZ 2110
replacing side mirrors on a VAZ 2110
, 2111.2112 and the like.
Replacing side mirrors on a VAZ 2110
Video review of replacing the mirror element with an external mirror, rear view
such cars
First way
Using a curved object or screwdriver, carefully rotate the mirror while pushing it from the inside. Trying to pull the mirror away from the edge may damage it. Some motorists use many objects to remove the mirror element. It could even be all kinds of kitchen spatulas. Some wrap the edge of the spatula with electrical tape to avoid damaging the surface of the mirror. Others use a single solid blade. correct the gap, and insert the other one more softly into the resulting groove.
How to disassemble a side mirror
First you need to decide on the make of the car and its design of the mirror. Then inspect the visible damage and read the repair instructions. In approximately half of the cases, side mirror malfunctions consist of a broken housing and broken glass. Although different cars will require a different approach to replacing a mirror, one thing is similar for them. If the mirror is cracked, you need to pull out the burdock with the mirror from the holding hinged bracket, which ensures mobility, and then replace it with a new one. The main thing during installation is not to overdo it! The mirror is very fragile, so it is better to perform the procedure at positive temperatures; in winter in a heated garage or in a service station.
Selecting and replacing mirrors on a VAZ 2114
To control the situation on the road, each car is necessarily equipped with rear-view mirrors. Two are located outside on the sides or one more is located inside the cabin. As a result, the driver receives a 360-degree view.
But it happens that the integrity of these mirrors is violated. This can happen as a result of an accident, banal looting, or some kind of accidental blow to them caused by the driver himself.
In any case, it is advisable for you to know how they are removed, disassembled, installed in place, adjusted and even insulated. Today our article will be devoted to these issues.
How to disassemble a car's side mirror
Communities Car cosmetics detailing, tests, tips Blog Glue for gluing the rear view mirror to the windshield.
Disassembling the side mirror involves removing the mirror element itself, which is located in a plastic case. This is necessary if the mirror element is broken, you need to repaint the plastic element or perform some other manipulations with these parts separately from each other.
The mirror element is secured in the mirror body using several plastic latches, which are located on its reverse side. Most often there are about 8 such latches, 2-3 on each side. We recommend proceeding as follows to remove the mirror from the housing without damaging any of the elements:
Since the latches are plastic, it makes sense to warm them up a little so that they are more flexible to deformation. To do this, you can use a regular household hair dryer.
Direct it onto the glass for 3-4 minutes, preferably distributing the heat evenly along all edges of the mirror. Important: Do not use a hair dryer for this work, since its temperature may exceed the melting point of plastic, as a result of which the mounts and side mirror housings are deformed and damaged; When the latches have become softer, you can proceed directly to the process of removing the mirror. To do this, we recommend taking plastic spatulas (which are often used in mobile equipment repair services)
If you don’t have such a spatula, you can use a regular flat-head screwdriver, but before doing this, it is advisable to wrap the metal part with electrical tape so as not to accidentally scratch the mirror and body. Also get a small piece of soft fabric; After this, place a soft piece of cloth on the plastic part of the body in the place where you will insert the spatulas or screwdrivers. After this, insert the tool, thereby moving the mirror; Next, carefully pull the improvised lever from a screwdriver or spatula to remove the mirror element from the plastic mount or mounts; Having freed one side from the fastenings, do similar actions with the others; After this, carefully remove the mirror, but note that it may still be attached to something, for example, glue, or there may be wires going to it. Disconnect everything unnecessary and remove the mirror element, at which point the process of disassembling the side mirror can be considered complete.
Depending on the car model and the mirror used, the space under the mirror element may be empty or filled with various components. Their dismantling, if necessary, should not cause difficulties.
(419 votes, average: 4.54 out of 5)
Price issue
First of all, we will orient you a little on the price tags that are presented on the market today.
The cost may vary depending on the manufacturer, technical features of the product and the region of its sales. Therefore, prices are average.
Mirror type
approximate cost
Outdoor heated
Obviously, the characteristics of the panoramic interior mirror provide a better view, and the presence of heated exterior mirrors provides comfort and does not require constant wiping. It is better to pay more, but buy new functional products.
Internal
Let's start with the rearview mirror installed inside your car.
Interior rear view element
There are several reasons why the driver will want or have to dismantle this element:
- The desire to replace with a more advanced, new model;
- Installation of electronics, parking sensors;
- The glass or plastic case is damaged, broken and does not allow further use of the component;
- There is a need to install sensors that are not included in the standard equipment of your car.
Replacement
Do not rush to remove the old mirror if you have not yet purchased a new product. Sometimes you have to wait for weeks because of the speed of delivery, and sometimes it’s enough to go to the market or store, where you will immediately find the desired product.
VAZ 2114 were produced until 2009, which requires the use of a standard type of fastening consisting of two bolts. This method of fixation has been used since 1976.
The downside of bolt-on mounting is the impossibility of installing an interior mirror from a foreign car. It’s good that there are many domestic products on the market that perfectly match the VAZ 2114.
You can start working.
- Remove the plug from the bolts. Although it is not always present.
- Holding the mirror body with one hand, begin to unscrew the mounting bolts with the other.
- Remove the old mirror.
- Check the condition of the seat and clean it.
- If the old bolts are covered with rust, it is better to replace them with similar new ones.
- Screw in the new mirror using the bolts.
- Insert decorative plugs so that the bolt heads do not spoil the appearance of the interior.
The simplest fasteners
The bolts should be fixed as tightly as possible to avoid damage to the glass as a result of shaking and vibration.
Adjustment
The interior rear view mirror is tilt adjustable.
- The ideal setting is when, when you look into it, you can see everything that is happening behind your car;
- Some cars have high seats, which means you can see part of your ear and headrest in the reflection. This is a normal phenomenon, so there is no need to change the settings;
- A panoramic product with backlighting is best suited for the role of a rear mirror, since the glass used is flat and there is no image distortion, which has a positive effect on safety.
How to repair a side mirror?
If the mirror does not fold, cannot be adjusted, or is constantly knocked down, the side mirror mechanism has broken down. In order to eliminate it, our specialists take the following actions:
- dismantle the mirror, disconnect its contacts from the vehicle’s on-board system, dismantle the unit;
- using a special hair dryer, heat the surface in order to soften the sealant and dismantle the mirror;
- dismantle the mirror engine;
- disconnect the body from the fixation leg to the door;
- Having reached the mechanism for folding/unfolding the block, check all connections and repair existing damage;
- carry out all the steps in reverse order in order to assemble the element and install it in its rightful place.
After this, repeated testing of the finished part is carried out, which allows you to be confident that the repair work has been carried out correctly.
"MBS-services" is always a guarantee of quality service! Contact us!
Lateral
There can also be many reasons for removing side mirrors. But mainly this is replacement, painting or installing a heating system.
Regardless of the situation specifically with your VAZ 2114, the first thing you will have to do is remove the elements. How to do it?
Side mirrors
Dismantling
Removing side mirrors is not a difficult task. Here you only need a screwdriver to work. Perhaps not alone.
- Pry off the plug located on the side mirror control knob.
- Behind the plug there is a screw that needs to be unscrewed with a Phillips screwdriver.
- Remove the triangular plug. In the case of the VAZ 2114, it is held in place by special clamps. So to remove it you need to carefully unscrew the latches. Use a flathead screwdriver to pry the plug and remove it without too much trouble.
- Next, three mounting screws appear in front of you.
- By unscrewing them, you will thereby remove the side mirror.
- Do the same procedure with the second rear view element.
As you can see, removing the components is quite simple; simple fastening is provided. This is largely why they love domestic cars, since even a person without much experience can disassemble and assemble most components.
Dismantling process
Disassembly
It is not a fact that you will need to completely change the rear view element assembly. Therefore, it is necessary to figure out how to properly and accurately disassemble the side mirror.
There are several ways to do this, each of which has its own characteristics.
- Press the inside of the plastic case and snap off the holders with a flat-head screwdriver. This method cannot be called reliable, since the probability of breaking the mirror itself is quite high.
- The second method is even more risky because it involves quickly striking the glass onto the surface. Choose a soft surface, such as rubber. This will allow you to quickly and easily remove and disassemble the element. Strike lightly but quickly.
- To replace the plastic housing or main fastener, you need to remove the adjusting rod and pin. Assembly is carried out in exactly the reverse order.
Heating
If you have driven foreign cars, especially in winter, you could appreciate all the delights of having heated exterior mirrors.
The VAZ 2114 does not have such an option, but this did not stop third-party manufacturers from producing a whole range of products equipped with heating.
Frankly speaking, it is much easier to spend about 800-900 rubles on buying a ready-made heated side mirror than to try to make the heating yourself. This is better in terms of reliability and safety.
The only peculiarity of the installation is that, unlike a conventional rear view element, you will need to not only install the housing on the seat, but also additionally connect the wiring to the power system of your car. That's all.
Heated mirror
For reference, we add that today there are kits for self-insulation on the market. It consists of three components:
- Wiring;
- A light bulb (it is this that creates the effect of heating the mirror);
- Insulating material (prevents the heat from the lamp from being wasted and leaving the housing).
Adjustment
To provide yourself with the necessary level of visibility of everything that is happening behind you, you need to properly adjust the side mirrors. This is not difficult to do, since there are appropriate adjustment knobs inside the cabin. Another question is what is the correct setting?
- When set correctly, when looking in the mirror you should be able to see the entire side of the road surface.
- When driving, you should have a good view of the adjacent lane and the car that is moving next to you.
- If the mirror is positioned correctly, you will see the edge of the body of your own car in it. Due to this, the distance between you and the neighboring car is correctly determined.
- The side element should reflect no more than 5 percent of your car.
- The road surface takes up about 50 percent of the bottom of the glass when properly configured.
- If you manually lower the mirrors down for easier parking, be sure to return them to their original position.
Example of correct adjustment
Checking the adjustment should be carried out exclusively on a level road. This way you will get the most accurate tuning result.
Obviously, changing mirrors is a very simple task. In this regard, the VAZ 2114 is designed simply but reliably. A couple of bolts, several clamps, decorative plugs - these are all the elements that need to be removed to get the result. The reassembly procedure does not cause any problems. So go for it!
How to glue a car mirror to the windshield
First we need to decide on the glue that we are going to use.
What glue should I use?
The main rule: the glue holding the interior mirror to the windshield must be two-component. Yes, there are many varieties of all-purpose glue. But in this case, universal glue will not work. The fact is that two-component glue perfectly withstands sudden temperature changes, high humidity, and most importantly, vibration. Conclusion: the mirror element should not be glued with universal glue.
There is a second option: use light-curing glue. This is a substance that quickly “sets” when exposed to sunlight. This glue can be purchased at specialized auto stores. But it has a serious drawback: to work with it, a powerful ultraviolet lamp is required, without which reliable bonding cannot be achieved. Some car enthusiasts claim that you can do without it, just sticking the mirror on a sunny summer day is enough. But such gluing cannot be called reliable.
The conclusion is simple: the best and least troublesome option for gluing a mirror is two-component glue. For example, Loctite 37438, which has become incredibly popular recently. By the way, it is sometimes used to glue DVRs that have a loose fastening device.
How to attach a mirror element
To keep the mirror securely on the windshield, you must follow the following algorithm:
- Select the location for installing the mirror. It should be glued in the center of the glass, at the same distance from both the passenger and the driver.
- The windshield is cleaned of dirt. First, this is done with a rag, then the surface of the glass is wiped with alcohol.
- The mirror is disassembled as indicated above (after all, in fact, only the bracket on which the mirror will be installed needs to be glued to the glass).
- A thin layer of glue is applied to the bracket and to the windshield. After this, you must wait at least 15 seconds.
Glue is applied to the interior mirror bracket - Then the bracket is installed on the windshield and lightly pressed down manually (and if you decide to install the mirror entirely, without disassembling, then after installation it must be additionally secured with tape, which will support the mirror until the glue sets).
The interior mirror is glued to the windshield - The glue must dry properly, so you cannot drive the car for 24 hours.
Video: gluing a mirror to the glass inside the cabin
Mounting the Device on a Bolt-On Bracket
Not all modern cars have interior mirrors glued to the windshield. In some cases, the mirror bracket is attached the old fashioned way: with bolts to the ceiling. In this case, you need to act like this:
- The mirror together with the mounting bracket is installed in the ceiling niche and held by hand.
The interior mirror is installed in a niche and held by hand - Self-tapping screws are inserted into the holes and tightened using a Phillips screwdriver.
- Sockets with installed self-tapping screws are closed with plastic plugs (provided that such are provided in the design of the bracket).
This is interesting: List of operations necessary to maintain the car in proper technical condition