Print this article Font size 16
Contents:
- Signs of wear
- Features of TC
- Rear TC
- Front TC
Front and rear brake pads are an important component of the VAZ 2109 braking system. Before replacing them, you should make sure that there is a malfunction.
Rear TC
Signs of wear
There are several main signs that indicate the need to replace the pads at the front and rear in the very near future.
| Sign | Peculiarities |
| Long service life | With a significant mileage, the probability of brake pad wear gradually reaches 100%. Therefore, it is purely a matter of time. But there’s no need to delay |
| Doesn't hold the handbrake | If the handbrake does not work properly, although everything is in order with the manual braking mechanism itself, the pads are simply worn out |
| Extraneous sounds from brakes | If the discs or drums begin to knock, squeak, or grind, this means there is a problem in the braking system. One of the most likely options is pad wear. |
| Low brake fluid level | When the pads wear out, the brake fluid in the reservoir is used up faster because consumption increases due to ineffective operation of the brake system |
| Small thickness of the friction layer | If the thickness of the friction layer on the pads has reached less than 1.5 millimeters, this indicates serious wear of the elements and the need to replace them |
These are the main signs of pad wear that any car owner can detect without disassembling the structure.
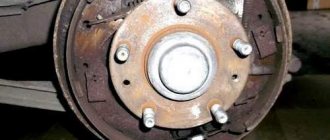
Replacing the rear pads of a VAZ 2109
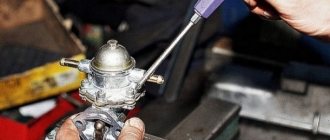
The instructions will tell you how to replace the rear pads on your car without the help of specialists. Of course, these car parts do not last forever, everything becomes unusable during use, and especially extreme use. The procedure for replacing pads is quite difficult, but it is possible to cope with it if you spend a little time and understand it thoroughly. What tools are needed? - Hammer. — Wooden set. - Flat screwdriver. - Pliers. — The wire is made of steel, we recommend bending it a little to create an imitation of a hook. — A standard set of keys, there should be a special key that can be used to unscrew the nuts of the parking brake cable equalizer. In the photo, see what the tool looks like.
About the procedure for replacing the rear brake pads of a VAZ 2109.
Next, we need to replace the pads, then you can drive the car onto an overpass. Install wheel chocks under the remaining wheels and put the car in first gear. The car itself, carefully place its front part on a jack, free the wheel from the mounting bolts and unscrew it. After you have gotten rid of the wheel, we recommend that you inspect the entire brake mechanism and clean it of dirt with a special brush that can be used for cleaning metal. Next, unscrew all the brake drum bolts.
And so, we unscrewed the bolt, then we need to dismantle the drum. It can be a little difficult here, because if the drum was installed a long time ago, it could have become quite stuck during the period of operation. If such a disaster happens, then naturally there is only one way out - you need to knock down the drum. A hammer and a wooden adapter will help with this issue. ATTENTION! You should only use a wooden attachment; a metal one can damage the drum. After you have dismantled the drum, we need to carefully disconnect the spring guides; they stretch to the brake pads.
Carefully remove the drive lever from the pads, we will immediately replace the springs. Now we can install, we begin to install the pads, connect the springs. When you install new springs, make sure that the pads themselves are installed in the groove of the cylinder. We also need to make sure that the handbrake bar is installed in the connector, which is shown by the arrow in the photo below; the connector is located on the block.
We need to carefully hook the handbrake cable to the drive lever, which is located on the well. Using a screwdriver, we will pry up the edge of the disc and try to remove the brake pads. You can consider the installation complete. Next, we return the drum to its place and install the wheels. Repeat the procedure on the other side of the pads. We have installed the pads, then we need to install the brake drum and install the wheel. We need to repeat the same with the second side. We replaced the pads, press the brake several times, this is necessary in order to tighten it. Adjust the handbrake cable. It is recommended to change the pads on both sides at the same time. Because if you do work on only one side, the car may skid later.
- Premium electricity. Test drive Audi e-tron
See all photo news >>
Features of TC
Brake pads (TC) installed on the VAZ 2109 have their own features and characteristics, which you should know about before purchasing new parts.
- The base of the block is made of fairly durable metal.
- A friction lining is glued on top of the base using special glue under the influence of a temperature of 100 degrees Celsius.
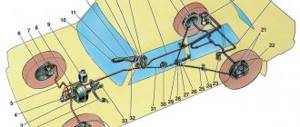
- The rear brakes include 4 pads. The body and base are stamped from sheet metal and then welded.
- The roughness on the surface of the pads, necessary to speed up the grinding in of the brake pads, is achieved through special processing.
- Efficiency during control braking from 80 km/h - 320 Nm. The pressure inside the brake system is 40 bar. The pads are cold.
- All elements of the brake system are made in accordance with strict international standards and requirements.
- The service life of a vehicle directly depends on driving style, road conditions and a number of external factors.
The operating manual states that the service life of the TC on the VAZ 2109 is within 70-90 thousand kilometers. But in practice this period is somewhat shorter.
Rear TC kit
Golden rules
There are four golden rules that must be strictly adhered to when replacing front and rear TCs.
- When cleaning brakes, never use mineral solvents such as diesel fuel, gasoline, etc.
- When replacing pads at the rear or front, both should be changed at once.
- You cannot swap front and rear TCs, as well as left and right, and vice versa. Otherwise, braking will be uneven.
- If there is a maximum level of brake fluid in the reservoir (MAX mark), part of the brake fluid must be pumped out.
Taking into account all these rules, you can begin to replace the TC.
Rear TC
The algorithm for replacing rear TCs on a VAZ 2109 is as follows.
- Place the car on a flat surface and loosen the tension on the wheel bolts.
- Unlock the pads by fully lowering the parking brake handle.
- Raise the rear of the car with a jack and remove the wheels.
- Place wheel chocks under the front wheels to prevent the vehicle from moving.
- Unscrew the brake drum studs from the rear wheel.
- Using a wooden block and a hammer, knock the drum off the TK.
- Clean the surfaces using the dry method and compressed air.
- We begin full dismantling work.
- Remove the upper garter spring. For this you will need pliers.
- The lower spring is removed in the same way.
- Remove the front TC guide spring.
- Remove the expansion bar.
- Next, the guide spring of the rear TC is dismantled and moved to the side.
- Remove the end of the parking brake cable from the lever.
- Remove the hand brake drive. To do this, you will need to remove the cotter pin from the finger, and then remove the finger itself.
- The dismantling work has been completed, so now everything should be reassembled in the reverse order, only with a new rear TC.
- Before installing the drum, be sure to compress the cylinder pistons so that the outer diameter of the shoes is smaller than the inner diameter of the drum.
- Assemble the unit, steps in reverse order.
- Lower the car to the ground, press the brake pedal several times, which will allow the pads to fully take their place.
Perform the procedure on both wheels. The principle of replacing rear TCs is the same. Just don’t forget to bleed the brake system after completing the work.
Replacing rear brake pads on VAZ 2108, 2109, 21099 and VAZ 2113, 2114, 2115
≡ 4 November 2020 Category: Repair
Replacing rear brake pads begins with removing the wheel. Please note that when replacing rear brake pads, the handbrake must be released, the car must be in first gear, and thrust blocks must be installed under the front wheels.
First (before jacking up the car), loosen all four wheel bolts. Next, we hang the rear of the car on a jack.
and unscrew the four cone bolts securing the wheel, and then remove it.
Removing the brake drum is carried out as follows. We unscrew the two guide pins with a socket or a 12-mm open-end wrench.
These pins are screwed into the hub and attract the brake drum to it. After unscrewing them, remove the drum. If it cannot be removed, then you need to screw the pins into the holes corresponding to their diameter (M8). Only now the thread should be on the brake drum.
We screw in both guide pins until they stop or until the drum begins to move. Now, one by one, we screw them in further, thereby pressing the drum off the brake pads.
Now you need to release the parking brake cables. To quickly loosen, you need to use an extended 13mm socket, two extensions and a ratchet wrench. This will allow you to relax the parking brake cables within a minute, without resorting to removing the muffler and other labor-intensive procedures. Using two 13mm open-end wrenches, loosen the locking nut and twist it:
Now we install the prepared extension cord, as shown in the figure, and twist the nut almost to the end.
Now we proceed directly to removing the brake pads. We take out the plinth from the pin holding the parking brake lever and push this pin deep into:
Using pliers, remove the lower tension spring.
Using pliers, release the spring at the front brake pad, which keeps the pad from moving horizontally.
We release the pads from the upper tension spring using pliers or a screwdriver.
Remove the front pad.
Remove the spacer plate.
Remove the drive lever by removing it from the cable end.
Using pliers, release the spring at the rear brake pad, which keeps the pad from moving horizontally.
And remove the brake pad.
We install everything in the following order. First, we connect the new pads together using the upper compression spring, and then insert the spacer plate into the groove.
Now, slightly expanding the upper compression spring, insert the spacer plate into the opposite groove. It is necessary to insert the securing pin of the parking brake drive lever into the connected pads.
We install the assembled pads, passing the compression spring and plate between the hub and the brake cylinder. Please note that there is a concavity on the plate; when installing, it should be directed towards the hub.
Having inserted the pads into the grooves of the brake cylinders, we also install them in the lower grooves:
Install the lower compression spring.
We use pliers to install springs that prevent the brake pads from moving horizontally.
We press the finger inside, holding it so that it does not fall out. We insert the drive lever into the eye of the cable, insert it into the slot in the plate and bring it to the pin.
From the reverse side we squeeze the finger out, it should go through the hole in the lever. We put the washer on top and install the pin.
We remove the dowel pins from the brake drum and place the drum on the brake pads.
Holding the hub with your hand, rotate the drum so that the unthreaded holes on the drum coincide with the threaded holes on the hub. Screw in the mounting pins.
Install the wheel. Please note that the mounting screws must be tightened crosswise. After some time, check the tightness of the screws and, if necessary, tighten them.
We tighten the lever cables in the same way as we used to loosen them. The parking brake is considered tight if the number of clicks when lifting its lever is 2-4.
Please rate the article
( 31 votes, average rating: 4.55 out of 5)
There were 3 comments left on the post “Replacing rear brake pads on VAZ 2108, 2109, 21099 and VAZ 2113, 2114, 2115.”
- Andrey:
07/07/2013 at 19:35
If only the pads need to be replaced, I would do the following: jack up the car, unscrew the central nut and pull the wheel, drum, hub and bearing assembly off the axle. All that's left in front of you is the axle and pads, change them for good measure. and unscrewing the wheel, removing the drum (if it’s still stuck), and then the hub gets in the way - an extra headache, plus time. and with smoke breaks and chatting with a neighbor - about 40 minutes, no more (good luck to everyone on the roads!).
Answer
- Konstantin:
07/01/2015 at 19:36
Dear Andrey! How would you pull off the wheel if the drum is stuck))) Even after unscrewing the hub nut, you would not be able to remove the wheel together with the hub because... the drum must be knocked down! :)))))) Everyone would do that, look!)
Answer
Victor:
08/18/2018 at 19:39
Dear Konstantin! Maybe everyone does this?))) The drum is stuck to the hub, so remove it with the hub and bearings, as Andrey advises!
Answer
Leave your comment
Click to cancel reply.