Frequency of replacing the oil filter in Lada Kalina
The total frequency of replacing the Kalina oil filter (16 valves) is 15 thousand km. However, experts emphasize that this indicator is also influenced by individual operating conditions.
The duration and frequency of trips, the quality and surface of roads, the environment and temperature fluctuations - all this affects the wear of consumables and components. Taking into account these factors, replacing the oil filter on Kalina may be necessary after 10 thousand km.
Many car owners pay attention to signs of the need to change the oil and filter. These include:
- change in the color of the lubricant, the appearance of sediment or a burnt odor;
- interruptions in engine operation, extraneous noise and vibration;
- activation of an alarm about a lack of lubricant, oil starvation.
Experts, however, do not recommend waiting for such signs to appear. The best option is an annual preventative replacement of the oil filter along with the lubricant.
If necessary, the performance and wear of the filter element can be assessed by the quality of the oil. The main purpose of the filter is to clean the circulating lubricant from impurities. If there is sediment in the system, this indicates the urgency of replacing the oil and filter element.
How often does the filter need to be changed?
This period is considered fixed and depends on the distance the car travels. The optimal range is 15,000 kilometers. Although there are experts who claim that other characteristics of the vehicle’s operation also affect the replacement. Thus, a more urgent need for an oil change may arise if long trips were made on poor-quality road surfaces. It can be affected by changes in vehicle consumables, sudden changes in temperature conditions and an aggressive environment. If such circumstances exist, the period during which the Kalina oil filter is changed can be equal to 10,000 kilometers.
How to properly replace the oil filter?
Preparing to replace the oil filter includes three main points:
- purchase of consumables and components;
- choosing a level place to work;
- warming up the engine.
At the preliminary stage, it is recommended to inspect the entire system for wear and tear and buy replacement parts along with the filter. You should only contact official suppliers. Components must comply with the manufacturer's recommendations and article numbers.
To replace the oil filter, the car owner will need a repair pit, overpass or lift. In the absence of the possibility of using them, the car is evenly raised using a jack and supports.
Warming up the engine is necessary for better circulation and drainage of oil from the system. However, as a result of this, experts pay attention to safety precautions when replacing the oil filter. To avoid thermal and chemical burns, all work should be carried out in special clothing and rubber gloves.
In the context of recommendations for preparation and work, the Lada Kalina car owner will need the following equipment :
- overalls, gloves, clean lint-free rags or rags;
- a set of screwdrivers and keys, a gate with attachments, a probe;
- container for collecting used lubricating fluid;
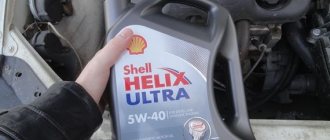
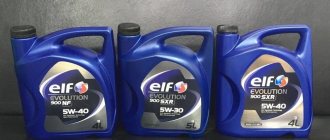
- new oil to fill, funnel;
- a new filter element, gaskets, seals and other components to replace worn connections.
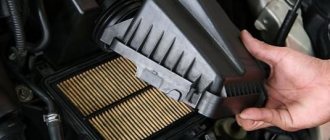
On Lada Kalina, the oil filter is replaced according to the standard procedure. Along with it, for preventive purposes, not only the oil is changed, but also faulty or worn parts that may soon fail.
Stage one
The procedure for replacing the oil filter is carried out in several simple steps. However, in the context of simultaneous oil refilling, a general procedure is distinguished in the work, conditionally divided into two stages.
The first one involves the following steps:
- in the lower part of the car, remove the engine protection, if any;
- Place a container under the drain and unscrew the plug;
- as soon as the oil is completely drained, the container is moved under the location of the oil filter;
- for ease of access, disconnect the wiring harness block from the sensor connector and move them to the side;
- unscrew the casing by hand; if necessary, use a special tool;
- When removing the used filter element from the casing, keep an eye on the perforated tube; it should remain for the next consumable.
At this stage, all components and accessible components are checked. Particular attention is paid to gaskets, sealants and other parts responsible for the tightness of connections. If necessary, they are replaced.
Stage two
The second stage is cleaning and installation of components in their original places. The procedure is as follows :
- the internal cavity of the filter element casing is cleaned of waste lubricant residues;
- oil is poured into the mounted filter, soaking it with new lubricant, and the cartridge is inserted into place;
- during installation, pay attention to the rubber seals; they must be lubricated with oil and not come out of their grooves;
- tighten the oil filter and drain plug, check the tightness of the connections;
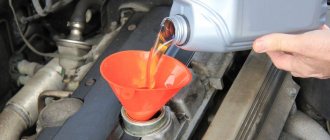
- the system is returned to its original state, new oil is poured into the filler neck;
- The engine is warmed up to operating temperature for 10-15 minutes.
After warming up, measure the lubricant level. When heated, it should not be higher than the permissible maximum on the dipstick; at normal temperatures, the level should not fall below the specified minimum.
During the warm-up process, the emergency light may light up for some time, indicating a lack of oil in the system. This usually happens until the lubricant fills all the mechanisms involved. If the light does not go out, check the lubricant level; topping up may be required.
Preparing to change the filter
In order to quickly replace the filter, it is important to have all the necessary components available, as well as select a place that should be as level as possible and preheat the engine. It is important to buy components from an official source so that they are of appropriate quality. To replace the filter, you need a pit or a lift; when such devices are not available, a jack may also be suitable. Warm up the engine in order to drain residues from the system. Here it is worth especially noting safety precautions, which, if neglected, may cause health problems. It is not at all difficult to get a thermal or chemical burn, so it is important to approach this matter using special protective equipment. These include gloves and special clothing.
Installation of components
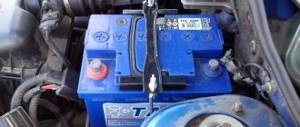
- the vehicle must be de-energized. This is not particularly difficult to do, since it is enough to disconnect the negative terminal from the battery.
- the cap is disconnected from the neck into which the oil should be poured
- to get to the filter, you need to be directly under the car, especially if we are talking about 16 cylinders. If it is necessary to carry out this work on an engine consisting of eight valves, you should not climb under the device, since the replacement is carried out from above, which is certainly more convenient and practical.
- it is necessary to check whether there are any oil residues left; for this, you should always have a container for draining at hand
- Next comes cleaning the cork from all stains and other possible contaminants.
- it can be removed using key No. 17, sometimes a socket is also used
- in some cases, the hole that is responsible for draining also has internal boundaries, then another type of key is used, a 12 hex
- Since the oil is usually hot, all manipulations should be carried out as carefully as possible. And then you need to remove the plug directly, this must be done slowly as the remaining oil decreases. Sometimes it is not completely unscrewed for some time, waiting until the residues are completely removed.
- You can continue replacing when the waste being removed begins to drip. Typically, used oil can drain completely within ten minutes.
- removes plaque and dirt from threads, as well as from plugs
- The crankcase is also wiped dry
- a container is installed under the oil filter
- This filter is unscrewed counterclockwise. Here you can try to do it manually; if it doesn’t work, then use special, previously prepared tools. For example, it is possible to loosen the fastening using a puller.
- Next, using a screwdriver, you need to pierce the filter; sometimes an awl is more suitable for this procedure. Then the oil filter is removed.
- To avoid possible damage to the sensor functions, it is necessary to carefully separate the wires
- after which the element being replaced is unscrewed, that is, the filter; you can remove it by hand, but you should not forget about their protection
- the area where the filter was located must be cleaned for oil stains and other possible contaminants
- then the new element is filled 50% with a special liquid, which acts as a lubricant. It also processes a special rubber ring, which is located on the oil filter itself.
- after which the filter returns to its place, and is screwed on by hand as firmly as possible. Do not tighten it with special force, as this may affect the time required for the next oil filter replacement.
- using the hole, 3.2 liters of lubricant are added to the neck
- Then the lid is screwed on. It is worth noting that this vehicle requires 4.4 liters of oil.
Good non-original filters
The low quality of original oil filters has led to the need for drivers to look for alternative options. Third-party manufacturers produce a lot of analogues, among which there are many worthy copies. The best of them are presented in the table below.
Table - Good analogues of the original Lada Kalina oil filter
| Manufacturer | vendor code | Price, ruble |
| Champion | COF100030S | 145-150 |
| Knecht | OC606 | 35-455 |
| Zommer | 21051012005 | 145-175 |
| Stellox | 2050503SX | 175-210 |
| SAT | ST21051012005 | 170-255 |
| Starline | SFOF0255 | 145-195 |
| Patron | PF4047 | 210-250 |
The final stage of replacement
After the car is back in working order, you need to start the engine. It is worth making sure that the signal that informed you about the replacement has disappeared. It is also necessary to inspect the vehicle to determine if there are any problems that may be associated with oil leakage. If even minor leaks are observed, then this aspect should not be ignored. It is necessary to secure the structure more tightly so that this kind of problem disappears completely. Taking into account all the recommendations, replacing the oil filter yourself will not take much time and can save you a lot on trips to a car service center.
We recommend reading:
- Improving the hood of the Lada Kalina car
- We screw the fog lights on the Lada Kalina
- Selection of covers for Kalina
- Optimal tire pressure for Lada Kalina
- Spare parts and accessories for Kalina
- Guide to replacing Kalina brake pads
Where should you start replacing?
You should start by opening the part of the engine that is located below. Next, take a container under the used oil and apply it directly to the open part of the engine. It is important to wait until the oil is completely drained. Next, you need to disconnect the harness block from the sensor, or rather from its connector. After that, using a special tool, the casing is disconnected, from which an element is taken out that has already served its purpose. It is important to inspect the perforated tube as it will continue to function until the next routine replacement of this consumable. At this stage, it is important to inspect and carefully check all connecting units and components, so if necessary, you need to replace gaskets and other elements if they are worn out.