Features of the rear pillars
The rear pillars, like the front pillars, absorb mechanical energy that is transferred to the body from rough roads. These elements experience heavy loads when cornering. If the shock absorber struts do not function correctly, both the comfort of the vehicle and its safety will be significantly impaired.
The wear and tear of the entire chassis of the car depends on their condition. Rear struts, or rather shock absorbers, help prevent the entire body from bouncing when hitting a bump. If the car bounces, its wheels will lose contact with the road. As a result of this, braking and acceleration will not be able to occur, the impact of lateral forces is reduced (it will not be possible to turn). This has a significant impact on traffic safety.
Tasks of the rear pillars
The rear pillars, like the front pillars, are an important component of the car, designed to absorb body energy. This energy is transferred while driving along the road. If the coating is uneven, the racks experience double load.
Beam structure diagram
As a result, racks affect comfort and safety. There are several main tasks of these elements.
- They are responsible for wear on the chassis and help shock absorbers when the body “bounces.” After all, if the car jumps, at that moment the wheels do not contact the surface, the brakes do not work, and lateral forces act on the body. It is not safe.
- Increases driving comfort. The lack of effective cushioning negatively affects comfort. Especially when it comes to uneven road sections.
- Properly installed shock absorbers minimize braking distances and prevent the body from oscillating when bouncing.
If the struts are poorly installed, the braking distance will increase noticeably, the body will sway to the sides when bouncing, which will lead to wear on the chassis, tires and other elements of the car.
Comfort and driving
With the help of the rear struts of the VAZ-2110, driving comfort is improved. Driving becomes much more convenient. If the shock absorbers fail, then when hitting bumps the car will change direction spontaneously.
Disadvantages of using racks with defects:
- When braking or accelerating, even a small stone can cause the wheel to bounce and remain off the road surface for some time.
- If shock absorbers work poorly, this affects the braking distance - it increases, and significantly. The body shakes much more than usual. It constantly swings, which leads to rapid wear of the chassis elements and tires of the car.
Replacing the rear struts of the VAZ-2110 will solve all these problems. You can do the work yourself if you have all the necessary tools and equipment at hand. But one should not think that this is a very simple job. You need to treat it very carefully, because the slightest mistake can literally cost the lives of the driver and passengers.
Replacement frequency
The rear suspension consists of a small number of elements, the central place in it is occupied by struts. Their resource is approximately 3-4 times higher than that of the front ones. The slightest knocks coming from the rear wheels should alert the driver. This is a signal that indicates that it is necessary to inspect and repair one or more components of the vehicle's rear suspension.
Shock absorber struts can last 100,000 km, more or less. It all depends directly on the quality of the installed products, as well as on the driving style of the owner of the car. If you force the car to experience excessive loads, then the life of all suspension elements will be very short.
Symptoms of breakdowns
Before replacing the rear pillar on a VAZ-2110, you need to make sure that it is where all the faults lie. A knock in the suspension may occur for the following reasons:
- Damage to the shock absorbers manifests itself when driving on uneven roads. In this case, knocking noises may occur. These elements cannot be repaired; new ones will need to be installed.
- If, during a visual inspection, you find that the rubber bushings on the suspension arms are heavily worn, then they need to be replaced. It is quite possible that the VAZ-2110 struts are in good condition.
- If the spring sag or is damaged, it must be replaced. This element is made of high-strength metal, but with prolonged use and overload, it can change its length, deform or even break. As a result, the operation of the entire suspension will be incorrect.
- The appearance of knocking noises may be caused by the fact that the shock absorber is poorly secured in the upper glass or on the lower bracket. Be sure to inspect the silent block, which is installed on the lower eye. If it is damaged or severely worn, it must be replaced. All threaded connections must be tightened well.
- The appearance of a knock may be caused by an overload of the entire rear suspension. Breakdown is possible when the bump stops, which are installed on the shock absorber rods, are destroyed.
When diagnosing, it is necessary to determine which specific element has become unusable. Approximately the same symptoms can occur both when shock absorber struts malfunction and when suspension elements fail.
Knocks
It is necessary to replace the rear shock absorbers of a VAZ 2110 immediately after you hear characteristic knocking sounds from the rear.
You should approach this issue wisely, study the replacement procedure in a video, consult with specialists, and be sure to review the operating manual for your car.
Knocks occur for various reasons from the rear, so this should be looked into in more detail.
- If knocking noises are observed when driving on uneven ground, the shock absorbers have apparently failed. The only solution is to replace with new ones.
- If you see that the rubber bushings of the levers are worn out, change the suspension.
- When the spring settles, it must be replaced.
- A knocking sound is likely a sign of a loose shock absorber or worn rubber eye bushings.
- When the rear suspension is overloaded or damaged, knocking noise also occurs.
- If the bushings of the suspension arms are destroyed, the rear axle moves and a knock appears.
- When knocking is observed from the suspension arms, it is recommended to replace them with new ones.
- Knocks can also be determined by how busy the rear part is. Empty the trunk and do not seat anyone in the second row. This makes it easier to figure out what the reason is - shock absorbers or springs.
Article on the topic: DPKV on the VAZ 2114: from purpose to quick replacement - about everything
The main components of the rear suspension are dozens
On dozens, the rear suspension is dependent and has telescopic shock absorbers in its design, operating in two directions. The springs of the rear struts of the VAZ-2110 are installed between the shock absorber body and the car body. With their help, vibrations that occur when moving on uneven surfaces are dampened. The rear beam is the supporting element of the entire suspension; it consists of the following parts:
- Connector.
- Longitudinal suspension arms.
- Metal brackets with lugs.
- Rubber-metal bushings (silent blocks).
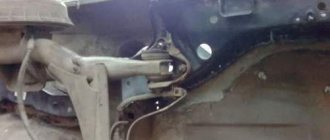
Shock absorber struts are installed on the rear beam on both sides. They ensure the mobility of this element when driving on uneven roads.
Rear suspension
Rear suspension parts
| 1 – rubber-metal hinge; | 9 – shock absorber; 10 – insulating gasket; 11 – rear suspension spring; 12 – lever connector; 13 – lever of the rear suspension beam; 14 – shock absorber mounting bracket; 15 – flange; 16 – lever bushing |
Shock absorber mounting
| 1 – protective casing; |
Rear suspension shock absorber parts
| 1 – compression valve body; | 16 – bypass valve spring; 17 – restrictive plate; 18 – spacer sleeve; 19 – reservoir; 20 – rod; 21 – compression buffer support; 22 – nut; 23 – oil seal cage; 24 – rod protective ring; 25 – oil seal; 26 – sealing ring of the tank; 27 – rod guide bushing; 28 – cylinder; 29 – rubber-metal hinge |
The rear suspension beam consists of two trailing arms 13
(see figure Rear suspension parts) and a connector
12
, which are welded together through reinforcements.
14
are welded to the suspension arms , as well as flanges
15
to which the rear wheel axles are bolted together with the wheel brake shields.
16
are welded to the suspension arms , into which rubber-metal hinges
1
.
Bolts pass through the hinges, connecting the suspension arms with stamped-welded brackets 2
, which are attached to the body side members with welded bolts.
Springs 11
The suspensions rest with one end on the shock absorber cup
9
, and with the other end, through an insulating rubber gasket
10
, in a support welded to the inner arch of the body.
The rear suspension shock absorber is hydraulic telescopic, double-acting. It is attached with a bolt 9
(Figure Shock Absorber Fastening) to the suspension trailing arm bracket.
The rod is attached to the upper support 5
of the suspension spring through rubber pads
6
and a support washer
3
.
Shock absorber parts are shown in the figure Rear suspension shock absorber parts).
At the hub 13
(see figure Shock Absorber Mounting) a double-row angular contact bearing
12
, similar to the front wheel hub bearing, but smaller.
Unlike the front wheel hub, on which the inner bearing ring is installed with guaranteed interference, on the rear wheel hub, bearing 12
on axle
14
has a transitional fit.
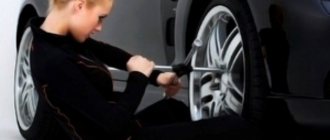
Tools for repairs
If after diagnostics you find that it is necessary to repair elements of the rear pillar, or install a new one, you need to prepare for work. To do this you will need the following tools and materials:
- Jack (preferably hydraulic type).
- A set of keys. You will need: for “17”, “6”, “19”.
- Special key for removing racks. You can use tubular keys for “17” and “6”.
- Special puller for tightening springs. Without it, installing the rear shock absorber will be quite difficult.
- Electrical tape or thin wire.
Only with all these tools at hand can you begin to repair or replace VAZ-2110 struts. You definitely need to purchase new nuts, preferably with a plastic thread locker. All rubber elements that are part of the shock absorber strut must be replaced. In particular, this applies to anthers, which protect the rod from foreign objects.
Which stands are best to buy?
On sale you can find several manufacturers who offer various models of racks for domestic cars. Those that are installed on the top ten from the factory are of rather poor quality. Of course, comfort will improve with replacement, but it will not be at a high level. The price of the VAZ-2110 rear pillar (stock) is about 1200 rubles. Higher quality shock absorbers will be more expensive.
On the market you can find racks manufactured by SS20. There are only three modifications for dozens:
- Racing - sports elements that have a slightly shorter stem and body length. When installing these struts, the car becomes a little lower, when cornering, roll is reduced and stability improves. Manageability at a high level.
- Master - these are elements that facilitate the operation of the car and reduce noise emanating from the road surface.
- Queen is a type of rack in which the entire load is evenly distributed and extraneous noise is well damped. The reliability of the suspension elements is much better than that of the factory ones or even the previous two.
It’s up to you to decide which VAZ-2110 rear struts are best to install on your car. Note the SS20 production elements. They work much more efficiently than stock ones, are resistant to high loads, although they are quite expensive.
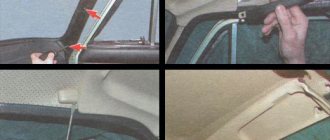
Removing the racks
Before removing the rear pillars, you need to completely empty the trunk. Follow these steps:
- In the luggage compartment, on the rear arch, there is a small hole with a rubber plug. It contains the rod fastening nut.
- Remove the rear straps and brackets that secure the seat. This will greatly facilitate access to the rack mounting location.
- Using a special wrench for racks, you need to unscrew the fastening nut.
- Use a jack to raise the rear of the car. The jack can only be installed under the body, but not under the rear beam. You need to completely unload the car's suspension so that the spring is free.
- Unscrew the nut that secures the lower eye of the rack to the beam.
Only then can the stand be completely removed. This completes the dismantling.
How to replace rear struts step by step
As mentioned earlier, replacing rear struts is not a very complicated process when it comes to repairing a VAZ-2112; the main thing is to carry out all operations step by step, taking into account the recommendations of professionals:
- Before installing the machine on an overpass or pit for repair and inspection, you should slightly unscrew the locking element that secures the rear rack. To remove it, you can be inside the car or reach the mount from the trunk. When unscrewing is carried out, the rod related to the stand must be stationary. You can fix it in this state using a 6 key or a special installation device.
- Using a special mechanism (jack), the car is raised to the desired level and the wheel is removed.
- Using a 19mm wrench, unscrew the fasteners securing the rear shock absorbers. In this case, you should unscrew the nut and hold the bolt firmly so that it cannot turn. The unscrewed fasteners are removed from the inside. To easily remove the fasteners, it is advisable to use a hammer or a punch. The bolt must be removed very carefully, as the threads can easily be damaged.
- Once the fasteners are removed, it is necessary to pry off the lower part of the rear pillars to eliminate the snagging of the parts.
- Next, unscrew the upper fasteners of the rear pillars using a special tool or two keys (open-end and 6).
- After this, you can easily get the completely assembled rear suspension of the VAZ-2112, replacing all elements will be quick and easy.
Since the rear suspension module no longer fixes anything, the spring can be removed quite easily. To remove the rear strut boot, you just need to pull this element up, and remove the special bumper or buffer from the rod with one movement of your hand. All removable parts of the VAZ-2112 are carefully checked; if damage is found, they are replaced with a new element.
How to install a new rack
Now you need to install a rear pillar on the VAZ-2110. Be sure to install a new shock absorber, spring, bump stop, cushions, and support washer. Secure the cushions to the spring with electrical tape or wire. All products made of rubber must be replaced. Next you need to do the following:
- Place the stand assembly in its place and insert the rod into the hole in the glass.
- Tighten the shock absorber using the rear beam. To do this, you can use a long crowbar or a jack.
- Install the lower shock absorber spring into the bracket on the beam.
- Insert the bolt and tighten the nut.
- At the top, attach the shock absorber rod mounting nut.
The price of the rear pillar of the VAZ-2110 is about 1000-1200 rubles (stock version). The kit will cost about 2500 rubles. (without pillows, anthers, springs). The work is carried out equally on the left and right sides of the car. Upon completion of the repair, it is necessary to install the wheel, lower the car and check the condition of all threaded connections. It is advisable to tighten the nuts after installing the car on the wheels. It is necessary that the car suspension is under load.
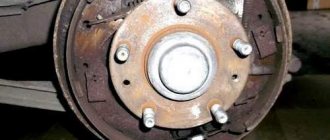
Rear wheel brake mechanism. Part 2
Home / Repair and operation manual for VAZ 2110/2112/2111 / Rear wheel brake mechanism. Part 2
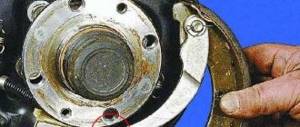
Rice. 6-27. Rear wheel brake parts:
1 - shield
brake mechanism; 2 — wheel cylinder; 3 — upper tension spring of the pads; 4 — brake pad; 5 — pad lining; 6 — brake drum, 7 — locating pin; 8 — guide spring; 9 — lower tension spring
When replacing the brake shield, unscrew the bolts securing it to the rear wheel axle flange and remove the shield.
Installation
carry out the brake mechanism parts in the reverse order of removal, taking into account the following:
— after installing the pads on the brake shield, make sure that the ends of the pads are correctly positioned in the grooves of the wheel cylinder piston stops and on the support plate;
— before installing the drum, lubricate the hub seating belt with graphite grease or LSC-15 grease.
After assembling the brake mechanisms and removing air from the hydraulic drive, press the brake pedal 2-3 times with a force of 39.2 N (40 kgf) to set the pistons to the working position. Then check the ease of rotation of the wheel (the drum may slightly touch the pads). Adjust the parking brake system.
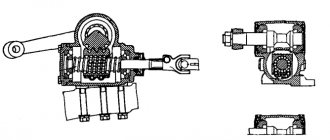
Disassembly and assembly of wheel cylinders
Disassembly.
Remove protective caps 10 (Fig. 6-28), then press pistons 1, complete with parts for automatically adjusting the gap between the brake pads and the drum, out of the cylinder body.
Install the piston assembly with the automatic device onto fixture 67.7820.9525 so that the protrusions of the fixture cover the head
screw the thrust screw 3. Using a special screwdriver, turning the piston 9, remove the thrust screw 3 from the piston. Remove the sealing ring 8 with the support cup 7, spring 6 and cotters 5 from the screw. Separate the thrust ring 4 and the thrust screw 3.
Assembly
carry out the automatic device and the cylinder itself in reverse order, taking into account the following:
— before installing parts, lubricate them generously with brake fluid;
— tighten the piston thrust screws to a torque of 3.9-6.9 Nm (0.4-0.7 kgf-m);
— slot A (see Fig. 6-8) on the thrust rings should be directed vertically upward: deviation from the vertical is allowed no more than 30°. This arrangement of the slot ensures complete removal of air from the wheel brake drive when bleeding the brake;
— press the pistons into the cylinder body using tool 67.7823.9532;
— the force of pressing the piston into the cylinder must be at least 345 N (35 kgf); with less force, replace the thrust ring;
— when pressing the piston into the cylinder, it is necessary to maintain the size of 4.5-4.8 mm and 67 mm (maximum) (see Fig. 6-8) for a free fit of the brake drum;
— after assembly, check the movement of each piston in the cylinder body. They should move easily within 1.25-1.65 mm. Reinstall protective caps 2 last.
Checking parts
Wheel cylinders.
Check the cleanliness of the working surfaces of the cylinder, pistons and thrust rings. The surfaces must be completely smooth to prevent fluid leakage and premature wear of seals and pistons. Eliminate defects on the cylinder surface by lapping or grinding. However, an increase in the internal diameter of the cylinder is not allowed.
Check the condition of the thrust screw 3 (see Fig. 6-28), spring 6, support cup 7 and nuts 5. If necessary, replace damaged parts with new ones.
Replace the seals 8 with new ones. Check the condition of the protective caps 10 and replace them if necessary.
Pads.
Carefully check the pads for damage or deformation.
Check the elasticity of the coupling and guide springs of the pads, if necessary, replace them with new ones. The tension springs must not have residual deformations when the lower springs are stretched with a force of 137.2 N (14 kgf) and the upper springs with a force of 294 N (30 kgf).
Check the cleanliness of the linings; if dirt or traces of lubricant are found, thoroughly clean the linings with a wire brush and rinse with white spirit; in addition, check for any lubricant leakage inside the drum; Eliminate any detected faults.
Rice. 6-28. Wheel cylinder parts:
1 — piston assembly;
2 — cylinder body; 3 — thrust screw, 4 — thrust ring; 5 - crackers; 6 - spring; 7 — support cup; 8 - seal; 9 - piston; 10 - protective cap See also: Parking brake system →