Good afternoon, in this article I will share my personal experience of replacing the thermostat on a Lada Kalina car. The need to replace the thermostat arises in the event of underheating or overheating of the engine.
The first causes increased fuel consumption, decreased engine power, slow heating of the cabin and reduced exhaust gas catalyst life.
The second threatens to destroy the engine. In my case, there was underheating, the temperature rarely rose above 70 degrees, that is, the valve was open and coolant was constantly circulating through the radiator.
Spare parts for replacing the thermostat in Kalina
So, what you will need for work:
— a new thermostat itself, preferably previously tested for operation with boiling water, so as not to have to do all the work again if it becomes defective;
— 1 liter of coolant of the same brand that is poured into the system; see here
— an empty, clean container of at least 5 liters;
- silicone sealant; for example, like this
- a set of plumbing tools - screwdrivers, pliers, socket wrench - internal hexagon "5".
- desire, minimal plumbing skills and a couple of hours of free time.
It is highly advisable to wash the engine first. You don’t have to work in a garage, you don’t need a hole and you don’t have to crawl under the car. So, let's begin.
Thermostat on Priora 16 valves Which is better
The Prior thermostat is a small but very basic element of a car's cooling system.
Its task is to regulate the cooling process, directing antifreeze at the right time for this purpose. In one case, blood circulation occurs in a small circle, in the other - in a large circle. There is a fact that when a gasoline engine first starts, it does not heat up to operating temperatures, the thermostat valve is closed, which prevents antifreeze from moving through the radiator. Another problem is that when the internal combustion engine heats up, under these conditions the valve opens and facilitates the movement of antifreeze in a large circle through the radiator. Thus, the liquid very quickly gives up its strength to the heat of the radiator and subsequently moves through the system in a cooled state. However, what if there are problems with the controller? The answer is very clear - the internal combustion engine overheats, and therefore a number of serious problems arise. In fact, there are many circumstances that contribute to thermostat failure or malfunction. Here are the more common ones: - introduction of counterfeit antifreeze; — scale of the main parts of the system; - environmental pollution; — corrosion processes; — density violations that allow accounting (software).
The main element, which is very sensitive to wear, is a special sealed cylinder with a movable rod. Rust and scale accumulate on the thermocouple, after which it loses sensitivity and loses the ability to correctly determine the temperature state of the antifreeze. In addition, external deposits interfere with the movement of the thermostat and its rods, under the influence of which interruptions occur when closing or opening the small and large cooling circle in the car.
Extend the life of your unit and its components to avoid serious buildup by using only high-quality antifreeze and changing it periodically. When draining the cooler, look closely at the water. If the melted antifreeze is cloudy, has flakes or other signs of contamination, this indicates the need to flush the system. In addition, it is recommended to take care of the condition and density of the metering system connection nodes.
Defective symptoms: - difficult, prolonged warming up of the engine; — Quick warm-up of the internal combustion engine.
It is important to keep track of which thermostat is set to “Before” in order to monitor its current technical condition.
If you want to make sure that the thermostat is a necessary condition for the engine to overheat, do the following:
- Start the engine and wait until it warms up to operating values (85-90 degrees).
- Open the hood of the car and touch the radiator tube. If its surface is warm or burning, this indicates a dilemma in the operation of the radiators. A working thermostat begins to supply coolant over a wide range if the internal combustion engine heats up above 95 degrees. It is designed to very quickly warm up the engine to operating mode. When the valve starts to operate, the down pipe heats up.
- If you notice that the pipe heats up when the internal combustion engine heats up slightly, the cause is a faulty thermostat.
- Note that sometimes the movement of cooling water is prevented by a faulty water pump, which is also a good idea to check.
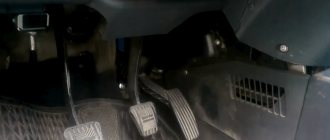
The following tools are useful for work: - Key to "13"; — Screwdriver with a flat end;
Warmth in the Priora for 250 rubles! How to replace the thermostat element without losing ANTIFREEZE?
— Capacious container for water; — Allen Kay.
- At the beginning of everything, we put the car on a lift, in a snowdrift, that is, above a garage pit.
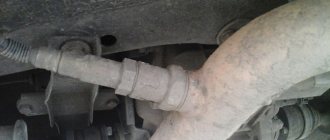
- We move below the car, remove the engine protection (if any). On the block we find a drain plug made in the form of a “13” bolt. We prepare and replace a deep closed container for drainage. Use a wrench to unscrew the drain nut. Wait until all the liquid has drained. We screw the bolt back in.
How to change a thermostat - step-by-step instructions
First you need to make a device for bleeding the cooling system, something like the one in the photo below. Instead of a hand pump, you can use a modern electric compressor.
A long hose - at least 1.5 meters is needed for convenience, so that you do not have to hold the pump in your hands while pumping. There is no need to extend the electric compressor hose. The inner diameter of the hose must ensure a tight fit on the upper fitting of the expansion tank. You can secure the hose with steel clamps of a suitable diameter, but this is not necessary, the pressure is low, and the hose holds even without them.
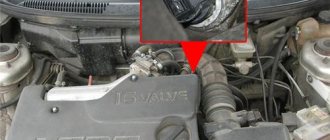
1 We begin disassembly by removing the air intake sleeve, popularly called the “trunk.” You need to loosen the clamp by unscrewing the screw a few turns, and twisting the sleeve, pull it off the filter inlet pipe.
Then you need to remove the filter housing. The filter is attached to 3 latches; to remove it, you need to tilt the rubber insert away from the groove and pull the bracket up. You need to start from the battery side, then tilt the filter housing towards you and lift it up.
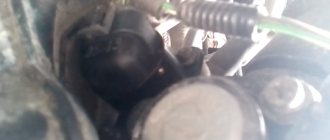
Next, you need to unplug the connectors of the 2 sensors, move them to the side and secure the cables with tape. To avoid flooding the connectors, they should be covered with a plastic bag. Now you can remove the coolant.
To do this, disconnect the upper hose from the expansion tank and connect the hose from the pump to it. Lower the lower hose into a container filled with coolant. Since the tank plug is a two-way relief valve, to prevent air from escaping, you need to remove it, cover the hole with a thin plastic bag, and wrap it back.
2 We start pumping or turn on the compressor. Liquid will be squeezed out of the system into the container. This will happen quickly: in a couple of minutes, about half of the 5-liter container will be filled. You need to finish when air comes out of the hose. Now remove all the hoses from the thermostat, having first loosened the clamps. Remove the thermostat by unscrewing the 2 fastening nuts with a 13mm wrench. After degreasing the seating surface with a rag moistened with gasoline or acetone, apply a thin layer of sealant - 1...1.5 mm. Before assembly, the sealant must have time to crystallize within 10-12 minutes. We install the new thermostat in place and tighten the 2 nuts until they stop. You can’t delay it too much; this needs to be done later. Now you need to move the temperature sensor from the old thermostat to the new one, not forgetting about the copper washer. You will need a key “19”. This can be done in advance. We fasten the thermostat hoses, sensors, air filter unit and “trunk” into place. Additional sealing of the connection of the fittings with the hoses with sealant will not harm, especially since this is done at the factory. Let's start filling the cooling system with liquid. Fill the tank with liquid from our container to the maximum mark. We return the hose to the container; it should be lowered into the liquid. We begin bleeding the system to get rid of air pockets. As the level drops, add liquid to the tank. The level must not be allowed to fall below a few centimeters from the bottom, otherwise air will again enter the system. You will have to flush the liquid several times. A sign of normal pumping is the absence of bubbles.
3 We connect the expansion tank hoses into place and remove the bag from under the lid. That's it, job done.
If you have time, it is better to postpone starting the engine until the next day. The sealant completely crystallizes after 12-24 hours. The next day we tighten up all the connections and start launching. If everything was done correctly, there will be no fluid leaks.
Let the engine warm up to operating temperature. After warming up, you need to unscrew the plug and release any air that may have remained in the heater radiator. I had to do this several times. The engine temperature initially ranged from 90 to 110 degrees, gradually reducing the range of fluctuations. After a couple of days, the air bubbles left the system and the thermometer readings stabilized at 90 degrees.
The new thermostat perfectly stabilizes the temperature. By the way, after replacing the thermostat, I reset the fuel consumption readings to zero - 9.7 l/100 km. After the first trip to work and home, it turned out that fuel consumption dropped to 8.5 liters per hundred kilometers in city mode in November!
How to check and replace?
Usually, it is possible to recognize a faulty device as soon as the following indicators are present:
- The engine takes too long to warm up;
- The coolant temperature rises unreasonably, and this causes the engine to overheat, even in the cold season.
Replacing the device with a new one is carried out as follows:
- First of all, the coolant is drained;
- The air filter is removed;
- Remove the hoses (there should be 4 of them);
- Unscrew the top nut of the thermostat and remove the ground wire;
- Now unscrew the nut on the device;
- Before installing a new thermostat, we prepare the seat. To do this, you need to clear everything of debris;
- Don’t forget to apply a layer of sealant or a new paper gasket;
- We install a new device.
And the most important thing:
Before installing the device, do not forget to pour boiling water over it. We pour water from the kettle and wait until the thermostat opens completely and then closes.
At this point the operation can be considered completed. Thus, knowing which thermostat is better for Kalina, we install the one that we like best. After this, you must definitely check how everything works.
Replacing the thermostat on Kalina if it fails to work can be easily done by the driver himself. You should consider in more detail the signs of a faulty thermostat, study the instructions for replacing it with a new device, and understand what tools are needed for this.
Thermostat functions and signs of malfunctions
The thermostat is one of the main components of the cooling system of any car; it is responsible for its optimal temperature conditions and preventing the engine from overheating.
A working thermostat can significantly reduce the time required to warm up the engine in winter.
The operation of the designated unit of the machine’s cooling system is carried out using 2 automatic valves. The valves are opened using a temperature-sensitive element, which, when the temperature in the system exceeds the normal temperature, begins to melt. The movement of cooling water in the system can be in a large or small circle. When the car engine quickly warms up, the large circle is blocked and the coolant flows through the small circle. When the system temperature reaches 85°C, the valve partially opens and the liquid begins to move in a large circle. Its full opening occurs at a temperature of 100°C. When the cooling water temperature drops, the valves close.
Read
Various malfunctions in the thermostat can be identified by the following signs:
- the motor overheats and then fails;
- The engine needs to warm up for a longer period of time.
If you notice a malfunction in the thermostat, you need to urgently replace it.
which thermostat to install on his car. The following tips will help you make the right choice when purchasing the designated part:
Thermostat from grants to viburnum! grantothermostat in viburnum
Here's everything you need to install a Grant thermostat
in
viburnum
1-
Thermostat
21900-1306010-00 grant 2- gasket.
Thermostat for viburnum but thermocouple from 10
suffered with the thermostat
on
the viburnum
, it was annoying that the operating temperature was 90-95 degrees, and the summer would soon suddenly boil.
- The material used to produce a high-quality thermostat is brass or stainless steel.
- The thermostat for Kalina should be taken from proven manufacturers AvtoVAZ, Luzar, Pramo, Elekton.
Many Lada Kalina owners ask the question, which is the best manufacturer of the main components of the car’s cooling system.
Read
All of the above manufacturers have proven themselves to be good. But, in the opinion of most professionals, the Russian-made AvtoVAZ thermostat is considered the best for Kalina; it is reliable, long-lasting, allowing the engine to quickly warm up to a suitable state. The designated device has a bolt for manual thermoregulation.
Also check out
- Remove the valve. To do this, you need to pull it up. Place it aside along with the tubes, this will make the work easier.
- Disconnect the connector from the air sensor, remove the air hose.
- Remove the air filter housing by first loosening and turning it.
- Lower the clamps and remove the 4 hoses. This can be done with an “8” socket wrench and a screwdriver. In this case, a lot of coolant should not leak out.
- Using a “12” wrench, unscrew the top nut of the thermostat so that you can remove the mass drive.
- Unscrew the stud and nut on the thermostat using a “13” key. Loosen the thermostat a little and remove it. You may need to use a screwdriver.
- Before installing the Lada Kalina thermostat
, you need to prepare the seat by removing dust, dirt and remnants of the old gasket from it. - Apply a one and a half millimeter layer of sealant. If this is not available, you can use a special paper gasket.
- You can install a new Lada Kalina thermostat only if the surface is thoroughly prepared and the sealant has already crystallized (this takes 5-10 minutes).