Step-by-step instructions for replacing thresholds on a VAZ 2114
Serial production of the VAZ 2114 lasted from 2003 to 2013; the car continued the line of VAZ “nines” and became its restyled version. The five-door hatchback received updated front body lines, new headlights, and moldings.
Structurally, the Lada Samara of all years of production was built on the same platform as the VAZ 2109; the model received universal engines, an all-metal body with attachments. Considering that the car has been out of production for almost seven years, replacing VAZ 2114 thresholds is one of the most common types of body repairs today.
Preparing for replacement
For the entire VAZ family, thresholds are non-removable body elements; in 80% of cases, repairing an element involves completely cutting or cutting out the part. Overcooking requires preparation
- The car is installed on a flat surface.
- The negative terminal is removed from the battery. In some cases, the battery is removed.
- The wiring from the inside of the doors from the electric windows is dismantled, all sensors are removed.
- The seats are removed from the interior, the inner trim of the pillars and the floor covering are removed.
- Doors are dismantled.
When planning to repair only the threshold, drivers have to partially change the bottom, install new jacks, and strengthen the central pillar. The metal for the body of the VAZ 2114, as well as for other models in the Lada Samara line, did not undergo anti-corrosion galvanizing.
Rolled steel was puttied, primed and painted. The inner part of the bottom and the box were not treated with anticorrosive; the first layers of rust appear on the internal parts of the body in the second year of operation. If the threshold is being repaired for the first time, and the “youngest” VAZ 2114 model is 6 years old, we can confidently say that the owner will find completely rotten metal under the bottom trim.
To prevent the geometry from becoming distorted during repairs and the central pillar from falling, it is recommended to install spacers or weld a channel.
Do-it-yourself replacement of VAZ 2114 thresholds: step-by-step instructions
If you are dismantling the thresholds, as well as replacing the bottom of a VAZ 2114 with your own hands, it is recommended to drive the car into an inspection hole or turn the car on its side before starting work. If only the threshold needs to be replaced, it is enough to place the car on a flat surface. To work you will need the following tools and materials:
- Bulgarian;
- a sharp chisel with a wide blade;
- hammer;
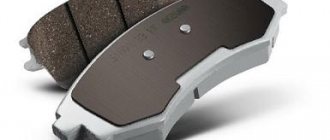
- set of thresholds with amplifier;
- automotive putty;
- primer;
- rubber spatula;
- sandpaper R-80;
- enamel for paintwork.
In car repair shops, welding machines are used for cutting: the metal is not cut, but welded along the old seams. This allows you to keep the old center pillar amplifier intact and does not damage the metal of the underbody. If the force plate under the strut needs to be replaced, the entire assembly is boiled down.
If you need to replace it yourself, the part is often cut off with a grinder or knocked out with a chisel. It is necessary to attach a new part to the old threshold and draw a dimension line in order to see the perimeter of the future cutting. The cutting is carried out from the central pillar to the left and to the right. Dismantling process:
- Remove old paint from the part using a grinder.
- Drill out weld points.
- Cut off the outer part.
- Check the seal and connector: if the metal is rotten, cut it off with a grinder.
- Clean the body from rust and sand it down to bare metal.
- Try on a new element, adjust it, cut off the excess edge.
- Mark the location for spot welding. Clear.
Preparation of the body for welding work has been completed. Before installation, the transport primer is removed from the parts.
How to cook thresholds on a VAZ 2114
If the sills on a VAZ 2114 are rotten, in addition to replacing the main element, you will also have to re-weld the bottom by cutting out the old metal and installing patches. Step by step process:
- The connector or the lower part of the box is welded.
- The amplifier is installed.
- The outer part is welded by arc welding.
- Welding seams are cleaned with a grinder, primed and puttied.
- After 12 hours, anti-corrosion agents are applied to the bottom and outer part, and at the final stage, painting is carried out with auto enamel.
It is not recommended to operate the car for 24 hours until the paint has completely dried.
How to remove door sill covers for VAZ 2114
The front fender of any modern car can be easily removed. As for the VAZ, it is even simpler, but removing the front wing from the VAZ 2114 is complicated by collective farm tuning.
Trim for the front bumper of VAZ 2114, cost of the set. about 1000 rubles
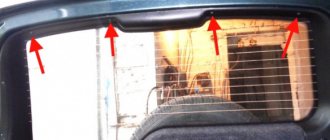
Vag 2114 with illuminated sills were created in order to complicate the process of disassembly and sudden destruction of car windows, even if it was presented in the form of nine permutations, the above ending is inevitable. Ugly, negative and inexpensive AvtoVAZ in its own repertoire.
Let's start by securing the wheels of the car, connecting and removing the wheel. Then remove the wing sheet. It is easy to remove the VAZ 2114 wing liner. An 8- or 10-head socket wrench is useful for this purpose. We observe the screws and unscrew them, disconnecting the fender flap from the side element and the front bumper.
VAZ 2114 lockers will cost 1,500 rubles
You, the mud screw, screw together with the wing cover through the screws to the wing and spar.
A set of lockers for a VAZ 2114 stand, about 800 tons of rubles
READ How to Remove Toyota Corolla Air Conditioning Tube
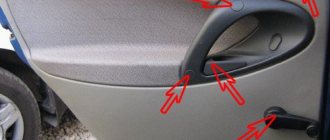
Covering the threshold from the VAZ 2114. This is at the second stage. Remove it by unscrewing the four screws under the screwdriver. The bottom screws are always clogged, so immediately take an awl and pick out the screw caps.
Open the front door (right side) and remove the door sill screws. When the thresholds of the VAZ 2114 and Lada 2115 consist of 4 pieces, two each for the front and rear doors, and the molding is unscrewed separately.
On Samara cars, the moldings are painted with a patina, the bumpers are at least some kind of plastic, even factory ones
The screws are out and allow the plastic mask to hang in place. The next obstacle is the so-called front wing of the VAZ 2114. Let's look at it.
The front wing pad of the Lada 2114-2114 carries a plastic petal with a protrusion at the bottom, which is inserted into the groove of the vapor pad. And in the center of the shield there is a plastic clamp that secures it in the hole on the wing.
VAZ 2113, 2114 for installing window sills
VAZ 2114 threshold sills are often glued to double-sided adhesive tape
Pull the retaining tendons out from under the wings and remove the trim. Now remove the window sill.
READ What Engine is Ford Kuga 2 5 Liter
I think you know how to remove the turn signal. Close the rotation lock, remove it, remove the cover with the light bulb and insert it inside under the fender.
When changing the turn signal, the VAZ 2114 asks you to remove the wing sheet when using dirt from behind
Next comes the stupidity that distinguishes the old four from the new (it even sounds ridiculous). Open the lid and we found, instead of the usual 8 bolts, screws under the star.
We unscrew them and replace them with two internal screws under the wing.
Then unscrew the screw from the threshold.
The last screw remains, which, of course, only comes out when the bumper is unscrewed. To do this we need 10 keys, unscrew the two nuts under the front bumper barrel.
We keep the rear of the fender towards us (behind the door) and back only if we don't want to remove the headlight and we're good to go!
To install the fender, look for clearances relative to the hood and doors, both vertically and horizontally.
VAZ 2114 repair threshold
Source
Square pipe instead of thresholds on a VAZ
To change the thresholds on a VAZ 2114 with your own hands, in half of the cases profile pipes are used. This method has proven itself well when replacing similar parts on classic VAZs. The profile has suitable dimensions of width and height, and the metal thickness reaches 2 mm, which ensures the reliability of the body for at least 7 years. In addition, profile pipes in 40% of cases have an additional zinc coating, which ensures the metal’s resistance to corrosion.
To work you will need:
- profile pipe 60x60x2 mm: 180 cm for one threshold, 70 cm for the cross member that will connect the spar to the part;
- profile with dimensions 40x20x2 mm: 70 cm for an additional cross member, 25 cm for jacks, if you have to reinstall the old ones;
- metal plate 15x5 cm to strengthen the part to the bottom;
- anticorrosive for the bottom - bitumen mastic 500 g;
- Bulgarian;
- electric or gas welding, 3 mm electrodes.
Experienced drivers recommend not using an inspection hole, but putting the car on its side, having first removed the battery, door, seats, and interior trim.
- Remove moldings and panels.
- Using a grinder, cut off the outer part along the top seam and bend the metal.
- Cut off the inside, remove the amplifier.
- Attach the pipe, cut off the excess part, weld plugs at the ends of the profile.
- Tack the profile to the bottom by welding at two points, front and back.
- Boil the outer part of the profile to the body, moving from the central pillar. If the body has a bend in this area, tap the pipe during welding to align the profile.
- Weld the cross members that will connect the threshold and the spar.
- Weld fasteners under the jack, weld plates to the bottom to strengthen the structure.
- Clean the weld seams with a grinder and treat with mastic.
- Paint and install decorative panels.
Plastic door sills
Protective body kits and plastic linings have become widespread specifically on the VAZ 2121 Niva. The all-wheel drive SUV was developed for use in difficult field conditions, has high ground clearance and additional body stiffening ribs. Plastic door sills for the VAZ 2121 allow you to protect the body from damage by gravel, branches, stones, etc.
The modernized version of the Niva VAZ-21214 (Lada 4×4) has a similar platform and sill dimensions, updates affected the power unit, the engine was redesigned to meet emission standards starting in 2002 under the Euro-0 protocol.
The plastic is ready for painting, the part is fastened with mortars, less often with car glue, the upper part is installed under the seal. When choosing protection, drivers strive to protect the parts as much as possible, while maintaining high clearance to the ground. The Niva has a ground clearance of 22 cm and an approach angle of 32°. When tuning, in 95% of cases body kits are not used.
Repair without welding
If the car owner is not enthusiastic about the idea of overcooking the car, you can use several proven methods for repairing parts from corrosion. However, it should be understood that such repairs are only a cosmetic procedure that is used for minor corrosive wear. It will give the car a fresh look, but after 6-8 months you will need a full replacement of the part.
To repair a threshold without welding, you will need the following materials and tools:
- epoxy resin or glue;
- solvent, rust remover;
- fiberglass or fiberglass;
- aluminum powder or silver;
- sandpaper R-80;
- automotive putty;
- priming;
- paint brush, rubber spatula, roller;
- auto enamel.
Instructions on how to repair a threshold using epoxy resin and fiberglass, step by step:
- Mix epoxy resin and hardener in a glass container, add silver. Aluminum powder plays the role of internal reinforcement of the composition and prevents the glue from cracking after complete hardening.
- Clean the threshold from old paint, remove rust with a corrosion cleaner.
- Clean the surface with sandpaper and degrease.
- Cut patches from fiberglass that are slightly larger than the corrosion dents.
- Coat the surface of the threshold with glue, attach a piece of fiberglass, and smooth with a spatula.
- Depending on the thickness of the corrosion dent, apply as many layers of fiberglass as necessary. If a hole in the threshold is sealed in this way, there cannot be less than 5-6 layers. Impregnate each layer with glue and roll it with a spatula.
- Roll the surface of the threshold with a roller to remove excess air and let the epoxy resin dry.
- Polymerization of epoxy glue lasts up to 12 hours; after drying, treat the surface of the threshold with sandpaper.
- Prime if necessary. If the dent was significant, apply a layer of putty and level the surface.
- After the putty has dried, paint over it with auto enamel.
All repair work using epoxy resin is carried out with gloves, this is convenient if you don’t have a roller and you have to level the surface with your hands.
How to install car sill trims yourself
To change the appearance of your own car, as well as to ensure reliable protection of car sills, it is recommended to use special plates made of different materials.
Car door sill covers are presented on the world market in various variations, depending on the raw materials used in production. And you can find them in https://mycar24.com.ua/shop/nakladki-na-porogi/index.html.
Chrome plated products are the most popular and in demand. In addition, these are quite durable and reliable accessories made of high-strength steel. Accordingly, this means that they will last for a long time without losing their original characteristics.
It is important to note that metal plates add additional weight to the machine. This is precisely the barrier to the use of steel products in sports cars.
Plastic and fiberglass accessories are no less common. And all because the second devices, in addition to being attractive, also have elasticity. In addition, unlike steel analogues, such plates are relatively light in weight.
But plastic accessories are universal. First of all, they are not heavy. Secondly, they are cheap. Thirdly, they have a good appearance. And besides, the plastic itself is able to withstand minor mechanical damage, while maintaining the integrity of the paint layer.
However, there are pitfalls here too. Due to temperature changes and excessive load, plastic products crack. Therefore, they cannot be called durable.
Now let's talk about installing the door sills.
In fact, this is a fairly simple process that does not require contacting highly qualified specialists. If you study all the intricacies of this activity in advance, you can reliably fix the protective plates on the thresholds in a matter of time.
Most often, the overlays are equipped with a self-adhesive base, which in turn makes their installation easy and simple. However, some preparatory work will need to be done here.
- Firstly, it is necessary to thoroughly clean the surface of the thresholds from dirt. You will also have to degrease the workspace.
- Secondly, you will need to wait some time for the thresholds to dry thoroughly after processing. You can use a soft cloth to remove any remaining dust.
- Thirdly, you need to remove the protective layer from the accessories and attach them to the thresholds. After this, you need to carefully press the pads so that they fit tightly to the surface on all sides. And, of course, it is important to ensure that no air bubbles form under the plates.
All work is carried out only at an air temperature of at least +18 degrees. If you had to face the need to install protective accessories in winter, use a special hair dryer.
How much does it cost on average to repair thresholds at a service center?
At a car service center, you can either carry out a complete replacement or limit yourself to cosmetic repair of metal from rust. The average cost of work for a service station in the capital region is given; the price does not include the cost of the material used and the part itself:
- Complete replacement of thresholds - from 8,000 rubles. Customer details.
- Replacement of sills and rear wing - from 23,000 rubles.
- Cosmetic repairs with epoxy glue from RUB 2,000.
At a service station within walking distance you can buy all the necessary parts for replacement; the craftsmen will recommend sets of thresholds, moldings, install additional plastic body kits, and carry out tuning.
Approximate price if you carry out repairs and changes yourself:
- Set of thresholds and amplifiers - from 2000 rubles.
- The cost of one threshold: external part and connector - from 700 rubles.
- Amplifier (1 pc.) - from 300 rub.
As an amplifier, you can use a metal plate of the required length and width. It is necessary to make perforation holes in the part with a drill with a diameter of 0.8 cm at a distance of 8-10 cm around the entire perimeter.
When using profile pipes, the price of work will not exceed 3,000 rubles. The cost of the profile is from 450 rubles. for 1 meter, bitumen mastic will cost from 500 rubles. per kilogram jar.
Threshold repairs on a VAZ are carried out if the part is new, but due to careless driving the body has received a dent from an impact. In other cases, it is recommended to replace the element with a new one.
How to replace rotten thresholds with your own hands
The article describes an interesting method for solving the problem with rotten thresholds. Perhaps someone will need it for VAZs.
Cars often have problems with thresholds. This depends on the age of the car, and is also affected by various weather conditions. Water, dirt, and car sills begin to rot. There is a different attitude towards car repair now. Previously, to make a high-quality threshold for several years, it took at least two days, or even more. I want to describe a method of how to quickly repair a car threshold in 5–6 hours. The time also depends on what to do with painting the threshold or not. In this repair, I want to leave the top of the threshold and cut off only the lowest part, the most rotten, and also cut off the lower part of the second repair threshold and put it in place of the rotten one. To begin with, I change the threshold, and in the future I will make sure that the doors coincide with it. Although there may not be any problems since I will only be cutting off the bottom part, one way or another there may be some minor problems because the replacement threshold is not original. My car is M2141 or Moskvich 41.
Self-installation of door sills
LED door sills on a car will not improve its technical characteristics in any way, but it is an excellent tuning for the car. Overlays can add comfort and coziness to the car interior not only at night, but also during the day. This accessory will be an interesting aesthetic solution for those who love originality and style.
In addition, the covers can also perfectly and permanently protect the sills of your car from chips, cracks and dirt, and in the dark they will provide excellent illumination of the road not only for the driver, but also for passengers. You won’t have to stumble every time you get into the car, and you won’t fall into a puddle when getting out.
It's no secret that LED accessories are very easy to install; they do not require additional equipment. For full operation, they should be connected to the machine’s network with a nominal voltage of 12 V and that’s it. It is for this reason that many car enthusiasts want to save money and carry out the installation themselves.
Self-installation of overlays
After you have purchased the luminous overlays, you should carefully read the instructions; they are included in each kit. If your car has plastic sills, then steel sills are mounted instead.
Therefore, stage No. 1 is the dismantling of the plastic strips that are installed on your machine. It is worth noting that the overlays can be mounted on plastic thresholds, and instead of them, it all depends on your personal preferences.
Stage No. 2. After you have finally decided on the installation location, you should thoroughly degrease the surface of the threshold. This can be done using rubbing alcohol or acetone. Degreasing is necessary so that the adhesive base interacts better with the surface of the threshold.
Stage No. 3. After you have degreased the car threshold, make sure that it is clean and free of dust and small dirt. Place the trim on the surface of the threshold. For further ease of installation, you can make marks in the places where the overlays will be installed.
Stage No. 4. Each threshold of the car has its own direction: left, right, top, bottom. Before you remove the protective film from the 3M tape, you should make sure that your overlay matches the direction. All information is indicated on the tape of each pad.
Stage No. 5. After you have completed all the steps, you should install the overlay. Take the trim from opposite edges and slide it under the sealing rubber. If you are sure that it is completely under the elastic, lower it and press on all sides. For greater effect, wipe the threshold trim with a soft cloth.
A similar procedure should be repeated for each threshold in the same way. Once you are sure that you have installed the pads correctly, you should connect them to the machine's network. All is ready! Now your car has stylish steel linings that make your car original and different from others. As already mentioned, the set of linings is made of high quality steel that does not corrode. There are LED modules inside the cover; they are characterized by the following:
- work for a long period of time;
- are not afraid of vibrations and shocks of the car;
- The machines are very economical in energy consumption;
- environmentally friendly and safe for human health;
- do not emit heat, so they do not deform the plastic parts of the linings;
- they are not afraid of sudden changes in voltage;
- the glow is equally bright, rich and powerful at any stage of work, regardless of the time of use.
The main rule is that before you decide to install the overlays yourself, carefully read the instructions. If you do not have enough skills or you are not confident that you can do everything at the “highest level,” then it is better to turn to specialists in this matter. In any case, the effect is unique. You can't imagine how stylish, modern and unusual it is. Illumination will make using the vehicle spectacular and more comfortable for a long period of time.
Threshold repair process
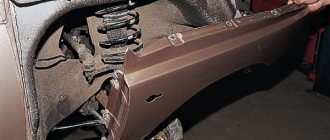
First, I will have to remove the driver's door, the left wheel, and also the front fender of the car. Next, you need to jack up the car, remove the front wheel, and then the wing. I need to remove the fender to make it easier to remove the car doors. My fender is screwed to the hood with six screws. From inside the hood, you also need to pull the “saber” and lower the bumper to free the lower part of the wing. The wing is also fastened from the inside with two screws and one near the door. I unscrew them. After all the screws are unscrewed, I have 9 of them, the wing is almost free. True, only mastic can hold it. To do this, you need to take a tool like a pry bar and try to slightly move the wing from the inside. Gradually I swing the wing from all sides, and after it moves away a little it can be removed. After the wing is removed, its strut usually needs to be cleaned of rust, dirt, plaque and other foreign bodies. In principle, you don’t have to clean it, but I usually always clean it. I usually clean the wing strut at the end of the job when I install it. Now we need to do the basics and repair the car sills.
Replacing Thresholds on a VAZ 2115 Do It Yourself Video
How to change the thresholds of a VAZ-2109 car
Although the body does not affect the movement of the car, the driver will not be happy if its elements begin to fall off in the direction of travel. High humidity, reagents and climatic conditions can greatly affect the underbody and sills of the VAZ-2109. Make yourself a VAZ 2110 threshold: video. How to replace the rear mounts on a VAZ 2114 with your own hands (video). Owners often find themselves having to replace these parts due to rust that has developed during normal operation.
Features of job replacement
Thresholds are the supporting part of the body. Detailed instructions on how to replace the generator on a VAZ 2101, 2102, 2103, 2104, 2105, 2106, 2107 with your own hands (video). They are placed in such a way that they can withstand significant loads on themselves; in the event of their structural destruction, deformation of the body is possible. The vehicle may become unbalanced and partially lose maneuverability.
In case of corrosion, you definitely need to change these body elements and at the same time knock on the bottom. Visually they appear undamaged, but when tapped or even pressed with a finger, the paint can fall off and anything from the center of rust to a through hole will appear underneath.
Experts do not recommend repairing the lower part of the case using patches. Then 100 or replacing the timing belt with your own hands (manually. This is a short-lived method, and in the worst case, the season will become corroded and the car will become completely unusable. Checks of the body part should also be carried out on the interior side.
DIY car repair and maintenance
Replacing the wing of a VAZ 2114 : (Photo), Video
The front fender of any modern car is very easy to dismantle. In relation to the VAZ, it is even simpler, however, removing the front wing of the VAZ 2114 is complicated by “collective farm tuning”.
Door sills for VAZ 2114 , set price is about 1000 rubles
The door sill covers for the VAZ 2114 are designed to complicate the dismantling process and make the car's sills rot more quickly, even if it was presented as a restyling of the Nine, the above-mentioned outcome is inevitable. Ugly, harmful and cheap, in general, AvtoVAZ has in its repertoire...
We begin work by fixing the wheels of the car, jacking it up and removing the wheel. Then, remove the fender liner. Removing the VAZ 2114 is not difficult. To do this, you will need an 8 or 10 socket wrench. We look for the screws and unscrew them, disconnecting the fender liner from the side member and the front bumper.
VAZ 2114 will cost 1,500 rubles
As a rule, the mudguard is screwed together with the fender liner using through screws to the wing and spar.
Read
A set of fender liners for a VAZ 2114 costs about 800 rubles
The threshold trim for the VAZ 2114 is in the second stage. You need to remove it by unscrewing four self-tapping screws using a shaped screwdriver. The bottom screws are always clogged, so immediately take an awl and pick out the heads of the screws.
Open the front door (from the right side) and unscrew the internal screws of the threshold molding. By the way, the door sill trims for the VAZ 2114 and Lada 2115 consist of 4 pieces, two for the front and rear doors, and each molding is unscrewed separately.