Steering gearbox Niva
Adjusting the steering gear and the reasons that contribute to the need to adjust the steering column on cars of the Niva family (2121, 2131, 21213, 21214, Chevrolet and other variety of both series and sub-series) is the topic of this story.
These works are not difficult and, if you have direct hands and desire, they can be done with a bang in the garage with your own hands, or with the hands of a local professional
© Uncle Slava
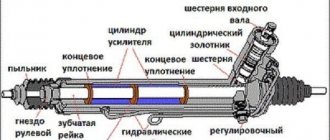
Steering gear design on Niva
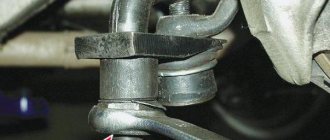
But before we start shamanism with a tambourine, a few words about the design of that very steering gearbox. The Shaitan machine, although not cunning in its design delights, still requires ingenuity and understanding from anyone who decides to repair it.
A few dry terms:
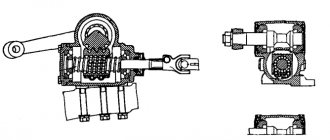
The picture was stolen from the Internet (c) who knows?
- Carter
- Bipod
- Lower crankcase cover
- Shims
- Worm shaft bearing outer ring
- Ball separator
- Bipod shaft
- Adjustment screw
- Adjustment plate
- Lock washer
- Worm shaft
- Upper crankcase cover
- Sealing gasket
- Bipod shaft bushing
- Worm shaft seal
- Bipod shaft seal.
During the operation of the columns, worm and roller, namely during their combined operation (friction or rolling as is correct), the operating gap in this pair increases, play appears trivially and some strange knocks and sounds appear.
The appearance of play leads to an increase in the free play of the steering wheel and wobble. And this, in turn, is not normal. Is the steering wheel moving? Poor handling, sensitivity and speed of response are lost, which means safe driving can be kept silent.
I didn’t open America to you here.
This play, if not eliminated in time, namely by not adjusting the steering gear, leads to the appearance of chips, microcracks and subsequent mechanical damage to the main pair - the worm and the bipod.
Well, in the end there comes a complete paragraph and failure. And you, yes, exactly you, end up with your hard-earned tugriks, because a new steering gearbox is less than five, and for Chevrolets with and without power steering, up to a whole ten rubles, in local Chinese spare parts stores, will not cost... checked...
No, of course, not everything is so scary because the gearbox can be removed and disassembled. How to do this will be discussed below.
How to disassemble the Niva steering gear
- First of all, the oil should be drained from the gearbox.
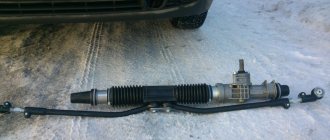
- Having disconnected the rods and unscrewed the bolts securing the gearbox to the body spar, remove it from the car.
- We remove the bipod. Unscrew the nut securing it. The bipod usually sticks strongly; to remove it, you should hit it sharply with a hammer.
- Then unscrew the bolts securing the upper cover of the gearbox housing and remove it along with the adjusting shims.
- The outer bearing race should now be pushed out of the crankcase. To do this we use a worm shaft.
- Then we remove the shaft along with the separator.
- Remove the oil seals for the worm shaft and bipod shaft.
Adjusting the Niva steering gear
And so, we disassembled and replaced the worn elements, installed the gearbox on the car and now we can start adjusting.
The order of our actions will be as follows:
- Opening the hood and looking at the gearbox, on the top cover of which there is an adjusting screw and a lock nut, these are what we need.
- Loosen the lock nut and use a flat screwdriver to turn the screw. By tightening the screw clockwise, the backlash in the column gears will decrease, but this is provided that the length of the adjusting screw allows us to tighten it.
If the screw is tightened all the way and the play is not removed, then the column must be replaced.
Servicing the Niva steering gear (Chevrolet, 2121, 21213 and 21214)
Like any other component, the steering gear should be maintained by adhering to three simple rules.
Three simple, but at the same time important rules that should always be followed:
- Timely visual inspection.
- Timely control of the oil level in the gearbox.
- Timely adjustment.
Timely visual inspection allows you to quickly identify and identify oil leaks, mechanical defects and other damage to the gearbox housing.
Oil level monitoring – this also includes timely oil changes.
Some craftsmen got the hang of pouring liquid LITOL into the gearbox, having previously melted it on a tile in a vessel.
Good or bad? Everyone decides for themselves. My personal opinion is that this measure takes place in the maintenance of gearboxes whose operational life is approaching sunset. The gaps in the gears can no longer be eliminated by simple adjustment, and the only way out, in order to get rid of the knocking, is to pour liquid lithol into the gearbox housing, thereby leveling the backlash at least a little.
Well, the adjustment allows you to eliminate play in the gearbox gears in a timely manner.
Consistently following the three recommendations above, rest assured that the steering gear in the field will serve you faithfully for more than tens of thousands of kilometers.
Source: https://Remladavaz.ru/rulevoj-reduktor-niva
Front axle repair video
Popular publications
latest comments
Believe it or not, but a quiet Niva is now possible.
For many years, the brainchild of the domestic automobile industry, the world's first crossover, is famous for its off-road characteristics. More than one generation of lovers of country trips, hunters, fishermen, or people who, by the will of fate, got acquainted with this car were able to appreciate it.
Light weight, short wheelbase and transfer case allow the Niva to get through where even famous foreign SUVs like Nissan, Toyota and Mitsubishi lie on their bellies on the ground and spin their wheels helplessly. Unpretentiousness in maintenance, availability of parts and components made the Niva an ideal budget SUV. And everything would be fine if not for a few shortcomings. Despite the above advantages, the car also has significant disadvantages, these are vibrations of the cardans and transfer case, poor quality of factory spare parts and the absence of any sound insulation. This is not just annoying, but also greatly complicates the use of modern devices - navigators, phones, tablets. But without such pleasant little things it is very difficult to imagine a comfortable trip. Today, the market offers a large number of options, by introducing which you can achieve positive results in refining the Niva.
Read more: Oil in manual transmission Toyota Corolla
To do this, we propose to make the following modifications in our workshop:
1. Subframe for the Republic of Kazakhstan
2. “Velvet transfer case” kit for the Republic of Kazakhstan, “Synchro-Sport” synchronizer and front axle disengagement clutch
3. Silent RK handles
4. Cardan shafts with CV joints
5. Brackets for untying the front axle gearbox
6. Steering knuckles with non-adjustable radial ball bearings
7. Clutch from Chevrolet Niva
8. Interior noise insulation
But it is not necessary to carry out the whole range of work, since it is not cheap. The car owner simply has to decide what he wants to achieve from the car and in what conditions it will be used. Any of the above improvements contributes to a significant increase in comfort in operation and maintenance of the Niva.
1. Install a subframe for the gearbox and transfer case of the VAZ 21213-214 Niva.
This device will help eliminate the problem of the VAZ SUV - vibration of the transfer case. A subframe for alternative mounting of the transfer case has a number of advantages. Monolithic frame. Reduces all kinds of vibrations and noise to a minimum, relieves the floor, and increases the possibility of adjustment along the axes. It is a natural protection for the transfer case.
During testing it proved to be the best. Allows you to accelerate the car without gear crusher and noise up to 140 km/h and higher (if the engine allows it). The set is factory-made from structural steel;
2. Install the “Velvet transfer case” kit.
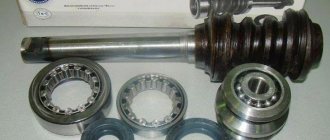
Double-row imported bearings and oil seals are pressed into the rear transfer case cover and the front axle disengagement clutch, eliminating play (vibration) and oil leaks on the transfer case flanges and thereby increasing the comfort when operating the vehicle. The axle release clutch adds another position for the RK locking handle, thanks to which the Niva can become significantly more economical in fuel consumption when driving on asphalt roads, and it is also possible to turn the differential lock on and off on the move, and the Synchro-Sport synchronizer will allow us to switch low and high gears of the RK when driving;
Read more: Converting kva to kW
3. Replace the transfer case shift handles with tuning ones (assembled according to the type of gearshift handle). This will remove the metallic itch when the transfer case is operating;
4. Install the cardan shafts on the CV joints.
The driveshaft on CV joints allows vibrations to be reduced to zero.
The principle is very simple, converting the cardan shaft crosspieces to constant velocity joints. Another plus: easy installation and dismantling. When subsequently replacing CV joints, unlike universal joints with a cross, the balancing is not disturbed;
5. Install the brackets for independent fastening of the front axle gearbox.
When the gearbox is mounted independently from the engine, noise and vibration are reduced, and cross-country ability is improved due to its more fixed mounting on the body. The Niva's front axle gearbox is attached to the body separately from the engine on special steel brackets through elastic bushings.
In the case of the Chevrolet Niva, we suggest replacing the silumin brackets of the front axle gearbox with reinforced steel ones. It is better to do this operation on a car in preparation for off-roading, since they are three times more reliable than standard ones;
6. Installation of a non-adjustable wheel bearing.
Some advantages of ball bearings over roller bearings used in standard designs:
a) reduction of resistance during rotation;
b) operates within a guaranteed thermal gap;
c) absence of play, and as a result, improved performance and extended service life of the brake mechanism;
d) improved handling, both on hard surfaces and on dirt roads,
e) noticeable reduction in fuel consumption.
Long-term operation, both under normal conditions and under conditions of increased load, including autocross, has proven the reliability of the proposed design;
7. Install the clutch from the VAZ 2123 Chevrolet Niva.
Large working surface area. The flywheel does not require additional balancing. The force of pressing the clutch pedal is reduced by half.
The RCS is self-regulating, for a backlash-free clutch drive type. The RCS rod is of a fixed length, the pressure is constant. No adjustment is needed, there is a power reserve in both directions;
8. Complete sound insulation of the cabin.
For sound insulation, high-quality automotive sound-absorbing materials and “STP” are used. This treatment of the car body allows you to reduce noise in the cabin by up to 3 dB.
Did you like the article? Subscribe to the channel to stay up to date with the most interesting materials
Niva car steering gear
In 1970, the designers of the Volzhsky Automobile Plant, who at that time had already mastered the production of the first VAZ model, were tasked with creating a comfortable off-road vehicle. At the development stage, many components and assemblies of the Zhiguli were transferred to the prototype of the new model. The car turned out to be quite lightweight in appearance, and off-road thanks to its off-road characteristics. At the same time, the interior turned out to be almost identical to that of a passenger car.
In 1974, the first 15 samples were produced, which went through a full cycle of pre-production tests. And in mid-1977, the first production car VAZ-2121 rolled off the assembly line. Some time after the launch of the conveyor, the car gained high popularity due to its reliable design and excellent off-road characteristics. In the best years, up to 80% of cars produced were exported.
An important role in such popularity of the car was played by the reliable and well-balanced design of the Niva, which made it possible to operate the car in different climatic and road conditions. The combination of a power unit, suspension, rigid two-volume body, transmissions and reliable steering ensured the Niva a long life on the assembly line.
Steering is considered to be one of the important critical systems of a car, the heart of which is the steering gear.
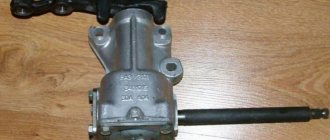
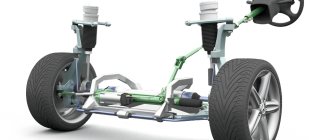
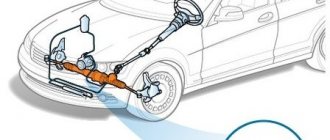
Steering
Steering
The Niva uses a worm-type steering gearbox. It provides reliable vehicle control at any speed and in different road conditions. The worm mechanism is equipped with a globoid type worm (variable shaft diameter) connected to an intermediate shaft and roller. A bipod is installed on the outer part of the roller shaft, which, through rods, activates the rotating mechanism. The rotation of the steering wheel ensures the movement of the bipod through a worm gear; it turns the wheels with rods.
The worm steering mechanism has a low level of sensitivity to shocks and impacts transmitted from the wheels on uneven roads. It has the ability to direct a VAZ vehicle to large turning angles and, accordingly, provides excellent maneuverability of the vehicle. The disadvantage of a worm gear is that it is difficult to manufacture. Worm steering has many connections and therefore requires periodic adjustments and adjustments.
Drive gear adjustment
To carry out the operation, use the original device A.95690, mandrel A.70184 or an analogue made according to the drawing.
The crankcase mating plane is positioned so that it assumes a horizontal position. Then an absolutely flat metal rod is installed on the bearing bed. The distance from the bar to the mandrel is measured by inserting the adjusting rings from the set into the gap under the bar in increments of 0.05. The measured value (crankcase base) is consistent with the correction applied to the drive gear. When assembling the unit, it is recommended to abandon the standard spacer sleeve to prevent repeated repairs. Instead, a non-deformable steel bushing 48 mm long is suitable (with a margin, shorten if necessary).
Read more: What is the Vanus system?
During turning, the parts control the force when turning the gear (should be 157–196 Ncm); for used bearings, a torque of 39.2–58.8 Ncm is valid. The use of a proprietary dynamometer 02.7812.9501 is not necessary.
Acceptable accuracy will be provided by a household steelyard. When working with it, you should wind one end of a 1 m long cord around the flange, and secure the other end to the scales. By pulling the device in a perpendicular direction, fix the turning torque. So, new bearings should provide 7-9 kg, and with mileage - 2-3 kg.
The process involves replacing the support washers with new ones - thicker than before. There are 7 standard sizes to choose from in increments of 0.05 mm within the range of 1.8-2.1 mm. Washer material – bronze or steel. In this case, the gears are installed tightly, but can be turned manually.
NIVA steering column
1:886
As you know, the Niva has a weak steering column; more than once I had the case that they came to repair the Niva with the steering wheel swaying up and down. I read that you can install a “ten” column, but I thought so, why is your own worse? You just need to strengthen it and slightly change the height and angle of the steering wheel. What I eventually achieved was that the steering wheel became two centimeters higher and straighter in the vertical plane.
what this gave: the fact is that the driver’s seat will be slightly higher than the standard one, for better visibility from the front, and with the standard version, the knees would rest against the steering wheel and it would not be convenient to turn the steering wheel. Then, due to the greater inclination of the steering wheel to the windshield, the arms get tired due to stretching, so the steering wheel had to be made straighter than in the standard version.
So, the progress of the work done: - Unscrew and remove the steering column; — remove the cardan from the steering wheel so that it does not interfere; — after using the “grinder” we cut off the mounting ears flush; - We weld the corners so that they are flush with the entire plane; — weld an additional plate from the bottom; - after that, we make holes and screw it back (I didn’t bother with the holes for the bolts, since one was broken off, and the rear part was generally held on by two M6 bolts, and I decided to specifically weld it) - then we further reinforce it with two ears that are welded from the end of the base of the ignition switch, and also on the other side, but only in place so that they are close to the transverse “stretch” of the struts. and also drill holes through and screw them in (again, mine are welded)