Operating principle and differences between buttons
The 1-2 generation button on the carburetor has two working positions and one neutral.
1st generation HBO button for carburetor
- I – the engine starts and runs only on gasoline (gas valve is closed, the red light is on).
- II – The internal combustion engine switches to gas, while the gasoline electric valve closes and the green lamp lights up.
- 0 (Neutral) – serves to burn gasoline from the carburetor float chamber.
Changing the fuel type should only occur through the neutral position. If you turn on the gas right away, two types of fuel will enter the combustion chambers and the engine will most likely stall.
Some copies have an indication of the fuel level in the cylinder, as well as an additional button for the pre-start supply of a portion of gas, which is needed to enrich the mixture when starting a warm engine on gas (for example, Lovato, Logo buttons for a vacuum reducer).
A key such as, for example, Stag 2-G already has a pre-start function built into it, with the ability to adjust by time.
In the injection version, instead of the middle position, there is an automatic mode (on some types, such as Stag 2-W, it can be extreme). In this position, the engine starts on gasoline, and when a certain engine speed is reached, the gas supply is automatically turned on.
Button for switching gas petrol 2nd generation to injector
The transition speed is regulated using a potentiometer on the side surface of the housing. This key can also come with a level indication.
The universal option involves installing a toggle switch on both the injector and the carburetor. The transition between modes is carried out using a jumper/jumper on the case (example SVG switch).
Universal switch
The 4th generation HBO button has an LED indication and 2 operating modes on/off. In the on position, the gas turns on automatically after the reducer-evaporator warms up to 35-45˚C. The temperature is programmed in the controller when setting up the equipment.
Stag 300
Button signals using Stag as an example:
- LED is on/off – the engine is running on gas/gasoline;
- blinks at intervals of 1 second. – the engine is not warmed up;
- flashes every 2 seconds – the system is ready to switch to gas;
- blinks every 4 seconds – the tank has run out of fuel;
- the buzzer beeps three times - the system switches from gas to gasoline due to lack of fuel;
- three short signals 1 long – ECU (control unit) error;
- two short beeps 1 long beep (with the ignition off) – maintenance of gas equipment is required.
In addition, the fourth version of the gas system has an emergency start on gas. The mode is activated as follows: hold the button with the ignition off until the LED lights up continuously. Then, without releasing the key, we start the engine. Deactivation occurs after stopping the internal combustion engine.
Types of buttons (video):
Selection table (with approximate prices):
| Name/labeling | injector/carburetor/generation | Level indication, +/- | Price in rubles |
| REG OMVL Dream XXI King | engineer/4 | + | 1020 |
| Logo 145 | engineer/4 | — | 280 |
| Logo 101 | carb./1.2 | — | 470 |
| Atiker (K01.003.000.020) | carb./1.2 | + | 600 |
| Stag 2-G | carb./1.2 | — | 550 |
| AEB 722 | carb./1.2 | + | 1050 |
| Tamona K-5 | carb./1.2 | — | 520 |
| Lovato | carb./1.2 | — | 590 |
| Torelli | carb./1.2 | + | 630 |
| Stag 2-W | engineer/2 | — | 600 |
| Tamona in-3 | engineer/2 | — | 540 |
| Stag LED-401 | engineer/4 | + | 750 |
| Stag LED-300 | engineer/4 | + | 580 |
Connection diagram of the 2nd generation HBO button to the injector
Installing and connecting the 2nd generation HBO button with your own hands on a car with an injector sometimes causes difficulty.
In fact, everything is much simpler than it seems. The factory instructions for installing the switch indicate the following pinout:
- the white wire should go to the level sensor on the multivalve (if such an indicator is installed);
- yellow goes to the positive of the gasoline valve (if there is emulation of gasoline injectors, this wire is not connected);
- blue connects to the positive terminals of the gas valves of the reducer and the additional remote valve with filter. The injector emulator also cuts into this circuit;
- red goes to the positive terminal of the ignition coil (necessarily with a fuse);
- black - mass;
- brown to the negative terminal of the coil.
Injection circuit
It’s hard to disagree with the first three points. But for the rest we will make recommendations:
- The red wire is best connected to the positive side of the ignition switch. Because the coils may have voltage surges. In order not to disassemble the panel, the contact can be found on the fuse block.
- The black wire should only be attached to the car body, like all negative equipment cables.
- Brown, must be wound onto the central high voltage wire of the coil.
It is advisable to do 10-15 turns, without using electrical tape. The electrical tape dries out over time and falls off; it is better to make a knot similar to tying a fish hook.
Correct connection of the brown wire
If the ignition system consists of separate coils, it is necessary to wind the wire onto the first two armor wires (for a more accurate signal), without breaking the brown one, i.e. first to the first then to the second.
After connecting the button, it must be adjusted. Periodically increasing the engine speed with the accelerator, it is necessary to smoothly turn the potentiometer screw clockwise and back. It is necessary to ensure that the gas supply is turned on in the “automatic” mode when the tachometer reading is 2000-2500 rpm.
Do-it-yourself HBO 2nd generation with injector
Again, due to a lack of funds, many car enthusiasts try to install LPG on a car with their own hands, without resorting to the services of specialists. We will not dissuade car enthusiasts from installing it themselves; we will only outline a couple of points:
- Installing GBO-2 generation on an injection car in a specialized service will cost, at the time of writing, from 3 to 5 thousand rubles, depending on the region and the installer company;
- The company is obliged to provide a set of documents that are necessary for the legalization of HBO in the traffic police;
- The fine for driving gas without documents is 500 rubles with the obligatory delivery of an order to register or dismantle the installed gas equipment;
- To legalize an LPG installed on a car, a conclusion from the installer’s company, which has the appropriate permits and licenses, is required.
Therefore, according to the authors of the article, self-installation of 2nd generation gas equipment on an injector may in the future become more expensive than installation by specialists who have permits and licenses.
Connecting an LPG to an injector is a pressing issue, since carburetor engines are gradually becoming a thing of the past due to their inefficiency and the need to constantly repair the mechanics. Injector is the use of injectors for point injection - optimal fuel economy. When thinking about which LPG injector is optimal, they often opt for the 2nd or 4th generation. The 5th is more suitable for modern foreign cars with large cylinder volumes, and the 3rd generation is 80% of the 2nd, but with electronic fuel dosing.
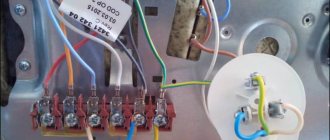
Connection diagram of the 2nd generation HBO button to the carburetor
For a carburetor engine, the connection looks similar:
- Red - through the fuse to the ignition coil/switch.
- Light blue (blue) – gas valve positive.
- Yellow – positive of the gasoline valve.
- Black – minus (car body).
- The brown one goes to the ignition coil armored wire. It is needed to transmit an impulse to the key, which determines whether the motor is running or not.
Carburetor diagram
If you still have questions about connecting or selecting buttons on the HBO, ask them in the comments. We will be happy to answer them.
What to do if HBO does not switch to gas
In most cases, it is possible to detect and repair a breakdown with your own hands.
Airlock
So, the first thing you need to do is bring the level of antifreeze/antifreeze in the expansion tank to normal. Then, by pressing on the radiator pipes and simultaneously releasing gas, try to “drive” the air plug out of the evaporator reducer. If this method does not help, and you are also sure that there is air, then you need to remove the output hose from the gearbox and drain a small part of the liquid (by starting the internal combustion engine for a couple of seconds), after first replacing it with a clean container.
You can detect the presence of a plug in the following way: heat the car engine to operating temperature, compare the heating intensity of the pipes and the evaporator itself.
Next, check the correct installation of the gas equipment (we wrote about this here), also inspect the mechanical damage to the installation, and the presence of kinks in tubes/hoses.
Temperature sensor
If the work done does not give a positive result, you need to make sure that the wires going to the gearbox temperature sensor are intact, and also make sure that its connectors are free of traces of oxidation. Wiring twists are not allowed here, only soldering or secure terminals.
If there is no visible damage to the evaporator temperature indicator, its diagnosis is required. You can find a defect, knowing the parameters (resistance) of a particular sensor, using a multimeter. And if you have a cable for adjusting/diagnostics of gas equipment, as well as software, it will be possible to identify the fault much faster.
The reason that the HBO does not switch to gas (4th generation) is usually a breakdown of the sensor or adjustment of its operating parameters. If adjusting the values does not produce results, it will need to be replaced or repaired.
As an option, to start the gas installation, you can try to short-circuit the sensor wires and then get to the place where it is purchased/repaired.
Problems with the 2nd generation of HBO
In a situation where the 2nd generation of LPG on an injector or carburetor does not switch to gas, there are usually three reasons:
- airing of the gearbox or low fluid level;
- malfunction of the fuel type switch button;
- failure of the gas solenoid valve coil.
You can find all other causes and methods for eliminating them by following the links in the article. If you still have questions, ask them in the form below, we will definitely give a detailed answer.