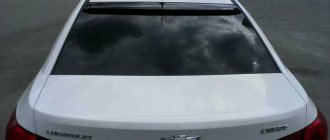
how to connect heated rear window on VAZ 2106 | Topic author: Love
Explain how to connect the heated rear window so that everything is clear!
please, there are 2 wires from the rear window. car VAZ 2106)) Nina I have a similar question, I’ve had it since 1995 without it, it’s impossible to drive in winter - it sweats instantly, but with a window it’s not an option.
Tamara What's the problem? One wire to ground, no need to even drag it. Install the amp relay at 15 under the hood, apply + to the winding and power contact, connect the second contact of the winding Peter to the heating on/off button. The second contact of the button is to ground. Connect the wire that goes to the glass to the second power contact of the relay. Here's + where to submit - choose for yourself. If the memory is OK, at least with the battery. If there are concerns, then you need to look at the diagram, where this + appears only when the ignition is on, which in principle is more correct.
Lyudmila You will need - wide terminals; – bolt terminals; – wires; - circuit breakers; – relay; – relay block; – glass heating switch; – bolts; – rubber tubes and nut
Remove the instrument panel. Next, instead of a plug, you must install the existing rear window heating switch in this one.
Attach the relay behind the instrument panel opposite the tachometer. Then do the wiring, choosing the length of the wires relative to the dimensions of your Nikita car. It is highly undesirable to ignore the installation of the relay and connect the wires directly. Otherwise, all the contacts will burn out, the switch button will melt and you will have to do everything all over again, only, of course, not forgetting to install the relay.
The overhead fuse you have has a looped wire on it. It must be cut at a distance of about six centimeters from the edge. From the short end of the wire, it must be crimped with a wide terminal and connected to the fuse. On the other side, also crimp with a wide terminal and insert the wire into the relay block.
Stretch two wires from the heating switch, with a cross-section of about one and a half square millimeters, attach one to the fuse Peter, the other to the relay block.
Attach the relay next to the fuse in any location convenient for you.
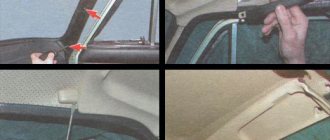
Remove the trim on both sides of the rear window.
Connect the wire to the glass itself on the right.
Connect a short wire to the rear window on the right with one end and the other to battery ground.
Andrey how many amperes to buy a button Vladislav
Replacing the Rear Window of a VAZ 2106
replacement
wind and wind
rear windshield
glass vases
2106
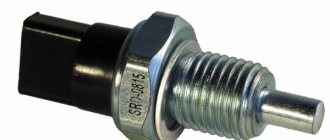
-2103
Removing front and front rear
windshield on station wagon
2106
if replaced with new ones, they are created during body work, for example, when painting a car or for tinting them. To remove the glasses, we need the help of an assistant, as well as a blanket or something similar, a screwdriver, and a piece of cord 4-6 mm in diameter. and about 5 meters in length.
If that's all, then you can start repairing:
- Firstly, in the car interior it is necessary to remove all interior parts that will interfere with us. Firstly, this is the decorative trim of the front side pillars, remove the interior rear view mirror (see replacing
rear mirror type VAZ 2106
), remove the sun visors, remove the ceiling lining.
- Now, starting from the top right corner (which is convenient for you, you can do both at the same time), bend the edges of the sealant using a screwdriver and push it through the housing flange, then manually press the sealant out using pressure on the glass. When performing this operation, the top corner of the glass along with the seal from the body opening and press the corner of the glass
inside the body.
- From the outside of the machine, use a screwdriver to squeeze out the fringed glasses (lock) and remove it from the seal. In addition, after bending the wipers, you need to rotate the top and sides of the housing. glass
and remove the glass by placing a blanket, blanket or any other material over the lid.
READ Tags Timing belt Geely Mk Cross
Installation of rear and windshield Installation of rear windshield and vase.
Rear installation
or windshield
glass vases
A very simple operation that anyone can do even at home.
replacing glass on vase 2106
Easy and quick to change rear windows
to the classics.
Now that we have removed the windshield, we need:
- Remove the rubber seal from it, start removing it from the middle. Check the seal for mechanical damage and replace it with a new one if necessary. Hardening of rubber sealant is also not allowed. We clean the seal and edge of the glass from dirt and rust.
- Check and, if necessary, clean the seals of dirt, seals and other debris.
- Locate and clean the drain holes in the seal.
Install a new windshield on a VAZ 2106 . Follow the procedure below:
- Install the seal onto the new glass, starting from the bottom corners.
- Then take the pre-prepared cord and insert it into the seal groove that fits onto the flange in the housing opening. Lay the cord in a circle, making sure it overlaps the opposite end by about 20cm.
- Wash down the soapy water with a brush and generously coat the seals and the inside of the case where the glass will sit.
- With a partner, insert the glass back into the hole so that the sealing groove at the cord exit point is on the flanges of the hole and the ends of the cord are in the cabin.
- Now one person remains in the cabin and slowly begins to pull the cord so that the edge of the seal protrudes beyond the flange of the hole; lightly tapping the glass, thereby pushing it into place.
READ How to Set the Time on the Starline A93 Alarm
After installing the windshield glass, replace all removed parts in the reverse order.
back the windshield was replaced in the same way, with the exception of some functions:
- The glass should be removed from the lower corners.
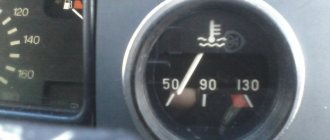
- Before removing the glass
, in the lower corner, outside the car, remove the decorative strip using a screwdriver.
Heated rear window VAZ 2106 | Topic started by: Ewing
Andrey, please try and look for it, I've been all over the internet
Andrey (Yarum) Rostislav, okay, if I find it, I’ll send it to you
Rostislav (Xatia) Andrey, thank you, I’m waiting
Andrey (Yarum) Rostislav, well, in general, I didn’t find the strips themselves, but I found conductive glue that can be used to restore them if they break.
Rostislav (Xatia) Andrey, clearly I’m interested in the set of glue strips and instructions for all this
Andrey (Yarum) I glued it together very simply, just take nail polish and met. the shavings are mixed and glued on the cliff
Alena (Swete) I can’t find this heating to stick on. Maybe someone else has done it?
Seryozha (Daksesa) Alena, I can fit the glass.
Alena (Swete) Seryozha, thank you. I live a little far away and the toner is good. It’s a pity
KIA LED heated seats diagram
Installing a VAZ 2109 engine on the Oka
Do-it-yourself filter heating 12 volts
How to connect rear window heating on a VAZ 2106: comments
Yes indeed. And I encountered this. Let's discuss this issue.
VAZ 2106 | Checking the heated rear window
Checking the heated rear window
When the rear window heating is turned on, the field of glass with visible conductors should be free of fog or ice after some time.
• In the event of a malfunction, first check the condition of the fuse in the fuse box.
• If the fuse is in order, check the reliability of the contacts of the plug connectors on the left and right of the rear window, and if necessary, clean the contacts from corrosion.
• If the rear window is still not heated, check the electrical supply wires and the switch.
• Check the filament. Measure the voltage between the filament and the connection point of the electrical supply wire. To do this, wrap the pointed electrode of the measuring device with a wide strip of foil and press it against the filament during measurement -arrow-.
• Start the engine and turn on the heated rear window.
• Measure the voltage in the middle of each section of the filament. If this voltage is approximately 6 volts, then the filament is fine. If the voltage is about 10 volts or about 0 volts, then the thread is broken.
• By moving a pointed electrode along sections of the filament, you can determine the location of the break. This is the place where a voltage surge from zero to several volts appears.
• If the filament is damaged, the electrical circuit can be restored by applying electrically conductive silver-based varnish. To do this, first clean the damaged area -A-.
• Cover the damaged area -A- on both sides, as shown in the figure, with adhesive tape -B- and apply varnish -C- with a thin brush.
• Dry the varnish at a temperature of approximately +25 °C for approximately 24 hours. You can also use a technical hair dryer for drying. At a temperature of +150 °C, the varnish dries in approximately 30 minutes.
Attention: Do not turn on the rear window heating until the varnish is completely dry. Do not use gasoline or other solvents to clean the damaged area.
automn.ru
Installation and connection of rear window heating
As you know, most of Russia has fairly cold winters. Therefore, a frozen rear window is an extremely pressing problem. To combat this phenomenon, it is recommended to install a heated rear window.
What you need to buy
- Rear window with electric heating threads.
- Wires. (6-7 meters red and 4-5 blue, approximately).
- On/Off switch.
- Relay (4 contacts 30 amperes).
- Terminals (“father”, “mother”).
- Pads.
- Heat shrink.
Tools:
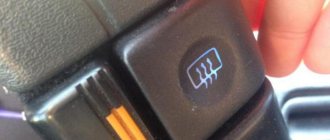
Panel with heating switch
Heating installation , especially in the cold season , is divided into two stages :
- Collection of preparations at home .
- Installation in a car .
We present the simplest diagram for connecting a heated rear window .
Heating connection diagram
First stage
- If pads with wiring were purchased, then remove them.
- Next, we create new contents of the block.
- After this, we perform the same action with the relay.
- We make the wiring necessary to connect the heating to the body in advance.
Second phase
First of all, we remove the dashboard. We remove the pads, having previously remembered their location.
Removing the dashboard
To avoid a short circuit, remove the battery terminals.
Next, you need to allocate a place to install the relay and on/off switch.
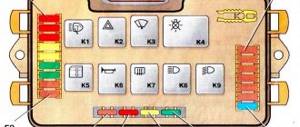
We run the wiring under the dashboard to the fuses . There we connect “ + ” wire coming from the relay to the 16 amp fuse .
We connect “ + ” wire from the switch to an 8- amp fuse .
We attach the wires to the main bundle and close the panel.
Don't forget to connect the on/off switch. Carefully pull it out of the dashboard, connect the block, and put it back.
Now the final, but the longest one: laying the wires directly to the heated glass itself. The “+” wire is laid across the entire car, wherever the car owner deems necessary. But it is easiest and most convenient to run the wire with the main wiring bundle.
After completing this step, we form a “mother” and wrap the exposed wire with electrical tape.
Using a pre-prepared piece of wire, we connect the “—” heating element to the car body and the strut housing.
Connected heating system
After wiring the panel and mats, we install them in their place. We connect the battery. Turn on the heating, wait 5-10 minutes, then check. If everything works, then you did everything right.
Heated glass in winter is very important for the driver. First of all, this is due to safety, since a layer of ice in severe frosts reduces rear visibility by almost half.
Rear window heating repair
To troubleshoot the heated rear window, you should start by determining the cause of its failure. If the individual threads of the heating element do not heat up, the threads have broken somewhere.
Note: to check the operation of the heating filaments (elements), you can use a regular tester, measure the resistance at the ends of each strip with an ohmmeter, or switch the multimeter to the “ringing” mode and determine where the break occurred.
Repair in this situation consists of restoring the electrical circuit. To do this, you can try to restore the heating circuit using a special conductive glue, or solder the disconnection point. At the gluing site, the glass will heat up more due to the greater resistance in this section of the circuit, which can lead to the glass breaking.
We recommend not doing these “things” for the sake of saving, but simply replacing the rear window with a heating element. Believe me, you will spend much more time and money, worry about soldering, and in the end, you will still come to the conclusion - buy new glass.
Option 2 - not a single heating thread (strip) heats up
Connection diagram for heated rear window of VAZ 2106
Causes of malfunction:
- faulty button (switch), relay, rear window heating fuse
- wires are damaged
- tips are oxidized or poorly connected
- The contact from the glass heating element has become disconnected.
Replace faulty switch, relay, fuse, wires with new ones. Clean and crimp the terminals. If the terminal is unsoldered from the heating element, replace the glass with the heating element.
How to connect heated rear window to VAZ 2106
Version 24.10.16 beta
[td] Car reference book
| Moving the site to a new domain. |
General diagram of electrical equipment of VAZ 2106
Electrical diagram of a VAZ 210 6 car
1 – front lights; 2 – side direction indicators; 3 – battery; 4 – battery charge indicator lamp relay; 5 – relay for turning on low beam headlights; 6 – relay for turning on the high beam headlights; 7 – starter; 8 – generator; 9 – external headlights; 10 – internal headlights; 11 – fan motor activation sensor; 12 – electric motor of the engine cooling system fan; 13 – sound signal; 14 – ignition coil; 15 – ignition distributor; 16 – spark plugs; 17 – carburetor solenoid valve; 18 – coolant temperature indicator sensor; 19 – engine compartment lamp; 20 – reverse light switch; 21 – oil pressure indicator sensor; 22 – low oil pressure indicator sensor; 23 – indicator sensor for insufficient brake fluid level; 24 – windshield wiper gearmotor; 25 – switch*; 26 – electric motor for windshield washer; 27 – fan motor activation relay**; 28 – voltage regulator; 29 – windshield wiper relay; 30 – additional fuse block; 31 – main fuse block; 32 – relay-interrupter for alarm and direction indicators; 33 – relay for turning on the heated rear window***; 34 – brake light switch; 35 – plug socket for a portable lamp****; 36 – additional resistor of the heater electric motor; 37 – heater electric motor; 38 – heater motor switch; 39 – hours; 40 – glove box lighting lamp; 41 – cigarette lighter; 42 – alarm switch; 43 – instrument lighting regulator; 44 – brake fluid level indicator lamp; 45 – three-lever switch; 46 – ignition switch; 47 – rear window heating switch***; 48 – rear fog lamp switch; 49 – external lighting switch; 50 – lamp switches located in the front door pillars; 51 – gearmotors for electric windows of the front doors***; 52 – lamp switches located in the rear door pillars; 53 – parking brake warning lamp switch; 54 – interior lamps; 55 – fuel level indicator with reserve indicator; 56 – coolant temperature indicator; 57 – oil pressure indicator with low pressure indicator; 58 – tachometer; 59 – parking brake warning lamp; 60 – battery charge indicator lamp; 61 – carburetor air damper indicator lamp; 62 – side light indicator lamp; 63 – turn signal lamp; 64 – headlight high beam indicator lamp; 65 – speedometer; 66 – carburetor air damper warning switch; 67 – power window switch for the left front door***; 68 – relay for turning on the electric windows of the front doors***; 69 – power window switch for the right front door***; 70 – rear lights; 71 – license plate lights; 72 – sensor for level indicator and fuel reserve; 73 – pads connected to the rear window heating element***; 74 – trunk lighting lamp; 75 – rear fog lamp.
The order of conditional numbering of plugs in blocks:
a – switch; b – ignition distributor sensor; c – windshield wiper and windshield wiper breaker relay; d – hazard warning and direction indicator breaker relay; d – three-lever switch.
* Installed if a vehicle uses a contactless ignition system. In this case, an ignition distributor sensor of type 38.3706 and an ignition coil of type 27.3705 or 027.3705 must be installed. ** Since 2000, it has not been installed and electric motor 12 is switched on directly by sensor-switch 11. In this case, instead of the previously used temperature sensor 11 of type TM-108, sensor-switch 661.3710 is used. *** Installed on car parts. **** Not installed since 2000.
1 – front lights; 2 – side direction indicators; 3 – battery; 4 – battery charge indicator relay; 5 – relay for turning on low beam headlights; 6 – relay for turning on the high beam headlights; 7 – starter; 8 – generator; 9 – external headlights; 10 – internal headlights; 11 – sound signals; 12 – electric motor of the engine cooling system fan; 13 – fan motor activation sensor; 14 – ignition coil; 15 – ignition distributor; 16 – spark plugs; 17 – carburetor solenoid valve; 18 – coolant temperature indicator sensor; 19 – engine compartment lamp; 20 – reverse light switch; 21 – oil pressure indicator sensor; 22 – low oil pressure indicator sensor; 23 – indicator sensor for insufficient brake fluid level; 24 – windshield wiper gearmotor; 25 – windshield washer electric motor; 26 – relay for turning on sound signals; 27 – relay for turning on the fan motor; 28 – voltage regulator; 29 – windshield wiper relay; 30 – additional fuse block; 31 – main fuse block; 32 – relay-breaker for alarm and direction indicators; 33 – brake signal switch; 34 – plug socket for a portable lamp; 35 – heater electric motor; 36 – additional resistor of the heater electric motor; 37 – hours; 38 – heater motor switch; 39 – glove box lighting lamp; 40 – cigarette lighter; 41 – alarm switch; 42 – instrument lighting switch; 43 – warning lamp for insufficient brake fluid level; 44 – three-lever switch; 45 – ignition switch; 46 – rear fog lamp switch*; 47 – external lighting switch; 48 – lamp switches located in the front door pillars; 49 – switches for warning lights of open front doors; 50 – alarm lights for open front doors; 51 – lamp switches located in the rear door pillars; 52 – parking brake warning switch; 53 – interior lamps; 54 – fuel level indicator with reserve indicator; 55 – coolant temperature indicator; 56 – oil pressure gauge with low pressure indicator; 57 – tachometer; 58 – parking brake warning lamp; 59 – battery charge indicator lamp; 60 – carburetor air damper indicator lamp; 61 – side light indicator lamp; 62 – turn signal lamp; 63 – headlight high beam indicator lamp; 64 – speedometer; 65 – carburetor air damper warning switch; 66 – parking brake warning relay; 67 – rear lights; 68 – license plate lights; 69 – sensor for level indicator and fuel reserve; 70 – trunk lighting lamp; 71 – rear fog lamp*.
The order of conditional numbering of plugs in blocks:
a – windshield wiper and windshield wiper breaker relay; b – hazard warning and direction indicator breaker relay; c – three-lever switch.
* Installed on parts of manufactured cars.
Repair of VAZ 2106 (Zhiguli): Rear window heating element
- Repair manuals
- Repair manual for VAZ 2106 (Zhiguli) 1976-2005.
- Rear window heating element
| Cause of malfunction | Elimination method |
| Individual threads of the heating element do not heat up | |
| Broken threads | Replace glass with heating element |
| No thread gets hot | |
| The switch, relay, rear window heating fuse is faulty, the wires are damaged, the tips are oxidized or poorly connected, the contact from the glass heating element is disconnected | Replace faulty switch, relay, fuse, wires. Clean and crimp the terminals. If the terminal is unsoldered from the heating element, replace the glass with the heating element |
Download information from the page
↓ Comments ↓
1. General information
1.0 General information 1.1 Safety precautions
2. Diagnosis of faults
2.0 Diagnostics of faults 2.1 diagnostics of faults in the engine and its systems 2.2 Diagnostics of faults in the clutch 2.3 diagnostics of faults in the gearbox 2.4 Diagnostics of faults in the driveline, rear axle, chassis, steering and braking system 2.5 Diagnosis of faults in the body 2.6. Diagnosis of electrical equipment faults
3. Engine
3.0 Engine 3.1 Cylinder head and timing mechanism 3.2 Lubrication system 3.3 Oil change 3.4 Replacing the camshaft drive chain guide 3.5 Replacing the camshaft and valve levers 3.6 Replacing the valve stem seals 3.7 Replacing the intake and exhaust manifold gaskets 3.8 Replacing the cylinder head gasket ov 3.9 Disassembling the head cylinder block, valve grinding
4. Engine power system
4.0 Engine power system 4.1 Replacing the air filter element 4.2 Replacing the fuel pump 4.3 Repairing the fuel pump 4.4 Replacing the fuel tank and its hatch cover
5. Carburetor
5.0 General information about the carburetor 5.1 Cleaning the fuel filter 5.2 Replacing the idle air system solenoid valve 5.3. Adjusting the carburetor 5.4 Replacing the carburetor 5.5. Carburetor repair
6. Engine cooling system
6.0 Engine cooling system 6.1 Replacing the coolant 6.2 Replacing the coolant pump 6.3. Replacing the thermostat 6.4 Replacing the engine radiator
7. Exhaust system
7.0 Exhaust system 7.1 Replacing exhaust system parts
8. Clutch
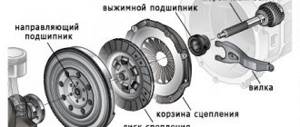
8.0 Clutch 8.1 Replacing fluid and bleeding the clutch hydraulic drive 8.2 Adjusting the drive 8.3 Replacing the clutch master cylinder 8.4 Repairing the clutch master cylinder 8.5 Replacing the clutch slave cylinder 8.6 Replacing the pressure plate assembly and clutch release bearing
9. Gearbox
9.0 Gearbox 9.1 Checking the level and changing the oil in the gearbox 9.2 Replacing the reverse light switch 9.3 Replacing the secondary shaft cuff 9.4 Replacing the gearbox 9.5 Repairing the gearbox 9.6 Replacing the speedometer drive 9.7 Features of repairing a five-speed gearbox
10. Cardan transmission
10.0 Cardan transmission 10.1. Maintenance 10.2. Replacing the driveshaft
11. Rear axle
11.0 Rear axle 11.1 Checking the serviceability of the rear axle 11.2 Changing the oil 11.3 Replacing the axle shaft and its cuff 11.4 Removing and installing the rear axle 11.5 Replacing the cuff of the drive gear 11.6 Replacing the gearbox 11.7 Repairing the gearbox
12. Front suspension
12.0 Front suspension 12.1. Maintenance 12.2 Replacing the bearings and hub cuff 12.3 Replacing the cushions and stabilizer bar 12.4 Replacing the ball joints 12.5 Replacing the shock absorbers 12.6 Replacing the springs 12.7 Replacing the upper arms and their rubber-metal hinges 12.8 Replacing the rubber-metal joints of the lower arms on a car 12.9 Replacing the lower arms 12.12 . Adjusting wheel alignment angles
13. Rear suspension
13.0 Rear suspension 13.1 Checking technical condition 13.2. Replacement of rear suspension parts
14. Steering
14.0 Steering 14.1 Adding oil 14.2 Checking the condition of the steering 14.3 Adjusting the gear engagement 14.4 Replacing steering rods 14.5 Replacing and repairing the pendulum arm 14.6 Removing and installing the steering wheel 14.7 Removing and installing the steering shaft 14.8 Removing and installing the steering mechanism 14.9 Removing the bipod
15. Brake system
15.0 Brake system 15.1 Checking the condition of the hydraulic drive 15.2 Checking the vacuum brake booster 15.3 Checking the functionality of the pressure regulator 15.4 Replacing brake fluid and bleeding the brake system 15.5 Replacing the brake pads of the front wheels 15.6 Replacing the brake pads of the rear wheels 15.7 Replacing the brake caliper of the front wheel 15.8 Replacing the brake cylinders of the front wheels 15 .9 Repair of front wheel brake cylinders
16. General information
16.0 General information 16.1. Checking electrical circuits 16.2 Fuse blocks 16.3 Replacing fuses 16.4 Replacing the main and additional fuse blocks 16.5. Replacing the relay 16.6 Replacing the ignition switch 16.7 Replacing the contact part of the ignition switch 16.8 Battery 16.9. Generator 16.10. Starter 16.11. Ignition system 16.12. Lighting, light and sound alarms 16.13. Windshield cleaner and washer 16.14. Repair of the electric heater motor 16.15. Control devices
17. Body
17.0 Body 17.1 Replacing the front bumper 17.2 Replacing the radiator grille 17.3 Replacing the hood latch 17.4 Replacing the hood 17.5 Replacing the windshield 17.6 Replacing the interior rear view mirror 17.7 Replacing the sun visor 17.8 Replacing the headliner 17.9 Replacing the ceiling grab handle
18. Heating and ventilation system
18.0 Heating and ventilation system 18.1 Replacing the electric heater fan 18.2 Replacing the heater radiator 18.3 Replacing the radiator casing 18.4 Replacing the heater valve
19. Car body care
19.0 Car body care 19.1 Car washing 19.2 Preservation and protection of paintwork
20. Applications
20.0 Applications 20.1 Tools used in addition to the standard set 20.2 Electrical diagram of VAZ-2106, VAZ-21061, VAZ-21063 cars produced in 1976–1987. 20.4 Tightening torques for threaded connections 20.5 Basic data for adjustments and monitoring 20.6 Characteristics of spark plugs 20.7 Fuel, lubricants and operating fluids used 20.8 Lamps used on the vehicle 20.9 Lip seals (oil seals)
automend.ru