Symptoms of a problem
If you repair the crankshaft yourself, you can save a lot on car service costs. Therefore, it is worth understanding its diagnosis, repair and installation. If repairs are not carried out in a timely manner, the engine may seize, and this can lead to more serious repairs. The following are signs that serve to identify malfunctions:
- when the engine is running, the oil level control light does not go out, which indicates a decrease in oil pressure in the system;
- at medium and high speeds a metallic knock is heard in the engine, which increases with increasing speed;
- engine jams.
The cause of the first two malfunctions is the wear of the main and connecting rod journals. In this case, the distance between the neck and the liner increases, which leads to a decrease in oil pressure. If the distance is too large, the shaft may run out, causing metallic sounds in the engine. If the engine jams, it is better to replace the crankshaft. To diagnose the serviceability of the crankshaft, it should be dismantled and cleaned. It is better to remove the part together with the engine.
We remove the part from the VAZ 2106 for inspection
After removal, you need to perform a visual inspection of the necks and cheeks, according to which a decision is made on the need for grinding or replacement. No special instruments are needed for inspection; you can tell by touch. If scratches and burrs are found on the journals, the part is sent for boring. Boring can be done 4 times. Each boring increases the dimensions of the liners by 0.25 mm. After dismantling the crankshaft, you need to evaluate the size of the liners and whether they will allow boring. If grinding has never been performed, then the liners have an icon without any numbers.
Main bearings for VAZ 2106
If cracks are found, the crankshaft must be replaced. You can send it for welding, but usually restored parts last no more than 50 thousand kilometers. After boring, you need to polish the journals. Then the journals and crankshaft need to be washed with gasoline. The oil passages should also be thoroughly cleaned to prevent contamination from entering the bearings. After washing with gasoline, you need to blow out the oil channels using compressed air.
Preparation for replacing bearings and direct installation of the crankshaft
After the hood and battery are removed from the VAZ 2106, you need to carefully drain the oil and coolant. Then remove parts such as the radiator, thermostat, carburetor, fuel pump and ignition distributor. Be sure to note for yourself the order in which they are removed. Next, you need to remove all adjacent hoses and wires from the engine along with the cylinder head.
Read more: New Honda Accord 2020 photo prices for Russia video test drive
In addition, disconnect parts such as the generator, starter, coolant pump, upper nuts that secure the engine mount, and bolts that secure the clutch housing to the engine. The order in which disconnection is made must be strictly observed. During operation, the lifting device cables must be secured to the block and carefully lifted.
Then, placing a jack under the gearbox, begin to carefully rock the unit in order to gradually disconnect it from the clutch housing. It will be necessary to remove the cylinder block, clutch, pulley, camshaft wire cover, oil pump parts, accessory drive shaft, flywheel and rear crankshaft seal holder.
Using a 10mm wrench, you need to unscrew all the bolts that secure the oil pan to the cylinder block and remove it along with the seal gasket. Disconnect the oil pump. Using a 14mm socket, unscrew the nuts that secure the connecting rod cover, and then remove it. Then take a hammer, press the handle against the connecting rod, and push the pistons out of the cylinders.
Crankshaft installation process
Before installing the crankshaft on the VAZ 2106, you need to wash, clean and dry the cylinder block. And only after that read the process.
Tools
To complete the installation you will need the following tools:
- a set of keys;
- Screwdriver Set;
- micrometer;
- consumables (liners, seals, half rings);
- torque wrench.
Set of repair tools
If defects in the form of scratches, burrs, or signs of wear are found on the surface of the liners, they must be replaced. The earbuds cannot be adjusted. When using the removed bearings further, you need to check the gap between them and the main and connecting rod journals of the crankshaft. For main shafts, the permissible size is 0.15 mm, for connecting rods - 0.10 mm. If the dimensions exceed the permissible limits, the liners are changed to a greater thickness after boring the necks. If the journals are properly ground and the appropriate bearings are selected, the crankshaft should rotate freely.
The oil seals that ensure the tightness of the crankshaft are replaced regardless of how long they have been standing. Half rings, like liners, cannot be adjusted. If burrs and scratches are found, the half rings are replaced. They are also changed if the axial clearance of the crankshaft is greater than the maximum permissible, which is 0.35 mm. The selection of new rings is carried out according to the nominal thickness or with a thickness increased by 0.127 so that the axial clearance is in the range of 0.06-0.26 mm.
Stages
Installation of the crankshaft on the VAZ 2106 is carried out in the following sequence:
- First, the support bearing of the input shaft is pressed in.
- Next you need to install new liners. The main liners are installed to the required repair size. The connecting rods are the same size, so they are interchangeable. When installing, you need to be careful not to mix up the bearings. The connecting rod bearings are smaller in diameter than the main bearings and do not have annular grooves.
- Then you need to install the thrust half rings into the bed of the 5th main bearing. In this case, the grooves should be directed towards the crankshaft. Half rings are selected according to tolerances.
Replacing worn parts
- The main and connecting rod journals must be lubricated with engine oil.
- Now the crankshaft should be placed in the block.
- The bearing caps are installed according to the marks. The surface of the bearings and journals should be wiped well with a clean rag. When installing the covers, you need to ensure that the arrows marked on them are directed forward along the power unit. The fastening bolts must be lubricated with engine oil and tightened to a torque of 68-84 Nm.
- Next, the connecting rod bearings are mounted and the connecting rods are attached. The tightening torque should not exceed 54 Nm.
- We check the rotation of the crankshaft; it should rotate freely, easily, without play or jamming.
- Next you need to install the rear crankshaft oil seal.
- Next, the engine sump is installed on the block.
- When grinding, in any case, it is necessary to replace the front oil seal. It must be installed on the block along with the cover.
- After tightening the front cover, you can install the crankshaft pulley.
- Then the intermediate shaft, timing parts and cylinder head are installed on the power unit.
- Then you need to adjust the chain tension.
- Next, marks are installed on the camshaft and crankshaft.
- Then the remaining engine parts and components are installed.
- After installing the alternator belt, it is necessary to adjust its tension.
- At the last stage, the ignition is installed and adjusted.
Installation
1. Wash the crankshaft in kerosene and blow through its internal cavities with compressed air. We install new crankshaft main bearing shells of nominal or repair size. On the outer cylindrical surface of the liners there are numbers stamped indicating the repair size: 025 - the first repair, for the crankshaft journal, reduced in diameter by 0.25 mm. Accordingly, for the second, third and fourth repair sizes the values will be: 050, 075, 100. It is easy to distinguish connecting rod bearings from main bearings. The upper main bearings (except for the middle one) have annular grooves. In addition, the middle support liners are wider than the others. The connecting rod bearings are all identical and interchangeable, their diameter is less than the diameter of the main bearings. To increase the contact area, there are no annular grooves on the connecting rod bearings.
2. We install thrust half-rings in the grooves of the fifth main bearing with grooves towards the crankshaft. Half rings are manufactured in normal thickness (2.310-2.360 mm) and increased thickness (2.437-2.487 mm).
3. We check the axial clearance between the thrust half-rings and the thrust surfaces of the crankshaft, which should be in the range of 0.06-0.26 mm. If the gap exceeds the maximum permissible (0.35 mm), replace the thrust half-rings with new ones, increased by 0.127 mm.
4. Lubricate the connecting rod and main journals of the crankshaft with engine oil and install the shaft into the block.
5. In accordance with the marks, install the main bearing caps and tighten their mounting bolts to a torque of 68.4-84.3 Nm. Check the free rotation of the shaft.
6. Install connecting rods with liners and covers on the crankshaft. Tighten the fastening nuts to a torque of 43.4-53.5 Nm.
8. Install the holder with the oil seal on the cylinder block (see “Crankshaft rear oil seal - replacement”).
9. Installation of the remaining removed parts is carried out in reverse order.
12. On a carburetor engine, we check and, if necessary, adjust the ignition timing (see “Ignition timing - checking and adjustment”).
Video “Assembling the engine of a classic VAZ car”
This video demonstrates the procedure for assembling an engine on a VAZ classic, including installing the crankshaft.
It is impossible to imagine an internal combustion engine without a crankshaft, since it is this part that allows the vehicle to move. The pistons are characterized only by translational movement, and the transmission requires torque, which can be obtained thanks to the crankshaft. Over time, the mechanism wears out and requires repair work. Therefore, it is important to know what needs to be done and in what order, and what tools to use.
Crankshaft repair
The crankshaft removed from the vehicle is thoroughly cleaned and inspected. The presence of cracks on the main and connecting rod journals, as well as on the cheeks, is not allowed. If they are found, the crankshaft can be submitted for welding, but it would be better to replace it. Typically, restored crankshafts do not last more than 50 thousand km. They also check for the presence of deep grooves, burrs, scratches and nicks at the contact point of the VAZ 2106 crankshaft oil seal.
To determine the runout, as well as the displacement of the axes of the connecting rod journals, the crank is mounted on prisms. The values of radial runout, axial displacement and non-perpendicularity of the flange end to the crankshaft axis are measured. If the permissible parameters are exceeded, a decision is made to replace the part or edit it using a hydraulic press. Let us immediately note that the VAZ 2106 crankshafts are made of cast iron, so attempts to correct its geometry with a press often end in part failure.
Next, measurements are taken of the parameters of the journals (connecting rod and main). When they are produced to a size that is 0.005 mm less than the minimum allowable (for this repair size) and (or) their ovality is exceeded by more than 0.05 mm, a decision is made whether grinding and replacement of the crankshaft liners is necessary. The journals must be ground to the closest size (according to the repair size chart). The center-to-center distance between the main and connecting rod journals should ensure a piston stroke from 79.9 mm to 80.05 mm.
Required tolerances for the dimensions of the VAZ 2106 crankshaft after grinding:
- when installing 1 and 5 necks on prisms, runout of 2, 3 and 4 necks is not allowed by more than 0.03 mm;
- runout of the seat for the crankshaft bearing and sprocket - up to 0.04 mm;
- taper, as well as ovality of the connecting rod journals - up to 0.007 mm.
Before assembly, remove the plugs from the crankshaft, clean and wash the oil channels. After this, blow with compressed air and install new plugs.
Why is a crankshaft needed in a VAZ 2106 engine?
The crankshaft (crankshaft) is an important part of the crank mechanism of any engine. The operation of the unit is aimed at converting the energy of combustion gases into mechanical energy.
Description of the VAZ 2106 crankshaft
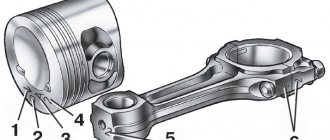
The crankshaft has a rather complex design, with connecting rod journals located on the same axis, which are connected through special cheeks. The number of connecting rod journals on the VAZ 2106 engine is four, which corresponds to the number of cylinders. Connecting rods provide connection between the journals on the shaft and the pistons, resulting in reciprocating movements.
Let's look at the main elements of the crankshaft:
- Main journals are the supporting part of the shaft and are installed on main bearings (located in the engine crankcase).
- Crankpins. This part is designed to connect the crankshaft to the connecting rods. The connecting rod journals, unlike the main ones, have a constant displacement to the sides.
- Cheeks are a part that provides connection between two types of shaft journals.
- Counterweights are an element that balances the weight of connecting rods and pistons.
- The front part of the shaft is the part on which the pulley and timing gear are mounted.
- Rear end. The flywheel is attached to it.
Seals are installed in front and behind the crankshaft - oil seals, which prevent oil from escaping out. The entire crankshaft mechanism rotates thanks to special plain bearings (liners). This part is a thin steel plate that is coated with a low-friction material. To prevent the shaft from moving along the axis, a thrust bearing is used. The material used in the manufacture of the crankshaft is carbon or alloy steel, as well as modified cast iron, and the production process itself is carried out by casting or stamping.
The crankshaft of the power unit has a complex structure, but the principle of its operation is quite simple. In the engine cylinders, the fuel-air mixture ignites and burns, resulting in the release of gases. During expansion, the gases exert an impact on the pistons, which leads to translational movements. Mechanical energy from the piston elements is transferred to the connecting rods, which are connected to them through the bushing and piston pin.
An element such as a connecting rod is connected to the crankshaft journal using a liner. As a result, the translational movement of the piston is converted into rotation of the crankshaft. When the shaft makes a half revolution (turns 180˚), the connecting rod journal moves back, thereby ensuring the return of the piston. Subsequently, the cycles are repeated.
No less important in the operation of the crankshaft is the process of lubrication of rubbing surfaces, which include the connecting rod and main journals. It is important to know and remember that lubricant is supplied to the shaft under pressure created by the oil pump. Oil is supplied to each main journal separately from the general lubrication system. Lubricant is supplied to the connecting rod journals through special channels located in the main journals.
Neck sizes
The main and connecting rod journals wear out as the engine operates, which leads to disruption of the proper operation of the power unit. In addition, wear can be associated with various types of engine problems. These include:
The listed nuances lead to damage to the surface of the shaft journals, which indicates the need for repair or replacement of the unit. To assess the wear of the journals, you need to know their dimensions, which are shown in the table.
Table: crankshaft journal diameters
| Connecting rod | Indigenous | ||||||||
| Nominal | Repair | Nominal | Repair | ||||||
| 0,25 | 0,5 | 0,75 | 1 | 0,25 | 0,5 | 0,75 | 1 | ||
| 47,814 | 47,564 | 47,314 | 47,064 | 46,814 | 50,775 | 50,525 | 50,275 | 50,025 | 49,775 |
| 47,834 | 47,584 | 47,334 | 47,084 | 46,834 | 50,795 | 50,545 | 50,295 | 50,045 | 49,795 |
What to do when necks wear out
What are the steps to take if the crankshaft journals are worn out on a VAZ 2106? First, the defectiveness is carried out, measurements are taken using a micrometer, after which the crankshaft journals are polished using special equipment to the repair size. This procedure cannot be done in a garage environment. The necks are ground to the closest size (based on the tables provided). After processing, thickened liners (repair) are installed in accordance with the new size of the necks.
If a major overhaul of the engine is being carried out, it would not be superfluous to inspect the oil pump, blow out the oil passages of the cylinder block, as well as the crankshaft itself. Attention should be paid to the cooling system. If there are signs of wear or damage on the engine elements or its systems, the parts and mechanisms need to be repaired or replaced.
3.22. Replacing crankshaft bearings
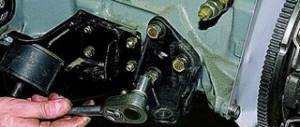
Remove the hood (see Replacing the hood) and the battery. Drain the oil (see Changing the oil). Drain the coolant (see Replacing the coolant). We remove the radiator together with the thermostat (see Replacing the radiator and Replacing the thermostat). Remove the carburetor (see Replacing the carburetor). Remove the fuel pump (see Replacing the fuel pump). Remove the ignition distributor (see Replacing the ignition distributor). Having sketched the connection order, we disconnect the hoses and wires from the engine, lighten the cylinder block, for which we remove the cylinder head (see Replacing the cylinder head gasket). We remove the generator (see Removing the generator). Remove the starter (see Replacing the starter). Remove the coolant pump (see Replacing the coolant pump). We unscrew the upper or lower nuts securing the engine support cushion (see Replacing the engine support cushion). We unscrew the bolts securing the clutch housing to the engine.
We fasten the cables of the lifting device to the block and lift it. By placing a jack under the gearbox and slightly rocking the block, we disconnect the block and the clutch housing.
We install the cylinder block on the stand. Remove the clutch (see Replacing the pressure plate assembly and clutch release bearing). Remove the pulley, camshaft drive cover, oil pump drive chain and gear (see Replacing the camshaft drive chain). Remove the auxiliary drive shaft (see Replacing the auxiliary drive roller). Remove the flywheel and the rear crankshaft cuff holder (see Replacing the rear crankshaft cuff).
Using a 10mm wrench, unscrew the fourteen bolts securing the oil pan to the cylinder block.
. and remove it along with the sealing gasket.
Using a 14mm socket, unscrew the two nuts securing the connecting rod cover.
. and remove the connecting rod cover.
Using the wooden handle of the hammer against the connecting rod, we push the piston out of the cylinder.
Similarly, remove the remaining three pistons.
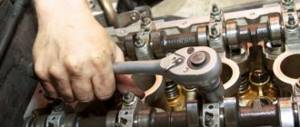
Using a 17mm socket, unscrew the two bolts securing the crankshaft main bearing cover.
In the same way, remove the remaining four main bearing caps. They are marked with marks corresponding to their serial number (count from the toe of the crankshaft). On the last (fifth) cover there are two marks stamped, spaced along the edges.
Marks on the main bearing caps.
We remove the crankshaft.
From the grooves in the bed of the fifth main bearing, we remove two half rings of the crankshaft thrust bearing.
The steel-aluminum liners installed in the beds of the 1st, 2nd, 4th and 5th main bearings have a groove. The shell of the 3rd bearing does not have a groove (similar to the shells installed in the main bearing caps).
We disassemble the crankshaft (see Disassembling the crankshaft). We take out the old main bearing shells. We wash the cylinder block and crankshaft in diesel fuel or kerosene. We blow out their internal cavities and oil channels with compressed air. We wipe the seats of the main bearings with a napkin and install new liners of the appropriate category (nominal or repair). Lubricate the main and connecting rod journals of the crankshaft with engine or transmission oil and install the shaft into the block.
We install the main bearing caps with new bearings of the category corresponding to the crankshaft journals installed in them in accordance with the marks. Tighten the cover fastening bolts with a torque wrench (see Appendices).
Checking the rotation of the crankshaft. It should be light and smooth, without jamming or play. We install new steel-aluminum liners into the lower heads and connecting rod caps (see Replacing the piston).
Crankshaft pulley
The generator and water pump on the VAZ 2106 are driven by a belt from the crankshaft pulley. When carrying out repair work on the engine, attention should also be paid to the condition of the pulley: is there any visible damage (cracks, scuffs, dents). If defects are found, the part should be replaced.
During the installation process, the pulley should sit smoothly on the crankshaft, without distortion. Despite the fact that the pulley fits quite tightly on the shaft, a key is used to prevent rotation, which can also be damaged. A defective part must be replaced.
Crankshaft marks
In order for the engine to work flawlessly, after installing the crankshaft, the correct ignition setting is necessary. There is a special casting on the crankshaft pulley, and on the cylinder block there are three marks (two short and one long) corresponding to the ignition timing. The first two indicate an angle of 5˚ and 10˚, and the long one - 0˚ (TDC).
The mark on the crankshaft pulley is located opposite the length of the marks on the cylinder block. There is also a mark on the camshaft sprocket that must be aligned with the casting on the bearing housing. To rotate the crankshaft, use a special wrench of the appropriate size. According to the marked marks, the piston of the first cylinder is at top dead center, while the slider on the ignition distributor must be installed opposite the contact of the first cylinder.
Replacing the crankshaft oil seal
The main sign of the need to replace the oil seal is contamination of the engine compartment. A breakdown occurs when the seal of the unit is broken, causing lubricant mixed with oil to leak through the damaged oil seal. As a result, when it gets on the rotating parts, the mixture is sprayed throughout the engine compartment.
In particular, a signal that an urgent replacement of the front oil seal liners is necessary is the direct contact of oil on the pulley and its further splashing in the front part of the engine. If oil leaks in the rear oil seal, splashing occurs on the flywheel in the clutch housing. Reasons for replacement:
- natural wear and tear;
- skewed installation, which may cause cracks on the body;
- mechanical damage;
- damage to surface integrity as a result of severe engine overheating;
- marriage.
You can replace crankshaft oil seals yourself; this will not only significantly save time and money spent on repairs in the workshop, but also gain invaluable experience. Replacing the crankshaft oil seal is a standard procedure to ensure optimal engine performance.
Oil seals are a type of cuff that acts as seals on moving parts. It would be most correct to call the crankshaft oil seal a reinforced cuff. Its role in the functioning of the engine is very significant, and therefore any failures in the stable operation of the crankshaft oil seal will lead to undesirable consequences. Even if the degree of its displacement from the standard place is insignificant, oil will begin to leak in the car.
According to statistics, the installation of a new oil seal should be done at least once every 3 years. However, oil seal bearings may need to be replaced much sooner. It all depends on the general condition of the parts and the conditions under which the car is used.