The bumper of a car is an important part that gives it a special appearance and emphasizes its contours. A unique bumper made by yourself also makes the car special, emphasizing the individuality of its owner. This detail is quite difficult to make. However, a little patience and polyurethane foam - and your car will be unique.
Alternative bumper options
Many car enthusiasts do not pay attention to bumpers and other body parts, leaving them as they are. But tuning lovers are constantly looking for new and original solutions. They are tormented by the same question: how to make a car original, stylish and stand out from the crowd?
There are few options regarding the bumper. You can buy a ready-made body kit for your car model and enjoy the new look. Or you can make a bumper with your own hands. This is where imagination, the talent of a sculptor, patience, a standard bumper and a video from the Internet come to the rescue. One of the best and proven materials for making a bumper with your own hands is polyurethane foam.
Power bumper manufacturing technology
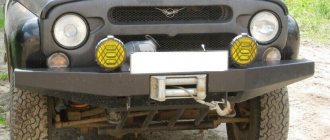
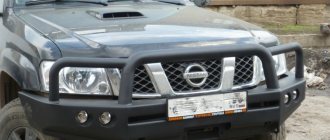
Previous models of car body kits will be able to distinguish your car from the general flow of cars with its appearance and individual design. However, more practical and functional are power bumpers, which are suitable for off-road driving and on our roads. It turns out that making a power bumper with your own hands is also possible; all you need is the ability to use a grinder and a welding machine, as well as a little desire and patience.
For work you will need sheet metal about three millimeters thick and cardboard. Before starting work, it is necessary to make a model of the product from cardboard in the full size of the finished body kit. A cardboard mock-up must be attached to the machine in order to see any inconsistencies or inconsistencies and correct them at this stage of work.
If the workpiece meets your requirements and fits the vehicle, then it can be transferred to metal. Next, the finished pieces of metal need to be shaped by bending them. The individual parts are connected by welding.
Questions may arise when making a rear power body kit if you want to make it from a single piece of metal. Not all metal warehouses sell large sheet metal. Another problematic point is that it is very difficult to bend a large sheet of metal at the correct angle. You will need a special power unit that can do this. If you do not have the opportunity to get it, you can make a bumper from pieces by welding. And also to increase the protection of the car and improve its appearance, you can weld a do-it-yourself guard using a similar method. It uses both round pipes and regular profile pipes. It all depends on the flight of your imagination and the availability of materials.
The final stage of work will be grouting the joints and painting the finished product.
Advantages of a foam-based bumper
Using polyurethane foam to make a unique bumper has its advantages:
- Polyurethane foam is a relatively inexpensive material
- It fills all cavities and accurately follows the contours of the original bumper
- The foam hardens quickly and is easy to process
- It is also quite easy to remove the foam at the final stage of making the bumper yourself
In addition to polyurethane foam, to make a bumper with your own hands, you will need some tools and other materials.
Necessary set of tools and consumables
So, what do you need to make a unique bumper with your own hands? The list of tools and materials is approximately as follows:
- 3-5 cylinders of polyurethane foam;
- special foam gun;
- masking tape;
- epoxy resin;
- fiberglass;
- culinary foil;
- sharp stationery knife with replaceable blades;
- sandpaper of different grain sizes;
- automotive putty.
In addition, you should prepare your workplace. This can be a regular table, which can be accessed from all sides for more convenient work. Good lighting will not hurt, as the work is artistic and requires attention to detail.
We make it ourselves
If you have previously had to deal with epoxy glue and the technology for its use, then making your own front bumper lip will not be difficult for you.
For ease of use, I recommend removing the bumper from the car. This will allow you to perform all necessary operations efficiently and comfortably. The lip is made from ordinary polyurethane foam or polystyrene foam, followed by gluing with fiberglass in several layers (usually 2–3 layers). To securely attach the lips to the bumper, I recommend carefully sanding the places on the bumper where they will be attached to each other.
Preparation of the base and sketch
Making the part yourself begins with dismantling the bumper. It will serve as the basis for something new. You can make this part without a template, however, such an operation requires experience. Using the old original bumper will make it easier to shape, guess with symmetry and not miss important details that relate to fastening.
The removed bumper is covered with masking tape from the inside in several layers. This will facilitate easy separation of the hardened foam from the template. It is also quite convenient to use masking tape to mark future bumper parts. After pasting, foam is applied in an even layer. A spray foam gun will be indispensable for this. At this stage, care should be taken not to apply too much material, since a thick layer of unnecessary foam will take quite a long time to dry.
After applying the foam, it is necessary to more accurately determine the details of the future bumper. You can draw on a piece of paper all the details in the form of a radiator grille, holes for daytime running lights and other little things.
Once everything is ready and the foam has hardened, you can proceed to the next stage. It usually takes at least 24 hours for the foam to harden. It all depends on the thickness of the layer and the ambient temperature.
How to Make a DIY Bumper From Foam
Amazing Customization Thought: Making a Bumper from Regular Foam
Bumper
The car is the main detail that gives it a special look and emphasizes its contours. A unique bumper, made independently, also makes the car special, emphasizing the uniqueness of its owner. It's hard to do this part. But a little patience and foam. and your car will be unique.
Alternative bumpers
Most motorists do not pay attention to bumpers and other body parts, leaving them as they are. However, tuning enthusiasts are constantly looking for new and unique solutions. They are tormented by the same question: how to make a car unusual, stylish and stand out from the crowd?
There are several bumper options. Buy a ready-made body kit for your car model and enjoy the new look. You can make a bumper at home. Fantasy, architectural talent, patience, a standard bumper and videos from the Internet will help you solve this problem. One of the best and proven materials for production. own bumper
foam installation force.
Benefits of foam based
application polyurethane foam Manufacturing a unique bumper has its advantages:
- Polyurethane foam is a relatively cheap material
- It fills our client's cavity and accurately follows the contours of an unusual bumper
- The foam hardens quickly and is easy to process
- It is also quite easy to remove the foam yourself at the last stage of the bumper
READ How to Start a BMW If the Battery is Dead
also polyurethane foam
Some tools and other materials will be useful for making a bumper at home.
Requires a set of tools and accessories
What else is needed to make a unique bumper yourself? The list of tools and materials is as follows:
- 3-5 polyurethane foam cylinders;
- special foam;
- insulating tape;
- epoxy resin;
- fiberglass;
- culinary foil;
- sharp stationery knife with replaceable blades;
- sandpaper of different grains;
- auto putty.
Workplaces must also be prepared. You'll love this more standard desk that can be accessed from all sides for a more comfortable work experience. Good lighting can't hurt because a piece of art requires attention to detail.
Excretion of the primary bumper form
Continuing with the BMW type configuration, in this part I will draw a form to create the bumpers
, I'll show you.
Make your own bumper? made of foam “4×4 auto news”
Keep moving do
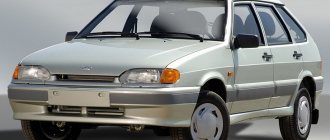
VAZ 2110. Let's face it. Project on disk2:
Preparing the base and sketch
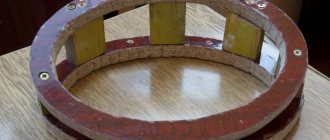
The production of parts in artisanal conditions begins with disassembling the bumper. This will serve as the basis for something new. They make this part without a template, but this operation requires experience. It will be easier to mold an old unusual bumper, guess the symmetry, so as not to miss the fundamental fastening details.
READ How to Make an Air Conditioner in a Car With Your Hands
The removed bumper is covered on the inside with several layers of masking tape. This will make it easier to release the cured foam from the template. It is also convenient to mark future bumper parts on the ink tape. When the shape of the future product improves, begin using the base material. fiberglass. the mythical material, combined with the resin, hardens and the product is quite tough and durable. Before applying fiberglass, the bumper is glued with cooking foil. This will make it easier to remove hardened foam and prevent it from being destroyed by corrosive material. If you don't have foil, you can use plain paper.
You can draw all the details on a piece of paper in the form of the radiator grille, daylight vents and other small details.
If there is still work to be done for our client and the foam has hardened, we move on to the next step. Usually the foam takes no more than two hours. It all depends on the thickness of the layer and the ambient temperature.
Molding parts
Here you need to carefully separate the workpiece from the old bumper, which served as a template. Do it
Simple enough, but it doesn't hurt to be careful because the tempered
foam quite fragile.
After using a stationary knife in the branch, through its use it is necessary to give the workpiece the desired shape. This is a useful talent of an artist. It is difficult to work out small details, because in addition to the correct shape, they must be symmetrical. If at this stage your hand , and how to choose additional material, then there is an opportunity to correct the situation with putty.
READ Soundproofing Doors of VAZ 2114 Do It Yourself
When cutting with a knife, you need to sand the piece with sandpaper. The more subtle the process, the less work will be done in the future. After sanding and removing the appropriate shape, the baked bumper is sealed with putty. Here our client has flaws that were made when cutting with a knife. The putty layer is also sanded with sandpaper, uniformly reducing the grain size.
Fiberglass cover
After gluing, the foam is applied evenly. In this regard, a foam gun will be indispensable. At this stage, try not to apply a lot of material, because a thick layer of unnecessary foam will take a long time to dry. After applying the foam, the details of the future bumper should be more precisely defined.
As a last resort, you can apply resin and foam with some caution.
After preliminary work, resin is applied to the workpiece. The first layer of pre-cut fiberglass is laid on top of the resin. Fiberglass is flattened with rubber, which is called a plastic scraper. At this stage it is important to ensure an even fit of the fiberglass. The formation of air bubbles and wrinkles should be avoided as much as possible.
Source
Shaping the part
At this stage, it is necessary to carefully separate the resulting workpiece from the old bumper, which served as a template. This is quite easy to do, however, caution will not hurt, since the hardened foam is quite fragile.
After separation, a stationery knife is used, with its help you need to give the workpiece the desired shape. This is where the talent of an artist is needed. It is quite difficult to work out small details, since in addition to the correct shape it is necessary to maintain symmetry. If at this stage your hand trembles and the knife picks out excess material, then you can correct the situation with putty.
After cutting with a knife, you need to sand the part with sandpaper. The more accurately this process is done, the less work there will be in the future. After sanding and obtaining the desired shape, the newly made bumper is sealed with putty. At this stage, all the flaws that were made when cutting with a knife are eliminated. The putty layer is also sanded with sandpaper, gradually reducing its grain size.
Bumper tuning using polyurethane foam
You can make a tuning bumper yourself using polyurethane foam as follows:
Bumper tuning using polyurethane foam
- The body kit must be removed from the vehicle and washed thoroughly with a special detergent, since ordinary water may not be effective enough.
- Creating a new bumper involves thoroughly drying the old body kit and degreasing it. Once this is done, it can be reinstalled directly onto the vehicle. It is important to understand that you need to provide all the gaps for the shape of the bumper that should be obtained in the end.
- Any changes to the bumper using polyurethane foam require appropriate protection of other parts of the car. That is why they need to be covered with film or masking tape.
- Next, the front bumper is filled with foam. It is necessary to take into account the period of its hardening. As a rule, if a large amount of material is used, it is about 3 days. When tuning a body kit using polyurethane foam, you need to be as careful as possible so that it does not get into important components of the vehicle or onto its body.
If the layer of material is too large, experts recommend making some kind of reinforcement. To do this, you need to make a simple wire frame, placing it in those places of the front bumper that need to be strengthened. Polyurethane foam should be gradually poured on top.
- As soon as the material hardens, it is necessary to begin the process of cutting out the body kit of the required shape. In order to ensure symmetry, you should use pre-prepared patterns. The shape of the future bumper should be such that when using the car on the very first day, this part will not be damaged.
- The polyurethane foam structure must be covered with thick paper on top. Once this layer is dry, fiberglass must be used. Epoxy resin must be used as an adhesive for gluing it. Fiberglass should be applied in several layers. The last of them needs to be treated with aluminum powder. This will help make subsequent processing of the structure easier to perform.
Finally, when making a bumper with your own hands, you need to process it using sandpaper. Its grain should be gradually reduced to 240. It is from this stage of work that depends on how reliably and efficiently the paint will be applied to the surface.
Bumper surfaces can be painted using various types of material depending on the preferences of the vehicle owner. As soon as they dry, we can conclude that tuning is complete.