We also recommend reading the article by our specialist, in which he talks in detail about how to grind in valves.
Operating principles of engine valves
The camshaft and crankshaft of the engine are connected to each other via a gear, belt or chain drive, with an optimal ratio of 2:1. For one revolution of the distribution element, the crankshaft makes two revolutions. The shape of the camshaft cams is able to ensure that the valves close and open so that they correspond to the position of the crankshaft, the engine stroke, and the distribution phases.
During engine operation, all parts increase slightly in size due to slight heating. As a result, the overall distance between the camshaft and the valve lifter changes. When the engine warms up to optimal operating temperature, the pushrod is pressed tightly against the valve and camshaft. This ensures the most efficient operation of the engine.
If the end of a closed valve is fixed in a position above the pushrod, a gap is formed between the seat and the plate, reducing engine compression. If the end of a fully closed valve is located below the pushrod, during the corresponding valve timing phase it will open slightly less than necessary. As a result, the engine power will be reduced, since the less the valve is open, the worse air and exhaust gases will escape through it.
Valve adjustment on Alpha:
Thank you! I finally found an article where everything was explained in detail about valve adjustment, and I learned a lot of useful things for myself.
The exhaust valve requires different clearances.
Thank you for your comment. I checked the instructions for my moped: yes, indeed the gap is 0.03 mm for the intake valve and 0.05 mm for the exhaust valve. Corrected the article.
the authors made me laugh))))) first write that “By and large, it is not necessary to clearly combine these marks, because both valves close already at the beginning of the compression stroke and do not open until almost the end of the power stroke, that is, at least half a turn the valves are closed.”, and then write the standard instruction “4. By rotating the crankshaft, we align the mark on the head sprocket with the mark on the head body. ..." IMHO it is necessary to set marks in any case to prevent the timing chain from being pulled out
What's so funny? I wrote that there is no point in looking at the mark on the crankshaft; it is enough to align the mark on the head to be sure that the valves are closed. And by half a revolution I mean crankshaft revolutions. I don’t argue that it is sometimes necessary to check whether the crankshaft marks match, especially when there are problems with the engine’s operation. But this has nothing to do with valve adjustment.
Timofey, you are right….that’s what marks exist for, to tune in to them.
These marks are needed to check and correctly install the timing chain. If, when adjusting the valves, you accidentally slightly overshoot the mark, it’s not a big deal. This was exactly the point of the paragraph about marks.
Timofey, you are right….that’s what marks exist for, to tune in to them.
Why are valve clearances necessary?
Answering the question why engine clearances are needed, it can be noted that for normal operation of the motor, the thermal gap is quite important. Due to it, the closing and opening times of the valves are observed, and the preservation of the optimal level of tightness when closed is ensured.
If the gaps are set in accordance with the rules, after warming up their parameters are reduced to minimum values. This ensures regulation of gas distribution phases and long service life of parts.
During the operation of the car, the gap changes up or down. Depending on such deviations, certain problems appear. In most cases, this leads to a decrease in the service life of the valves, a decrease in the engine power level, the filling of the cylinders with the fuel and air mixture becomes worse, the overall combustion efficiency decreases, and so on. It is for this reason that it is so important to adjust the gaps from time to time.
It is necessary to check and, if necessary, adjust the gaps every 20 - 30 thousand kilometers. You need to rely on the standards prescribed in the repair manual for a car of a particular brand.
Adjustment of valves
Setting the valve clearances on a scooter is not a difficult job, especially when there are instructions. To get started, you will need a set of probes, open-end wrenches, sockets and a socket wrench with a square (usually a 3.5 wrench). That's all you need for the repair. If you don’t have something, borrow it from a neighbor or buy it. They will still be useful to you in the near future after the next 4k km run. The set of necessary tools depends on the scooter itself, but you can also use existing tools. We will use pliers, a Phillips screwdriver, wrench heads for 8, 9 and 13. We will also take a feeler gauge to set the valve clearance, we need 0.05 and 0.1 mm.
Adjustment Tips
It is best to adjust the valve clearances on a 4t scooter in the morning, if it is summer outside. Because the scooter must be cold. But it should not be frozen, so in winter it is advisable to warm it up a little. As a rule, in most mopeds the timing design is very simple and has only one distributor shaft in the engine head. With this design, the valves are adjusted using screws. It is for them that a spanner wrench with a square is needed. These screws are screwed into the end of the rocker arms and press against the end of the valve stems. This small distance between the end of the adjusting screw and the end of the valve stem is the thermal clearance of the valve.
Valve adjustment is necessary if:
- The moped has traveled 4000 km or more since the previous regulation.
- Extraneous noise is heard from the engine (knocking, ringing).
- It's very difficult to gain momentum.
- It's difficult to start a moped.
- If the moped does start, it constantly stalls.
How to ensure the required clearance
The required clearance can only be obtained through properly carried out adjustment work. When carrying out this process, the main gas distribution mechanism is adjusted, especially the gap located between the camshaft cams and the valve lever.
There are special instructions on how to make the adjustment. It is not enough to ensure that the valves are pressed more tightly, since as the temperature rises, all parts become larger in size. Such an expansion automatically leads to various negative consequences.
The intake and exhaust valves should close the seat tightly, but with a small gap. It is necessary to ensure that the valve stem does not rest rigidly on the top of the device.
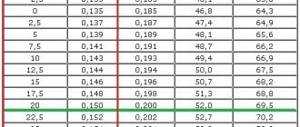
In the process of self-regulating gaps, you need to strive for strictly established values. They should not be more than 0.15 mm. The maximum permissible error level is 0.05 mm. These parameters should be checked only with a cold engine.
By ensuring the correct clearances during the adjustment process, the driver will receive stable engine operation, significant fuel savings, and increased service life.
Do-it-yourself adjustment of engine valve clearances of a VAZ 2107 car
Adjusting the VAZ 2107 valve clearances with your own hands is one of the procedures that any car owner should remember.
Every part that is inside a machine is subject to the basic laws of physics. For example, metals have the property of thermal expansion of bodies. This should take into account not only the adjustment order, but also the process of creating the engine itself. But few people understand why this is necessary when it comes to adjusting the gap that appears between the cam and the valve lever on the camshaft.
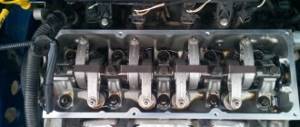
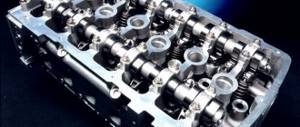
All valve mechanism parts.
1 — valve; 2 — retaining ring; 3 — guide sleeve; 4 — oil deflector cap; 5 — outer spring support washer; 6 — inner spring support washer; 7 — inner spring; 8 — outer spring; 9 — spring plate; 10 — crackers; 11 — valve drive lever; 12 — lever spring; 13 — adjusting bolt; 14 — lock nut of the adjusting bolt; 15 — bushing of the adjusting bolt; 16 — locking plate of the lever spring.
The valve and other parts become constantly hot during operation. Expansion occurs precisely because the temperature at some point becomes too high. The end of the neck will rest against the pusher part if there is no thermal gap. The nest will remain slightly open, which will lead to a certain decrease in power indicators.
Other serious consequences of this situation: violation of settings in the gas distribution mechanism, excessive fuel consumption. In this case, the carburetor also suffers.
The cylinder for the intake of fuel mixture or exhaust will not open fully due to the valve head if there is too much clearance. Therefore, adjusting the engine valve clearances becomes a necessity. Otherwise, performance characteristics will improve. The minimum change in dimensions is 0.15 millimeters for any part.
The description of the adjustment often involves the use of a special probe.
Its diameter is selected depending on the indicators mentioned above.
Need for adjustment
Technical inspections are often postponed indefinitely, especially by inexperienced owners of the VAZ 21074 and other cars. Usually they refer to the fact that the engine operates stably for a long time. But the temperature is constantly changing, which always affects the parts inside the vehicles.
The need to adjust the valves is determined by the behavior of the VAZ 2107 power unit.
There are several situations when valve maintenance may be necessary:
- Fuel consumption has increased significantly.
- The motor has lost power.
- After the last adjustment, the mileage exceeds 15 thousand kilometers.
- A characteristic noise appeared in the area of the cylinder head cover.
- The timing belt repair is being carried out, even the smallest one.
Many modern cars have a hydraulic compensator, making instructions for adjusting the valves unnecessary. But this rule does not apply to those who drive classic VAZ cars.
Preparatory stage
Preparation is an important step in any job. The procedure for adjusting valves is no exception. Otherwise, it will be impossible to achieve the goal you have set for yourself. Usually preparations consist of two stages:
- Devices and tools are being prepared;
- Then they move on to a gas/gas car.
Before carrying out repairs of any kind, the car must be washed - every motorist must also follow this rule. The valve adjustment diagram/table assumes that not only the external, but also the internal parts of the vehicle are cleaned.
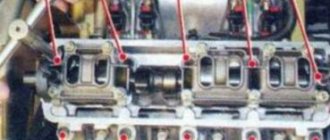
Set of tools for adjusting valves of VAZ 2107.
- You need a flat area with good lighting where the machine itself can be placed.
- The rack for adjusting the valve is taken later, first the parking brake is used to fix the position of the wheels.
- Quick valve adjustment requires turning on the ignition, after which the key is removed.
- If the existing lighting is not enough, you need to install the required number of additional sources.
- A 0.15 mm thick probe and a set with wrenches are being prepared.
- Why adjust valves? This has already been discussed earlier. We need to remove the cylinder head cover, as well as the air filter housing.
Signs and consequences of improper clearance
After starting the engine, it itself and all its parts begin to heat up significantly and automatically expand. It is also worth taking into account the natural wear and tear of the elements in contact with each other. All this is the basis for ensuring strictly established gaps between certain parts. Deviations from the norm can lead to certain problems. The list of them depends on which direction the gaps have changed - more or less.
Gap too big
If the gap is larger than the required size, the driver will begin to hear the characteristic clatter of the engine, which gradually goes away as the car warms up. With increased clearance, the camshaft fist does not push through the rocker of the valve stem, but simply begins to knock on it.
Such long-term shock load leads to such unpleasant consequences as:
- significant reduction in valve life;
- riveting;
- chipping of the end, which further increases the gap;
- increased noise during engine operation.
At the same time, engine power decreases due to serious disruption of gas distribution processes.
Gap too small
With a very small gap, the car engine will not be able to fully realize its functionality. This will automatically affect the overall speed and dynamic characteristics of the vehicle. At the same time, there will be significant overheating of all exhaust valves with melting of their edges. Among the main consequences of a reduced gap size are the following factors, based on the loss of combustion chamber tightness:
- Reducing compression due to the release of the air-fuel mixture.
- During the working stroke, exhaust and hot gases break through and lead to severe burnout of the valves.
- The plates no longer touch the seats, which disrupts heat transfer.
- The valves are heated to temperatures that significantly increase corrosion and oxidation.
- Increased load on timing belts.
Based on everything said above, we can conclude that adjusting the gaps must be done without fail. The process must be carried out if the following signs are present:
- in the upper part of the cylinder head of installed cylinders there is an extraneous, slightly ringing noise;
- repair of the gas distribution mechanism;
- the adjustment was made more than 20 thousand kilometers ago;
- a clear decrease in engine output;
- increased fuel consumption.
The engines of modern cars are designed in such a way that thermal clearances must be adjusted manually. For some it may seem simple, while others consider this process serious and responsible. It all depends on the driver’s experience, the availability of certain skills and tools. Moreover, there is no difference between diesel and gasoline engines. The adjustment process is carried out here according to the same scheme.
It is advisable to combine the adjustment with an oil change. This will prevent dirt, sand and dust from getting into the engine.
Gap measurement
Determining and checking which valve clearances are present should be carried out exclusively on a cold engine.
To carry out this operation, you will need to prepare a dipstick and other additional tools, the choice of which depends on the category of the valve pusher. This can be a spanner or open-end wrench, a hammer, a micrometer or a puller. The processes involved in measuring gaps are carried out in different ways.
To measure the thermal clearance on a pushrod with a special screw adjustment, the crankshaft must be rotated so that its cam is directed in the opposite direction from the pushrod. Next, you need to lightly hit the pusher with a hammer and swing it slightly to the sides with your hands. Using a feeler gauge, the gap between the valve and the pusher is measured, and then checked with the value specified in the car’s operating instructions.
To measure the thermal gap on a motor with shim adjustment, the crankshaft must be rotated so that the cam of the selected valve points upward. Using a probe, measurements are taken and also compared with the indicators in the car’s instructions.
If, as a result of the measurements taken, it becomes clear that the indicators are deviated from the norm, adjustment will be required.
Adjusting valve clearances
The adjustment process is carried out through several stages. Particular attention is paid to preparatory work aimed at preparing the premises and the car. Each process is worth considering in more detail.
Additionally, we recommend reading the article by our specialist, which describes in detail how the VAZ-2106 valves are adjusted.
Preparation
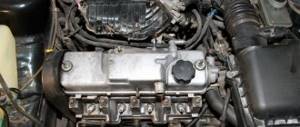
Before you begin adjustment work, you need to thoroughly clean and wash the vehicle body. It is important to completely remove dust and dirt from the engine compartment. This is necessary to ensure that nothing unnecessary gets into the engine after the cylinder head cover is removed.
After this, place the car on the most flat surface possible, carefully tighten the parking brake and be sure to place special supports under the wheels. It is advisable to ensure that the room where work is carried out is provided with uniform and moderately bright lighting.
It is equally important to prepare the tools necessary for adjustment:
- set of wrenches;
- screwdrivers;
- special measuring probe;
- tweezers;
- micrometer;
- set of adjusting washers;
- device for adjusting valves.
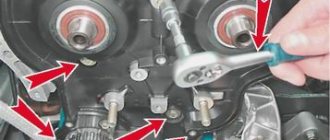
Another important criterion for preparatory work is the mandatory removal of the cylinder head. During the process of installing the cylinder head on a car and during broaching, there is a possibility that the gaps will shift towards plus or minus. It is for this reason that you need to play it safe and double-check again.
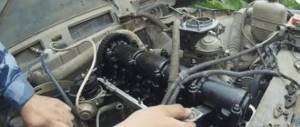
Adjustment using a feeler gauge
This method of changing the gap indicators is carried out using a feeler gauge. On modern cars, valve shims are used for this procedure. The sequence of actions here is as follows:
- It is necessary to unhook the valve tubes and covers, as well as the cables that lead to the damper drives, and dismantle the air filter housing. You can unscrew the spark plugs to make the crankshaft turn easier.
- Two nuts are unscrewed, the cover is removed, and the remaining car oil is removed from the top part.
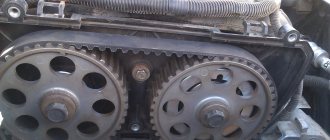
- The timing belt cover is removed.
- The piston of the cylinder, where the regulation process will begin, is set to the highest compression point. To obtain more accurate results, you can rely on the marks applied by the manufacturer.
- The crankshaft rotates along the sprocket and strictly clockwise. In order for the adjustment to be carried out as correctly as possible, you need to ensure that the marks on the bearing housing and on the crankshaft completely coincide.
- On the screw that is used to set the gap, the lock nut should be loosened. In this case, the gap is set so that the flat feeler gauge is the maximum bolt turn. As soon as the locknut is tightened, you need to check the correctness of the indicators, since if they are tightened too much, they may move.
This process is carried out with all other valves.
Adjustment using rack and indicator
To adjust the automotive thermal gap, a special rail is often used, along with an indicator. These devices allow you to achieve maximum accuracy, which cannot be obtained with the method described above. The order of work here is as follows:
- after carrying out the preparatory work and removing the valve covers, the engine must be turned until the marks on the camshaft gear and the marks on the housing coincide;
- You need to put your icons on the back of the built-in gear with a marker. This must be done every 90 degrees, relative to the mark set by the manufacturer;
- using three bolts you need to fix the rack on the protrusion of the block of installed bearings;
- You need to insert a dial indicator into a special slot on the bar. In this case, the scale should be set to zero;
- Using a special device, take the cam and pull it up a little. In a normal situation, the indicator needle will move by approximately 50 - 52 divisions.
If, as a result of the measures taken, the obtained parameters are slightly different, you will need to make adjustments using the method described above.
At the end of the adjustment process associated with setting the clearances in the valve mechanism, you need to start the engine and listen to how it operates in different modes. If the manipulation was carried out after the head was restored, it is necessary to ensure that the valves are properly ground in.
Valve adjustment on Alpha
I want to touch on an interesting topic that everyone has heard about, but not everyone understands its essence - let's talk about valve adjustment.
A little theory.
First, a little theory. Where did the need to adjust the valves come from and why is the thermal gap needed?
Any four-stroke engine has at least two valves: an intake valve, through which the working mixture enters the combustion chamber, and an exhaust valve, through which exhaust gases exit. Part of the valve is constantly located in the combustion chamber and therefore the valve becomes very hot. And as we know from school physics courses, bodies expand when heated. Moreover, the stronger the heating, the greater the expansion.
The valves in the engine are always in a “spring-loaded” state, while the valve plate is pressed very tightly to its seat - the valve seat, this ensures the tightness of the valve closure.
To open the valve, you need to press on it. In our case, the valve is pressed by a rocker arm, which moves under the influence of the camshaft cam.
Now let’s imagine that the engine is cold (it stood for several hours and all the parts cooled down to “room” temperature). If you start the engine, the valves will begin to heat up quickly and, as a result, lengthen. If you do not leave it room for expansion (the gap between the rocker arm and the valve stem), then the moment will come when the valve will elongate so much that it will not fit tightly to its seat and will begin to leak gases from the combustion chamber. This leads to a loss of engine power and can also lead to overheating and burnt valves.
For this reason, a gap is left between the valve and the rocker arm. Engine manufacturers calculate how much the valve lengthens when the engine is running and give the value of this gap in the operating instructions. Thus, at the operating temperature of the valve, the gap will be minimal, so that the valve can close completely, but at the same time the rocker arm would be almost close and the valve would open as wide as possible and there would be no impact (“clattering”) of the rocker arm on the valve.
IMPORTANT: the gaps are set on a cold engine , when the valve has not yet had time to lengthen.
What happens if the valves are adjusted incorrectly?
Very often on various forums questions are asked: “What will happen if the valves are adjusted incorrectly?” There are two possible options:
- If the gap is too large, this is the most harmless option. If the gap is too large, then the valve shank and rocker arm will wear out more, since the rocker arm will hit the valve with a running start. The valve opening height will decrease slightly, due to this the filling of the combustion chamber will deteriorate, and the engine efficiency will drop, but these changes are hardly noticeable. The engine sound will also be stronger and a characteristic clattering sound will appear. In general, engine operation will not be affected.
- If the gap is too small, when the valve heats up, it will “press” against the rocker arm and the valve will no longer fit tightly to the seat. The fuel-air mixture and exhaust gases will escape through the resulting gap. The release of exhaust gases will cause the valve to overheat and burn out. Engine compression will drop and, as a result, efficiency.
Thus, a gap that is too small is much more dangerous than a gap that is too large. It is for this reason that it is not recommended to set the gaps “by ear” without using feeler gauges, because if there is a feeler gauge between the rocker arm and the valve, there will be a gap between the rocker arm and the valve, unless of course you clamp it with great force.
Why combine tags?
The valves must be adjusted in a position where the rocker arm does not press on the valve stem, that is, the valve is closed. When a four-stroke engine is running, both valves are closed at the end of the compression stroke, so for ease of adjustment, align the mark on the camshaft sprocket with the mark on the head housing. This position corresponds to the top dead center - the end of the “compression” stroke and the beginning of the “power stroke” and both valves are closed at this moment and can be adjusted.
By and large, it is not necessary to clearly combine these marks, because both valves close already at the beginning of the compression stroke and do not open until almost the end of the power stroke, that is, the valves are closed at least half a revolution. That is, there is nothing to worry about if you “overshoot” the mark a little, or if you don’t reach it a little (within reasonable limits, of course).
For some reason, some “craftsmen” in their video instructions combine the “T” mark on the crankshaft flywheel (apparently because it is there). To adjust the valves, this is not at all necessary, because for one revolution of the camshaft, the crankshaft makes two revolutions, and the mark will coincide twice: once at the end of the compression stroke, and the second time at the end of the exhaust stroke (when the exhaust valve is still open and the intake valve is preparing to open).
What should the valve clearance be on an Alpha?
The intake valve clearance on most engines is usually less than the exhaust valve clearance. This is due to the fact that the intake valves heat up less due to their cooling by fresh air flows.
The thermal clearance of the intake valve for the 139FMB engine is 0.03 mm. The exhaust valve must have a clearance of 0.05 mm.
From theory to practice.
It's actually quite simple:
- The engine must be cold. If not, wait a couple of hours for it to cool down to “room” temperature.
- Place the moped on the center stand. Turn off the ignition (so as not to accidentally start the engine).
- Unscrew the side cover of the engine head. It is better to stock up on a spare gasket, since the gasket usually breaks when removing this cover. Or you can put it on a heat-resistant sealant.
- By rotating the crankshaft, we align the mark on the head sprocket with the mark on the head body. The crankshaft can be turned either with the kickstarter leg (but this is inconvenient, since the kick is on the right side of the moped, and the mark is on the left). You can unscrew the plug on the generator cover and rotate the crankshaft through it by putting the “head” on the nut securing the generator rotor. To make it easier to rotate the crankshaft, you can unscrew the spark plug.
- Using a 17 wrench, unscrew the head plugs intended for adjusting the valves. One cover is on top, the second is on the bottom.
- Unscrew the lock nut of the adjusting screw with a 9mm wrench and slightly unscrew the adjusting screw.
- We take a flat feeler gauge (0.03 mm for the intake valve or 0.05 mm for the exhaust valve) and insert it between the valve stem and the adjusting screw.
- Carefully tighten the adjusting screw so that the probe moves with slight resistance, but does not “bite”.
- Holding the adjusting screw, tighten the locknut and check that the gap has not changed.
- We perform a similar operation with the second valve.
- We put everything back together and start the engine to check that everything is done correctly and there are no oil leaks anywhere.