Preparation for repair and dismantling of the device
The starter unit on domestic “sevens” is a four-lane electric motor equipped with four currents. This unit is a DC motor. If it breaks, the crankshaft of the power unit will not be able to turn when trying to start the engine.
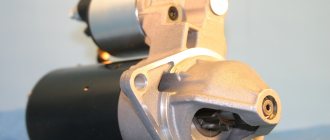
Design of the starter device model 4216.3708-02 for VAZ-2107
Mechanism design 4216.3708-02:
- 1 — front protective cover of the device;
- 2 - sealing element, designed to protect the unit from moisture and dust entering the structure;
- 3 — overrunning clutch, equipped with a drive gear;
- 4 — the drive lever itself;
- 5 - partition separating the two components of the mechanism;
- 6 — tie rod;
- 7 - rod;
- 8 — mechanism retractor relay;
- 9 — washers intended for adjustment;
- 10 — anchor device pulley casing;
- 11 — lock washer;
- 12 — rear protective cover made of metal;
- 13 — brush mechanism holder;
- 14 — housing in which the stator device is installed;
- 15 — anchor assembly of the mechanism;
- 16 — axis on which the lever device of the drive unit is mounted;
- 17 — retaining metal ring;
- 18 — sealing element made in the form of a ring;
- 19 - limiter, made in the form of a ring and designed to limit the travel of the gear.
Design of the starter device for the “seven” 57722.3708
Main structural elements of the model 5722.3708:
- 1 - nuts, used to secure the back cover of the mechanism to the main part of the device;
- 2 — back cover of the unit, made of metal;
- 3 - bolts used to fix the brush mechanism;
- 4 — spring elements for brushes;
- 5 - brush mechanism itself;
- 6 — stator unit, equipped with magnetic elements;
- 7 — anchor device;
- 8 — thrust washer;
- 9 — anchor mechanism pulley support;
- 10 — central gear of the gearbox;
- 11 — planetary gears of the reduction mechanism;
- 12 — main shaft of the drive unit;
- 13 - external gear of the reduction device, equipped with internal teeth;
- 14 - a sealing element made in the form of a ring is used to prevent the negative impact of water and dust on the design of the device;
- 15 — drive mechanism pulley support;
- 16 — thrust washer;
- 17 — locking element for the drive pulley, made in the form of a ring;
- 18 - another locking component, only intended for the lever of the drive unit;
- 19 — washer;
- 20 — drive unit lever coupling;
- 21 — lever support;
- 22 — lever of the drive device;
- 23 — the drive unit itself;
- 24 — element for limiting the travel of the drive unit, made in the form of a ring;
- 25 — locking ring of the limiting element;
- 26 — mechanism retractor relay;
- 27 - bolts used to fix the solenoid relay of the device;
- 28 — return spring element;
- 29 — core of the retractor relay mechanism;
- 30 — protective cover of the mechanism, installed at the front;
- 31 — tie rods of the device.
Regardless of the device model, the unit is mounted in the engine compartment. The starter mechanism can be seen to the right of the cylinder block of the power unit. It is fixed in the seat using three screws and mounted on the clutch system housing.
It is more convenient to carry out work in a specially equipped room - a garage box. The VAZ 2107 is installed above the inspection hole; for repair and restoration operations, a set of wrenches, a set of heads with a wrench and a device for pressing out the bearing are required. In the event of a malfunction of several other components in addition to the bendix, it makes sense to replace the starter assembly. On a car where there is an injector in the power supply system, repair work is best carried out from below.
The procedure for dismantling the starter on a VAZ 2107 car is as follows:
- Disconnect the battery and remove it from the engine compartment.
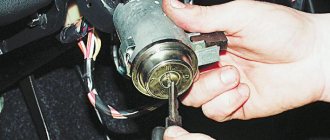
- We unscrew the terminal and disconnect the terminal and the wire that supplies power to the starter.
- We unscrew the bolts securing the device that ensures engine starting.
- We remove the unit complete with the bendix feed mechanism from the hole in the housing.
On a VAZ 2107 car, an engine with an injector installed will require a number of additional operations. In this case, replacing the faulty unit is only possible from below. To gain access to the assembly, you need to remove the steel protection and boots covering the engine compartment from below. The remaining operations carried out on the starter are carried out similarly to those described.
Checking the VAZ 2107 starter
After removing the starter from the car, we disassemble it and inspect the components. Particular attention is paid to the condition of the bendix and sliding bearing bushings; the housing must be disassembled for inspection. Carefully remove the brushes from their sockets and clean the commutator of dirt. We assemble the device and check its functionality using the battery.
Installation of the VAZ 2107 engine starting mechanism is carried out in the reverse order of removal. If during testing it is revealed that the starter cannot be restored, it is replaced with a new one. If an injector is installed on the car, after connecting the battery, it will take some time to create the necessary pressure in the gas line. The engine should be started only after the pump has stopped running.
In the "seven", as in most cars, the starter is located at the bottom of the engine near the gearbox. Work to replace the starter must be carried out on a pit or a lift in order to have free access to the mounting bolts and power supply terminals. Actually, the only problem when dismantling/installing the starter is its inconvenient location. The work does not require special tools or training.
Disconnect the battery terminals (you can remove the battery, it will be easier to work without it).
Remove the dirt shield if it is installed at the bottom of the engine compartment.
Unscrew the fastenings of the wiring harness that go to the starter.
Unscrew the nuts and disconnect the control and power wires from the traction relay.
Unscrew the two upper and one lower fastening bolts (One of the upper ones is located extremely inconveniently, so some “masters” do not put it in place after unscrewing it. This weakens the fastening and can lead to breakage under conditions of dynamic loads and vibrations on the unit) .
Remove the starter by lifting it down under the car.
After this, you can check the functionality of the starter and, if necessary, repair or replace it.
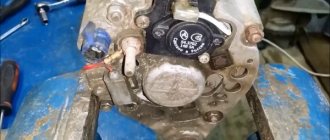
Before checking the starter, it is necessary to thoroughly clean it of dirt. Then you should make sure that the traction relay is working. To do this, you need to apply “minus” to the starter housing and “50” to the terminal. A working retractor (traction) relay will push the starter gear forward, and a characteristic click will occur. If the relay is working properly, you need to check the starter windings using a multimeter.
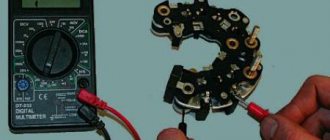
To access the winding, the brush assembly must be removed. The check is carried out in two stages:
- Check for short circuit. Connect one probe to the body, and touch the winding terminals in series with the second. If the winding is not closed, the resistance must be at least 10 kOhm.
- Check for a break. Connect the probes of the device to the terminals of the windings. In case of a break, the multimeter will show “infinity”.
Next you need to check the armature winding. If the armature is not closed, the resistance between the housing and the contact plates should be above 10 kOhm.
If the VAZ 2107 starter (carburetor, injector) has shorted or broken windings, it needs to be replaced. It is practically impossible to rewind the winding in a workshop.
The work of installing a starter is not difficult, but it is extremely responsible. Therefore, before installation, it is necessary to carry out a visual inspection, check the equipment, make sure that the starter is working, and that the starter centering sleeve is present.
Place the starter in its original place and fasten it with the longest bolt, then with a pair of shorter ones.
Tighten the bolts.
Install the power and control wires, tighten the terminal fastening nuts.
Screw on the starter wiring harness support.
Install the battery and connect the terminals to it.
Install (if equipped) a mudguard.
Advice: to make it easier to remove and install the VAZ 2107 starter, before starting work, you should remove the air filter on the carburetor engine or the inlet pipe stretch on the injector.
VAZ 2107 starter repair - removing, replacing and installing the starter yourself
Hello, dear car enthusiasts! Especially hello, all owners of the VAZ “Seven”! Because this is exactly what we will be talking about – the VAZ 2107.
Although, the domestic auto industry has nothing special to boast about, given the model line and quality of cars produced, but still, there are examples of cars that should be paid attention to.
VAZ 2107 is a car that can deservedly be called a people's car. Thanks to its somewhat unusual design, this car stands out noticeably from the series of “classic” VAZ cars.
This fact, supplemented by minor design differences, was the reason why the model lasted quite a long time on the assembly line. At times it seemed that the “seven” would be produced forever, but time takes its toll.
Nevertheless, hundreds of thousands of cars of the seventh model are moving on the country’s roads, which will lead the popularity ratings among the “classics” for a very long time.
The design of the VAZ 2107 car is not fundamentally different from previous models. The biggest innovation in recent years has been the installation of an injection power system instead of the usual carburetor.
The rest is classic. This also applies to the starting system. That is why for every car enthusiast who bought a VAZ 2107, how to remove the starter remains a pressing question.
Removing the VAZ 2107 starter in the garage, do it yourself
As in most other cars, in the “seven” the starter is located at the bottom of the engine. In order to get to it, you need to have an inspection hole or overpass, since it cannot be removed through the top.
The inconvenient location is the only difficulty when dismantling the starter. Otherwise, everything is extremely simple; no special tools or special knowledge are required.
Removing the VAZ 2107 starter occurs only with the ignition off as follows:
- First, remove the battery cover and disconnect the ground terminal;
- the mudguard is removed, if one was installed in the lower part of the engine compartment;
- For convenience, the battery and support can be removed;
- the clamp of the wiring harness leading to the starter is unscrewed;
- unscrew and remove the wires from the starter traction relay;
- the three starter mounting bolts are unscrewed (two at the top and one at the bottom), after which the starter is removed under the car.
At this stage, the starter is completely ready for repair or maintenance.
Self-replacement of VAZ 2107 starter
If you can find a good, knowledgeable assistant to repair the starter, then you will have to install it back into the car yourself. This activity is not at all inconvenient, but quite responsible, so it should be carried out very carefully in compliance with the order indicated below.
In order to replace the VAZ 2107 starter, or rather, install it in its original place, you must do the following:
- Before installation, carefully inspect the starter, its equipment, build quality, and the presence of a centering sleeve;
- the starter is installed in its regular place at the bottom of the car and screwed with the longest bolt, after which the other two mounting bolts are screwed in and tightened;
- the wire terminals are installed and the nuts are tightened;
- wire harness supports are installed and secured;
- the battery support is screwed on, the battery is put in place;
- the battery terminals are connected, the protective cover is closed;
- The functionality of the electrical system is checked and a dirt shield is installed.
Main causes of starter malfunction
Reasons why a unit on a VAZ-2107 injector or carburetor stops working and requires its removal and disassembly:
- Battery. The battery on carburetor and injection internal combustion engines can be completely discharged or fail. It is possible that the battery is not completely discharged, but the remaining charge is not enough to turn the starter mechanism and crankshaft. The discharge problem is solved by recharging, and the faulty battery will have to be replaced with a new one.
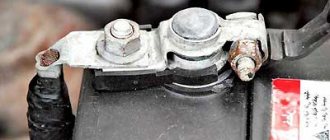
- Oxidation of contact parts on the battery. If there is oxidation, a white coating will appear on the terminals of the device. It must be carefully removed using a brush or fine-grained sandpaper.
- Malfunction of the contact components of the starter unit. They may be damaged or have carbon deposits on them. Oxidation may form on the contacts of the mechanism.
- There has been a break in the windings of the devices or the electrical circuit to which the unit is connected. Detailed diagnostics and ringing of power lines will be required.
- The brush assembly has worn out or the commutator device has burned out. Such problems are solved by replacing the constituent elements.
- The appearance of a short circuit in the windings or on the brush holder. A short circuit indicates a malfunction in the electrical component. Need a call.
- Problems with the solenoid relay. Such a malfunction will be indicated by repeated clicks or random shutdown of the device. The problem is usually caused by a decrease in the voltage in the vehicle's on-board network. You need to check the contacts on the relay.
- Bendix malfunctions. This element is called a freewheel.
- Damage to the teeth of the drive mechanism or flywheel. Worn elements must be replaced.
- Wear of bearing devices or spring elements of the solenoid relay. This part is usually beyond repair, so it must be replaced.
The Avtoelektrika HF channel spoke about the causes of malfunctions in the operation of starter mechanisms.
Replacing starter Lada 2107 (VAZ 2107)
The starter is an integral device of any modern vehicle with an internal combustion engine. Without going into details, we can characterize the starter as an electric DC motor, which has a fairly large power and is responsible for starting the car engine.
The starter, like any other part, wears out and fails over time, so sooner or later any car owner may be faced with the need to dismantle it for the purpose of further repair or replacement. Today we will talk about how to remove the starter on a VAZ 2107 in a garage without the involvement of third-party specialists.
If for some reason it is not possible to carry out this work yourself, then the car can be made available to the service station workers, but in this case you must be prepared for additional financial costs.
We install wheel chocks
Performing a few simple steps related to preparing the VAZ 2107 for repair work will significantly save your time, improve the quality of maintenance and will guarantee the safety of your health.
- The place where the machine will be serviced must have good and uniform lighting. In some cases, this can only be achieved through the use of additional lighting.
- Due to the fact that the starter in the VAZ 2107 is located in the lower part of the engine, work on its dismantling should be carried out on an overpass or inspection hole. It is not possible to remove the starter from the top.
The machine must be securely secured using the parking brake or wheel chocks. Otherwise, there is a possibility that the vehicle will start moving spontaneously.
Instructions for dismantling the starter on a VAZ 2107
Disconnecting the battery
- The first step is to de-energize the machine's electrical network by disconnecting the battery.
- Next, you should remove the mudguard, which will be present if the “seven” has an injection-type engine installed.
- The fastening bolt, located at the bottom of the starter shield, is unscrewed using a socket wrench (the throat size of which is 10 mm) with an extension.
Unscrew the nuts
- At the next stage, the three mounting bolts securing the starter with the clutch housing are unscrewed. To do this, use a 13mm socket wrench.
- If the car is equipped with a carburetor-type engine, then the air duct and air filter must be dismantled. If the engine is of an injection type, then the intake manifold extensions must be removed.
Removing the starter
- Using a 13mm socket wrench, the fastening nut located on the starter shield is unscrewed, after which the shield itself is pulled out.
- At the final stage, you should unscrew the fastening nut connecting the electrical wires of the starter and the battery, after which you can remove the starter.
Installation of the starter is carried out strictly in the reverse order.
Details about the features of replacing the starter:
In most cases, repairing the VAZ 2107 starter can be done independently, saving a lot of time. Therefore, let's learn some diagnostic techniques, “treating” this mechanism and deal with situations when only replacement will help.
Assessing the scale of the problem
If, when you turn the key in the ignition switch, the starter does not turn, no clicks or sounds are heard, then the reason may be this:
- the battery is discharged or faulty;
- battery contacts are oxidized;
- problem with the contacts of the starter itself;
- a break in the windings of the device or the electrical circuit of the car.
When the starter turns slowly, clicks of the traction relay are heard, the reason may be this:
- there is a charge in the battery, but it is not enough to properly spin the moving parts of the starter;
- carbon deposits have formed on the contacts or they have oxidized;
- worn brushes or burnt commutator;
- short circuits in windings or brush holders.
Repeated operation of the relay and its spontaneous shutdown can be caused by a voltage drop in the network due to oxidized contacts or a malfunction of the traction relay. When the starter turns, but the flywheel does not rotate, there may be several reasons:
- problem with the freewheel (Bendix);
- drive or flywheel teeth are damaged;
- The bearings or springs of the traction relay are worn out.
These are perhaps the main malfunctions and their most common explanations. They are equally valid for carburetor models and injectors.
What to do first?
Disassembling the mechanism is not a priority task, since the starter’s power supply is connected to the battery, so you need to start with it. If the car is not too old, it is unlikely that the problems will lie in the design of the starter itself. It is enough to clean the contacts of the battery or the device itself for everything to work again in the desired mode.
THIS IS INTERESTING: How to remove a gas stove 31105
Difficulties begin when the machine has worked for a long time and its operation has not been delicate.
If, after a complete check of the electrical equipment of your VAZ 2107, the starter still does not start or continues to work intermittently, then the reason is inside the device and it is necessary to remove and disassemble the starter.
On this model, both in carburetor and injection versions, it is installed rather inconveniently. To get to it normally, you will have to drive the car onto an overpass or inspection hole.
After the ignition is turned off, you can begin the “operation”. It must be done in the following order:
- remove the ground terminal from the battery;
- if there is a protective mud casing at the bottom, then it must be dismantled;
- remove the electrical wires from the solenoid relay;
- unscrew the three mounting bolts (two upper, one lower);
- remove the starter.
As you can see, nothing complicated. The only thing is that in the case of an injection model, mechanics advise removing the inlet pipe extensions as well. Now we have to disassemble the device itself.
How to check the starter for performance?
Before repairing the device, it is necessary to diagnose it. This will allow you to determine the type of malfunction and the procedure for doing the repair yourself. There are two options for checking the starter - with or without removal.
To diagnose the operation of the starter device without dismantling, you will need a metal product. It will be used to close the contact terminals at the output of the mechanism. As a metal object, you can use a piece of electrical cable or a screwdriver with a bare shaft.
If there is sparking, but there is no cranking of the starter device, do the following:
- The contact terminals on the battery are being diagnosed; you need to make sure that there is no oxidation on the terminals. If there is white or other color deposits, cleaning is done using sandpaper. If it is not available, you can use a knife, but you must act carefully.
- The operation of the solenoid relay is checked. The unit should be disassembled and the device replaced if necessary.
- The integrity of the electrical circuit between the solenoid relay of the device and the mechanism itself is diagnosed. The assembly will also have to be disassembled. The cause may be damaged wiring.
The starter assembly rotates the crankshaft, but the rotation is not sufficient to start the engine:
- You need to check the battery charge and replenish it if necessary. If recharging is not possible, it is permissible to “light” the car from a vehicle with a charged battery.
- It is necessary to diagnose the integrity of the power cables connected to the starter mechanism. There may be an insulation break or breakdown.
When the key is turned in the lock slot, the crankshaft does not turn, but the device clicks:
- Low battery. Requires recharging.
- The contacts are damaged or their quality is poor. We are talking about contact elements connected to the starter unit. It is necessary to check the integrity of the parts and tighten them if necessary.
If the steps described above did not help, you need to check the operation of the traction relay. The problem may also be with the ignition switch. If the diagnostics did not determine the cause, the switch will need to be disassembled and checked. To make sure that the lock is not working properly, you need to thoroughly clean all contacts and connections.
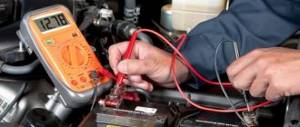
User Battery Man showed how you can check the current of the starter device on a mechanism that has not been removed from the car.
After removal, the starter mechanism must be securely fixed in a vice. This should be done carefully so as not to damage the device. Then you need to connect battery power to it and use a screwdriver or a piece of cable to close the contact screws. If the mechanism begins to spin, then the problem lies in the operation of the retractor relay.
Further diagnostics:
- To ensure that the traction relay is working, the positive terminal from the battery is connected to it. The negative contact is connected to the mechanism body. If this element is working, then the anchor device will extend the gear. You may not see this, but you will hear a characteristic click.
- Then the integrity of the brush mechanism and armature is checked, for this purpose a 12-volt voltage is supplied to the unit. To check the operation of the anchor device, take a 220-volt household lamp and connect it to the break point between the winding and the pulley. If, as a result of connection, the light source begins to burn or sparks appear, then the anchor element must be replaced. When sparking, you can smell a burning smell.
- To diagnose the brush assembly, a 12 volt lamp is used. The device is connected to the brush assembly or mechanism body. If, as a result of connection, the light source begins to burn, then the brushes must be replaced.
- Bendix diagnostics are being performed. To do this, place a soft pad around the part and clamp it in a vice. It is necessary to check the quality of functioning of the coupling itself. If, as a result of physical impact, it turns in different directions, then the bendix must be replaced. The clutch should only turn in one direction.
When diagnosing the starter on a VAZ-2107, you must remember that most malfunctions are caused by problems with electrical circuits, as well as the battery or solenoid relay.
How to change the starter on a VAZ 2107
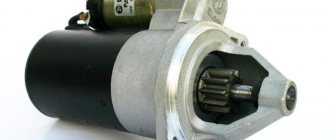
A car starter is the main element of the engine starting system, and is designed to start it by cranking the crankshaft.
Essentially, it is a direct current electric motor driven by closing an electrical circuit by turning the ignition key. The autostarter consists of a stator, an armature (rotor), a brush holder with brushes, as well as a traction relay and a drive.
In all VAZ classic models, incl. and in the “seven”, it is located at the bottom of the engine, and is attached to the clutch housing.
Malfunctions
Considering that the starter is a complex electrical device, malfunctions in it can occur quite often, but most of them can be eliminated through repair. Malfunctions that cannot be repaired and require replacement of the entire assembly include:
- damage to the commutator due to brush wear or other reasons;
- short circuit or break in the stator winding;
- short circuit or break in the armature winding;
- complete wear of the armature bearing bushings.
If the above faults are detected, it is better to replace the starter with a new one. Otherwise, your car will either not start at all, or serious problems may occur in the on-board electrical circuit of the car.
Price
The catalog number of the original “seven” starter is 2107.3708010-01. Its price is approximately 2500-3000 rubles. You can also purchase improved models - starters with a built-in gearbox, which are very popular today.
Their advantage is that even if the battery is partially discharged, the starter, due to the gearbox, provides a sufficient number of flywheel revolutions to start the engine. The price for such models starts from 3,500 rubles. The cost of replacing a starter at a service station averages 500-600 rubles.
Replacement
Tool:
- socket wrench 10;
- socket wrench with extension 13;
- screwdriver.
Work order
- We place the car on a viewing hole or overpass and secure it with the parking brake.
- Open the hood and disconnect the ground wire from the battery.
- Using a 10mm socket, unscrew the bolt of the lower fastening of the starter heat shield.
- We dismantle the air filter housing and the warm air supply hose (for injection units, remove the fastenings of the intake pipeline).
- Using a socket wrench with a 13 mm extension, unscrew the 3 bolts securing the starter housing. It is better to unscrew the bottom bolt from the inspection hole.
- Using a 13mm wrench, unscrew the nut (on the injection engine there are two nuts) securing the starter shield. Let's take it out.
- Using a socket wrench with a 13 mm extension, unscrew the 3 bolts securing the starter housing. It is better to unscrew the bottom bolt from the inspection hole.
- Using the same tool, unscrew the nut securing the tip of the wire going to the “+” battery.
- Disconnect the start relay wire.
- We remove the starter from the rear wall of the engine compartment.
- We install a new starter in its place.
- We carry out installation work in reverse order.
Conclusion
After installing the new starter, turn on the ignition and start the engine. There should be no extraneous sounds. The starter should turn on when the solenoid relay clicks and stop working when the ignition key is turned back.
mylada.net
Self-replacement of the starter on a VAZ 2107-2105
The starter for VAZ cars of all “classic” models, both 2105 and 2107, is completely the same in design and mounting. So the procedure for replacing it will be identical. I would like to note right away that if you have all kinds of tools, this device can be removed from the car very quickly and easily. Although, in fact, only one key per 13 is enough
Source: https://autoprivat.ru/remont_avto/kak_pomenyat_starter_na_vaz_2107.html
How to repair a car starter with your own hands?
The VAZ-2107 starter repair procedure includes two stages. We are talking about disassembling the device and troubleshooting its component parts.
Disassembling the device
When disassembling the device, it is necessary to replace the defective parts with new ones:
- First, unscrew the nut located on the lower contact screw of the solenoid relay. The output with the windings is disconnected from the screw; for this, the spring element is dismantled, as well as two washers. Three bolts are unscrewed, which secure the relay itself to the mechanism cover. The screws are located on the drive side. Holding the anchor mechanism, the retractor relay is removed.
- The spring element is removed from the anchor mechanism. The anchor is pulled upward and disengaged from the lever of the drive device. The element is retrieved.
- The two bolts securing the protective casing of the device are unscrewed, then the protection is removed. Using a screwdriver, pry off the retaining ring of the rotor mechanism pulley, as well as the washer. The two tightening screws are unscrewed, after which the cover is disconnected from the drive device side from the mechanism body. Dismantling is carried out together with the stator device.
- The bolts that secure the winding of the stator mechanism and the connecting electrical circuit are unscrewed. The jumpers are disconnected from the brush holder. The insulating tube is dismantled.
- The cover of the starter mechanism on the side of the commutator device is disconnected from the housing.
- The winding jumper is removed from the mechanism for fixing the brushes. The stator brushes and the spring element are dismantled; these parts must be pryed off using a screwdriver.
- The rear bearing device, made in the form of a bushing, is pressed out. This part is located on the rear cover of the starter mechanism. To remove it, you will need a mandrel of the appropriate diameter. The cotter pin of the drive mechanism lever axis is also removed; it is located in the front cover. To perform this task, you will need a flat blade screwdriver.
- The rubber plug is removed, after which the lever of the drive device is removed from engagement with the bendicosm. The anchor mechanism with the clutch is being dismantled.
- Then you need to move the thrust washer, which is fixed on the pulley of the anchor element. It moves towards the coupling of the drive device. The locking element, made in the form of a ring, is dismantled; to do this, it must be opened using two screwdrivers. If you have forceps, it will be more convenient to use this tool. The clutch is removed from the drive.
- The front bearing is dismantled from the mechanism cover; to do this, it must be pressed out. The procedure is performed from the drive device side.
The Auto Repair and Maintenance channel showed the procedure for self-disassembling the starter mechanism for classic VAZ models.
Defects of constituent elements are performed as follows:
- First, the height of the brushes on the mechanism is measured. Over time, parts wear out. Therefore, if the height is 1.2 cm or less, the brushes must be replaced.
- A visual check of the winding condition is performed. There should be no signs of damage to the insulation or burnout. The poles of the stator device must be free of mechanical damage in the form of cracks and other defects. If present, the winding must be replaced or rewinded.
- The bushing on the cover from the side of the collector device is inspected. It must not be worn, cracks or any other defects are not allowed.
- A visual check of the anchor element is performed. It is not allowed to have burrs or nicks, in particular, we are talking about splines and the shaft. There should be no signs of burning on the armature commutator mechanism, otherwise it must be replaced.
- Then you need to check how easily the retractor anchor device moves. You need to make sure that the contact screws of the plate are closed; for this you will need an ohmmeter or multimeter.
- The clutch gears of the drive device are inspected. There should be no signs of wear on its teeth.
- Perform a visual check of the drive arm. There are no traces of cracks or other defects on it, as well as wear of the grooves.
One of the weakest devices in the VAZ-2017 starter is the bendix, but often it cannot be repaired, only replaced.
The altevaa TV channel talked about checking the windings in order to determine their faults and replace parts.
Assembly Features
The assembly procedure is performed in reverse order:
- If necessary, the surface of the armature commutator device is cleaned. For cleaning, use fine-grained sandpaper. After cleaning, the collector mechanism must be blown with a compressed air stream, and also treated with fuel or an alcohol solution.
- Then the splined surface of the anchor element pulley is treated with motor fluid. Also subject to treatment are the pulley journals, the drive coupling gear and the bearing elements located in the device covers.
- When the assembly of the mechanism is completed, using a caliper, the axial clearance of the anchor device shaft is diagnosed. To do this, the shaft moves in one direction - to the commutator mechanism, and then in the other - to the drive. It is necessary to measure the difference in the parameters of the protrusion of the pulley from the cover on the side of the drive element. The gap should be no more than 0.5 mm.