Advantages and disadvantages
If you decide to change from conventional drum mechanisms to disc brakes, be sure to take into account the positive and negative aspects of such a decision.
| Advantages | Flaws |
| Braking distance is reduced | High cost of new disc brakes compared to traditional drums |
| Braking force is distributed evenly across all wheels | Requirements for precise adjustment and tuning, which not everyone can do with their own hands |
| Unsprung weight is reduced | If installation requirements are violated, the car skids, it brakes unevenly, and squeaks occur. |
| Provides more efficient heat dissipation and prevents brakes from overheating | Replacing drums with DT is illegal and not a certified action for VAZ |
| Increases the reliability of the braking system | There may be problems with the traffic police. People don’t often find fault with rear disc brakes, but if they catch you, you’ll have to competently “excuse yourself” |
| Replacement and maintenance of pads cause fewer problems and difficulties | There are problems with the handbrake that needs to be changed or improved |
| No need to regularly tighten the handbrake | In case of accidents, you will most likely be the culprit, since such design changes are unacceptable by law |
| Appearance noticeably changes for the better | Careful adjustment is required after replacement, which is best done at a service station |
| Disc brakes do not freeze during winter washing, which cannot be said about drums | If you make an error during assembly, the rear wheels may begin to brake more effectively than the front wheels, which will cause serious consequences and troubles. |
Think carefully about the feasibility of carrying out such work. Please note that all responsibility falls on you.
pros
Let's look at why disc brakes are better than drum brakes:
- Braking becomes more reliable, braking distance is reduced;
- Braking forces are distributed more evenly, given that the VAZ 2114 is a front-wheel drive car;
- There is an effect of faster response after pressing the pedal;
- Unsprung masses are reduced;
- Heat dissipation occurs better, which is especially important when driving on a mountain road or during active acceleration/braking. For this reason, the brake system is cooled better;
- Disk ones are much easier to dismantle and replace;
- There is no need to adjust the handbrake after each repair of the rear brakes, although this will have to be done the first time;
- They do not freeze in winter after washing, like drum ones;
- Rear disc brakes installed on the VAZ 2114 are much more convenient to control and promptly notice pad wear.
Replacement
Since you can no longer be stopped and you want to equip the rear wheels of your VAZ 2109 with disc brakes, first prepare a set of necessary components that will be useful during the replacement process.
- Calipers. Take simple front calipers from a VAZ 2109;
- Hoses. Use front brake hoses as standard iron hoses will not reach into place;
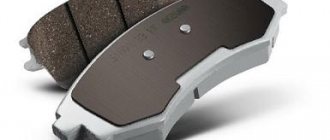
- Pads. Any high-quality pads of the required size will do;
- Bolts, washers-grower. Requires M10x1.25 bolts 30 millimeters long. A total of 12 pieces and always with growers;
- Distance washers. Take the timing belt tensioner roller washers, which are used for the VAZ 2108. You need 8 of these pieces;
- Faceplate or caliper mounting plate. Need 2 pieces. Moreover, this part is non-standard; it will have to be made as accurately as possible using a coordinate machine;
- Disks. Front discs with a diameter of 240 mm are suitable. First sharpen them so that the hub seats coincide by 60 millimeters. You can machine the hub itself, not the brake disc. The choice is yours.
To achieve a high-quality result when installing disk mechanisms, you first need to ensure proper dismantling of the elements of the braking system.
Dismantling
Let's start the procedure. It is not the easiest, but it is quite possible to do it yourself.
- Remove the wheel.
- Release the tension on the handbrake cable and close the rear pads.
- Using a 12mm wrench, unscrew a pair of guide pins.
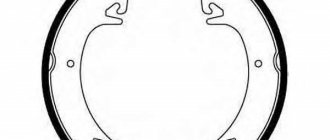
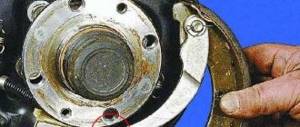
- Using a hammer, carefully knock down the brake drum. Before doing this, it is better to clean the seats with a wire brush, and also treat the surfaces with WD40.
- Apply gentle blows with a rubber mallet or use a wooden block. You should knock along the entire circumference of the brake drum. In some cases it comes off quite hard, but be patient.
- Using a screwdriver, pry up the lower tension spring TK and remove it. Using the same spring, you can remove the small springs (guides) that press the pads to the boot. This is the brake cylinder shield.
- Remove the springs, then grab the bottom of the brake pad and lift it up.
- Place the upper part against the brake cylinder and remove the spacer bar.
- Remove the shoe from the brake cylinder and remove the upper tension spring TK.
- Remove the handbrake lever from the handbrake cable and remove the second brake lever.
- Remove the bolts that secure the hub to the beam. Arm yourself with a split wrench or a regular open-end wrench 17 and a wrench to increase the leverage. Treat the bolts with WD40 and remove them.
- Proceed carefully, no sudden movements. Otherwise, you will simply lick off the edges of the fasteners.
- Before knocking down the hub, remove the brake pipe. To do this you need a split wrench. Having torn off the fastening, bend the tube slightly to the side and seal it with a cap, which must first be removed from the cylinder bleeder fitting. This will prevent brake fluid from leaking.
- The hub is held in the seat of the beam, and it is there from the factory. That's why she probably got attached to it. The blows will have to be delivered accurately and powerfully. Hit the support disk from the inside, alternating strikes from above and below.
- If you ruin the platter, no big deal. It's going to landfill anyway.
- When the hub begins to gradually separate from the beam, apply less strong blows. Knock off the hub completely.
Replacement procedure
Installation of HTD
Now comes the most crucial moment - installing disc brakes on the rear wheels of your VAZ 2109.
- Decide exactly how the caliper will be mounted. This can be done from behind or in front of the axle. Please note that this does not affect efficiency, so there is no need to think too much. To make it more symmetrical, we choose the rear location.
- Join the hub and faceplate into a single unit. Make sure the holes line up. If there are any inaccuracies, use gentle hammer blows to center the position. It is very important.
- Straighten the corners of the beam on which the caliper will eventually be able to rest. This can be done with a regular hammer. The processing of one or another corner depends on which side you chose for installation.
- Install the hub. Please note that you do not need to use an engraver for the upper left hub fixing bolt. Otherwise, you will have to work with a grinder, grinding off the fastener head. Without doing this, the caliper bracket will simply rest against the gromver.
- Place the purchased disc brake on the hub.
- Install a bracket on the faceplate, and place washers between the elements at the joints. This will give you the necessary clearances.
- In some cases, washers do not correspond to the required dimensions, so it is better to choose them specifically for your car.
- The connection between the faceplate and the bracket is tightened with an applied force of 3-4 Nm.
- Install the pads, connect the hose to the caliper, and then connect the tube to the hose. It is important not to do the opposite here.
- Seal the brake line and pressurize the system by pressing the brake pedal. Make sure the system is tight and there are no leaks.
- If everything works well, you can install the brake discs on the second rear wheel in the same way.
ZDT
After completing the assembly of the new brake system on the rear wheels, be sure to bleed the brakes. You cannot go on the roads without this.
It would be a good idea to visit a trusted car service center, where experienced specialists will analyze the quality of replacing drums with discs and make sure that the settings are correct. It would be nice to have friends here who won’t deceive you.
How to install rear disc brakes on a VAZ 2108
Expensive foreign cars are equipped with rear disc brakes, thanks to which the car can brake confidently. The obvious disadvantage of Russian cars is the not very effective braking system. In this article you will learn how to install rear disc brakes on a VAZ 2108, 2109.
But before you start reading the article:
ATTENTION!!!! CHANGING THE DESIGN OF THE AUTO BRAKE SYSTEM IS PROHIBITED!!! THIS MECHANISM IS NOT CERTIFIED!!! WE ARE NOT RESPONSIBLE IF YOU DECIDE TO REPEAT!!!
Car tuning projects are usually divided into several stages, namely: fine-tuning the engine, gearbox, suspension, body and, most importantly, fine-tuning the brake system.
According to professionals, tuning should begin with modifying the brakes - the car must be taught to stop! I will write in more detail about the installation of RBD (rear disc brakes) in this article. It is clear that many foreign cars are equipped with disc brakes on all wheels, and thanks to this they confidently brake at high speeds. The braking system of our cars is equipped with rear drum brakes and are not very effective, especially when driving fast.
Almost all drivers are familiar with a brake pedal that has lost its information content due to overheating of the entire braking system. Agree, it’s a bad situation, I decided to correct this deficiency in my VAZ 2109 and teach it to stop no worse than foreign cars.
On my car, I recently replaced the front brake discs with a diameter of 240 millimeters with ventilated VAZ 2110 discs with a diameter of 264 millimeters, which in itself gave a significant increase in braking efficiency. The original wheels remained out of use and were dumped in the corner of the garage.
And so I decided to bring the old idea to life and began installing rear disc brakes. Old discs from the front brakes were loaded into the “body” of the nine, went to the garage, installed the eight on jacks, and began disassembling; if you have the necessary tools and skill, the whole job takes less than 4 hours. The rear brake installation procedures are quite simple.
Necessary parts for brake conversion:
- brake calipers - use regular front calipers from the VAZ 2109;
- brake hoses - front brake hoses, since ordinary iron pipes do not reach;
- brake pads – Lucas pads, 1 set;
- Grover bolts and washers - I recommend using M10x1.25 bolts with a length of 30 millimeters - 12 pcs. with growers;
- spacer washers – timing belt tensioner roller washers from VAZ 2108, 8 pcs.;
- caliper mounting plates (faceplates) – 2 pcs., an unusual part that requires precise production using a coordinate machine;
- brake discs - I took front discs with a diameter of 240 millimeters. Beforehand, they need to be machined to accommodate the hub seat of 60 millimeters. You can also grind the hub instead of the brake rotor.
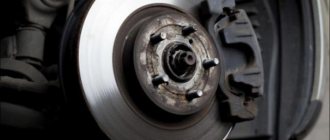
(photo with a broken brake drum)
The process of removing VAZ rear drum brakes
First of all, we remove the wheel. Having loosened the tension of the handbrake cable and brought the rear pads together, use a 12 key to unscrew the 2nd guide pins. Using a hammer, carefully knock down the brake drum, having previously cleaned the seat on the hub with a brush and sprayed it with WD-40.
You need to knock evenly and around the entire circumference of the drum. It does not always come out of place easily, so we recommend using a rubber hammer or turning the brake drum through a wooden spacer.
- Using a screwdriver, pry up the lower spring that tightens the brake pads and remove it, then use the same spring to remove the small guide springs that press the pads to the boot (brake cylinder shield),
- Having removed the springs, take the lower part of the brake pad and lift it to the top,
- the upper part resting against the brake cylinder,
- remove the spacer bar,
- remove the brake pad from the brake cylinder and remove the upper tension spring of the brake pads,
- remove the handbrake lever from the handbrake cable and remove the 2nd brake pad.
- (photo of unscrewing the hub using an open-end wrench)
Now unscrew the bolts securing the hub to the beam. You need to take a special split wrench; if you don’t have one, use a 17 mm open-end wrench with a crank to increase the “shoulder”. After spraying the bolts with a wedge, we twist them. There is no need to rush here, because the effort is quite large, and there is a danger of licking off the edges. Everything turned out quite simply for me.
(photo of unscrewing the brake pipe and a photo of the cap on the pipe)
Before knocking down the hubs, you need to unscrew the brake pipe. To do this, we use a split wrench (see picture), I have one for brake pipes. Having torn it off, unscrew it, bend it slightly to the side and seal it with the cap previously removed from the brake cylinder bleeder fitting. Everything is ready for the next step.
(photo of the beam with the hub removed)
The hub is held only in the seat of the beam and no one removed it from the factory, so it must be hit hard and accurately. The blows must be directed at the support disk from the inside, from below and from above in turn.
Don't be afraid to damage the support disk, because it is no longer needed and then throw it away. The force of the impacts can be reduced when you see that the hub has separated from the beam. Lightly tap the hub completely. This is what the support looks like without a hub.
(photo of the faceplate, photo of the hub connected to the faceplate)
Installing rear disc brakes on a VAZ 2109
Let's start installing the rear disc brakes. You need to decide how the caliper will be installed, in front or behind the axle. This does not affect the performance of the brakes. I placed the faceplates so that the caliper was at the rear of the axle, so it was more symmetrical. We join the faceplate and hub into one piece. All holes must match exactly. Small displacements can be corrected by light tapping. Centering must be done carefully.
(shot of a flattened beam corner)
Before installing the hub combined with the faceplate on the support, it is imperative to “straighten” the corners of the beam on which the calipers will rest. I flattened them using a hammer. Which corner needs to be corrected depends on which side of the rear disc brakes you choose to mount on the axle.
Among the “pitfalls” of this assembly step, it should be noted that there is no need to place an engraver under the upper left hub mounting bolt, otherwise the head of the bolt will have to be ground off with a grinder, due to the fact that the brake caliper bracket will rest against it. The decision is yours - grinder or no engraver.
(shot of rear disc brakes installed)
We put the brake disc on the hub. We mount the bracket on the faceplate, placing washers between them at the joints. They will provide the necessary clearances for the caliper, caliper and brake disc. It happens that the size of the washers may differ.
Then they need to be selected directly for the machine. It is necessary to tighten the connection between the bracket and the faceplate with a force of 3-4 N.M. We install the pads, screw the hose to the caliper, and then connect the tube with the hose. Don't do the opposite!
We seal the brake line, pump up the pressure in the system with the pedal, check the brake system for leaks, if no leaks are found, you can begin installing a set of rear disc brakes on the second side.
ZDT for caliper VAZ 2109
The main advantages of disc brakes over drum brakes:
- Significantly improves braking performance and brake cooling.
- Easy to replace pads and visually monitor their wear.
- Of course, the appearance: a car with drum systems cannot pretend to be a sports car.
Let's look at the design of the rear disc brakes of a front-wheel drive VAZ. A hub is attached to the rear beam of the car on each side, on which there is a brake disc and the wheel rotates. Also, a hydraulic brake caliper with pads is attached to the beam using an adapter faceplate. The caliper can be with a built-in mechanical parking brake, or without it. Hydraulic parking brake options are available. On motorsport cars there is often no handbrake.
It is advisable to install the rear brake discs 1-2 inches smaller than the front ones to avoid over-braking of the rear axle.
Three main elements for tuning the rear brake system of a VAZ:
Brake disc VAZ 13-14 inches. Used on front-wheel drive VAZ models as a front brake disc.
There are three varieties:
- 13" unvented (model 2108),
- 13" vented (model 2110) and
- 14" vented (model 2112).
- Average price 600 rubles 1 piece.
The caliper also comes in three types, depending on the disc with which it is used.
Sold complete with pads and hose.
Average price 1450 rubles 1 piece.
The adapter faceplate is necessary for attaching the caliper to the rear beam of the car. Universally fits 13 and 14 inch brakes. Average price 1000 rubles 1 pair
Installation of rear disc brakes on VAZ 2108-2115 cars,
Unscrew the drum brake system. Remove the hub by unscrewing 4 bolts (difficulties may arise, be careful) Unscrew the brake pipe from the cylinder.
We fasten the hub, placing the appropriate faceplate between it (right, left). The bolt indicated by the arrow is not placed under the bolt, it will interfere with the installation of the caliper.
The bolts for fastening the hub are needed 5mm longer than before. That is, M10*30*1.25 instead of M10*25*1.25. Standard bolts are too short. You will need six of them on each side. That is, four pieces for fastening the hubs and two pieces for fastening the calipers, 12 pieces in total. If you do not find suitable bolts, then they can be made from longer ones by cutting them with a grinder. Only the thread should be no more than 13mm from the head.
The angle of the beam shown in the figure is crushed with a hammer and, if necessary, slightly modified with a grinder. The operation is simple, since the metal is soft. This is done so that the caliper does not touch the beam. 14" rear discs and calipers do not require this operation. But if you put 14-inch brakes in the rear, you need to have at least 15-inch brakes in the front. ! Swap the calipers from the LEFT to the right side and the RIGHT to the left! Otherwise you’ll never pump it up (PS I pumped it for 2 days and it’s a lot of crap))))
The hub has a 1mm protrusion all around, marked in red. This protrusion interferes with the landing of our standard VAZ wheel. The disk has an internal hole of 58mm, the hub has basically the same diameter, but in the place of this protrusion the diameter is 60mm. What to do? Take the disc to a turner and sharpen it! 100 rubles a couple.
Well, if you happen to not have a lathe at hand, it doesn’t matter. We again take the miracle tool “grinder” and carefully grind off this protrusion from the hub without directly removing it from the car. The hub will rotate, ensuring even metal removal. Just don’t get carried away with this process; constantly try on the brake disc so that it does not dangle and is pressed tightly to the hub.
We choose one of three varieties of VAZ wheels (13 inches non-ventilated, 13 inches ventilated, 14 inches ventilated). Remember that the disc size is 1-2 inches smaller than on the front brakes. Place the disc on the hub and secure it with guide bolts.
We fasten the caliper corresponding to the dimensions of this disc, connect the brake pipe with the hose. We bleed the brakes.
Issue price: 5,500 ₽
Tuning brakes VAZ 2114
On the VAZ 2114, 195/50 R15 tires were installed, while the effectiveness of the R14 brakes significantly decreased, and the rear brakes also needed improvement. It was decided to install brakes with a diameter of 15 inches, ventilated. First, we go to the store and select staples. In this case, we chose between LGR and prosport brackets. We settle on the last option. With wheels it’s not so simple, I had to search and in the end I bought 15th Zimmerman wheels, they are inexpensive and look angry. As for the pads, we buy EBC Green, it has a large lining surface area.
So, let's start the installation. We unscrew the brackets, guides, cylinders. Standard discs can stick, so using a hammer is acceptable, although this should be done within reasonable limits. The peculiarity of the purchased wheels is that its central center is 0.5 mm larger than that of the VAZ 2114. For proper centering, cut a strip from a beer can and insert it between the disc and the hub to eliminate play. Next, we put on the disk and screw on the new bracket. During installation, it turned out that one of the two holes for the finger is smaller than the other and the finger, naturally, does not fit into it. To do this, I had to go to a car service and drill a hole with a diameter of 8.5 mm. Pay attention to the cylinders; they need to be replaced if necessary. The front brakes of the VAZ 2114 very often present unpleasant surprises, the main reason being overheating of the brake pads and discs. The ventilated disc is wider than the stock disc, so you will have to buy the appropriate calipers, pad guides and protective covers for them. These parts are very difficult to find individually; they are much more often found assembled.
When purchasing, you must make sure that these spare parts are of high quality and genuine. There is no need to skimp on the brake system and replace everything during the planned replacement of worn parts. If desired, you can perform tuning of the brake system without a lift; just install the car on a reliable stand. The tools we need are a hexagon and a 15mm wrench. Before installing a new disc on the car, you should thoroughly clean the mating surfaces of the hub. If the disc runout is too great, we pull out the wheel guides and rotate it 180 degrees relative to the hub, sometimes this helps. If there are no changes in a positive direction, then the disks will have to be replaced with others. There is no way without selection. When replacing cylinders, be sure to bleed the brake system so that no air remains inside. Installing 260mm brake discs will not be much different from installing regular size brake discs. When installing wheels with R14 discs on a VAZ 2114, do not forget about the spare wheel, because an R13 disc will not fit on 260 mm ventilated brake discs.
How to make rear disc brakes on a VAZ 2109
Rear disc brakes
Almost all foreign cars (not counting budget models) have long been equipped with rear disc brakes. The point is not only the superiority of disc brakes over drum brakes. As for the VAZ 2109, rear disc brakes ensure uniform braking force on all wheels. VAZ 2109 disc brakes can be easily installed on the rear wheel with your own hands.
Note! As a rule, a lag or advance in the functioning of any of the braking mechanisms causes loss of controllability.
DIFFERENCES IN DISC AND DRUM BRAKES
VAZ 2109 rear disc brakes
Compared to drum brakes, disc brakes have the following advantages:
- shorter braking distance;
- even distribution of braking forces;
- brakes operate faster;
- Unsprung weight is reduced;
- heat dissipates better;
- greater reliability;
- maintenance and changing pads is easier;
- there is no need to frequently tighten the handbrake;
- more attractive appearance;
- During the winter months, disc brakes do not freeze after washing, which cannot be said about drum brakes.
WHAT PROBLEMS CAN APPEAR AFTER CHANGING DRUM BRAKES
VAZ 2109 rear disc brake
Of course, the VAZ plant does not officially install rear disc brakes on its cars, but despite this fact, the instructions provide a section on replacing brake drums with disc devices. Let's pay more attention to the shortcomings of installing the HCD on VAZ 2109 cars. So:
- High-quality brakes are the key to safety. They are not installed just for beauty; they are precisely balanced mechanisms developed by experienced engineers. It’s not enough to just buy and deliver a product; it needs to be properly adjusted and tested. All this work can be done either at a service station or independently, following certain instructions. In the worst case, braking will be uneven, the car will skid when braking, the discs may overheat and complete or partial failure. In addition, you can hear an unpleasant creak.
- It is not always practical to install an HTD on VAZ cars. Perhaps the money spent produces the desired results, but along with the purchased HRT, new problems arise.
- Troubles associated with maintenance. Even though HBRs are much more efficient than drum brakes, replacing them is perceived as an illegal change.
VAZ 2109 how to make rear disc brakes
- Problems on the road with traffic police. Often on the road people don’t find much fault with the rear brakes, but if this does happen, you’ll have to come up with a convincing explanation.
- Troubles with the handbrake of a VAZ. When changing brakes, you will need to think about the handbrake. You can consider two options: installing a cable handbrake or using a hydraulic handbrake. In the second case, it becomes possible to brake on any plane, but it is not recommended to use it for parking, since it weakens over time. Some drivers do not pay attention to the handbrake at all and pass the technical inspection without any hindrance.
- In an accident, a car with rear disc brakes will most likely be the culprit, since design changes have been made that are not required by law.
VAZ 2109 rear disc brakes
- Setting up the braking system. Upon completion of the installation of this mechanism on the VAZ 2109, in any case, you cannot do without adjusting the sorcerer. In the worst case, the rear wheels will brake more than the front wheels. An incorrectly adjusted sorcerer can cause skidding, squeaking and overheating of discs.
Note! In certain cases, the problem of excessive braking of the rear mechanisms cannot always be solved, so it is necessary to grind down up to 25 or 50 percent of the pads, which reduces the contact area.
OWN INSTALLATION OF REAR DISC BRAKES
Set of rear disc brakes for VAZ 2109
The main advantage of installing the HAZ on your own is saving money. Thus, you can save about 10 thousand rubles.
If you are already thinking about installing new rear brakes, then it is recommended to give preference to devices that have a certificate from an autonomous non-profit company. Rear disc brake devices of the M513 type have a certificate; they can be purchased at service stations from major suppliers; certificates are also provided here indicating that the rear disc mechanisms on the VAZ 2109 have already been adjusted in accordance with all standards.
Note! This feature also plays an important role, since it ensures unhindered technical inspection.
So, first you need to determine which TDTs will be used. Today there are several options for purchasing products:
- shopping on the market;
- in the cabin;
- in the Internet.
Many experts recommend buying well-known brakes from. In this situation, the car owner will not need to interfere with the design of the device.
In other cases, when installing the guide bracket, you may find that it does not quite fit, then you will need to sharpen it yourself. High-quality disc brakes can be bought for 3,000-12,000 rubles, it all depends on the manufacturer and the materials used.
Note! To install the mechanism yourself, you need to acquire not only patience, but also time, since such work requires maximum care and precision. It should also be noted that the installation process will be individual for each case (for example, with or without a handbrake, with a regulator, etc.).
Disc brakes
Some experienced car owners believe that it is better to buy 14th front brakes, high-quality brake discs with pads, change the VUT, rather than block something at the back, but this opinion is controversial, since each case is individual.
Of course, any repair or replacement of parts can be done at a service station with the help of competent specialists, but why spend money on maintenance if with the help of videos and photos you can do everything yourself, and installation of rear disc mechanisms is no exception.
The car enthusiast is provided with detailed instructions on how to replace important parts on a VAZ 2109 car. Self-repair is especially necessary for those who want to save money, since the price of current services leaves much to be desired.
Installation of rear disc brakes on VAZ 2114, 2112, 2110, 2110, 2106
» Repair » Installation of rear disc brakes on VAZ 2114, 2112, 2110, 2110, 2106
07.10.2015
The ability to replace the brakes on your car is a valuable skill that will come in handy time and time again. This will allow:
- understand one of the most important functions of a car;
- will help you feel safe;
- get satisfaction and joy from a handmade replacement.
There are several replacement options with installation kits for various VAZ models, with their own characteristics.
VAZ 2114
Installation is carried out using spare parts:
- VAZ 2108 calipers;
- front hoses;
- Lucas brake pads;
- spacer roller washers of the VAZ 2108 type – 8 pcs.;
- faceplates – 2 pcs.;
- wheels Ø 240 mm.
VAZ 2112
You will need
- front calipers with hose and pads VAZ 2110;
- plates for calipers (made independently);
- wheels for 13-inch VAZ models;
- set of hoses and tubes;
- brake fluid;
- hydraulic handbrake.
VAZ 2101
Installation is carried out if spare parts are available:
- faceplates (grind to Ø 117 mm);
- adapters;
- spacer rings for axle shaft bearings 3.9 mm (independent production - 2 pcs.);
- VAZ 2108 wheels (grind from 12 to 9 mm);
- caliper kit with Oka hoses;
- brake pipes – 2 pcs.;
- long axle bolts with a 10 mm projection.
VAZ 2106
- axle shafts 2101 – 2 pcs.;
- bearing axle shafts – 2 pcs.;
- retaining rings;
- caliper lower mounting bolts 2101– 4 pcs.;
- thread sealant;
- brackets securing the caliper;
- rear axle oil seals – 2 pcs.
The installation of rear disc brakes on the VAZ 21099 is carried out as on the VAZ 2114.
Installation of rear disc brakes on a VAZ 2108 is carried out using factory instructions and spare parts:
- Darbis NS2 rear brake kit;
- rubber corrugations, sandpaper, hexagon, thread locker.
Description of a typical assembly of rear disc brakes of a front-wheel drive VAZ
- Installing a jack under the wheel and removing the wheel.
- Removing the drum brake system by unscrewing.
- Removing the hub using a hexagon.
- Unscrewing the brake pipe from the cylinder.
- Screwing the hub, between which the corresponding faceplates are placed (left and right).
- Achieving the required bolt size using a grinder (M10x1.25 bolts with groovers, standard length 30-35 mm).
- Sharpening the hub protrusion to the diameter of the disc using a lathe or grinder.
- Installing the disc on the hub with bolts.
- Correctly sized caliper mount.
- Bleeding the brakes.
- Setting the brake force regulator.
Replacing a drum system with a disk one yourself has a lot of advantages, such as cost and speed of work.
THIS IS INTERESTING: Fuel pump VAZ 2112 16 valves
Source: https://boge.com.ru/ustanovka-zadnix-diskovyx-tormozov-na-vaz-2114-2112-2110-2110-2106/
Benefits of rear disc brakes
Rear disc brakes on the VAZ-2109 are in demand in the automotive spare parts market for a number of obvious reasons:
- with them the braking distance of the car is significantly reduced;
- ZDTs greatly simplify pad maintenance;
- the reliability of the brakes is greatly increased, which improves the safety indicator;
- Braking power is applied evenly across all wheels;
- due to the special method of thermal dissipation, overheating of the heat exchanger is eliminated;
- unsprung mass is reduced;
- in the winter season you don’t have to deal with such a problem as frozen brakes after washing;
- From an aesthetic point of view, the wheels look better.
Advantages of disc brakes
Installing new elements in the rear wheelset is not a whim, since disc brakes significantly increase the safety of the driver and his companions, other motorists, as well as pedestrians. The two main advantages of a disk system are described below:
- Stable work. Weather conditions have little effect on how disc brakes perform. The same cannot be said about drum brakes, since they only perform well in dry weather. When there is light rain, the braking distance increases significantly;
- Resistance to overheating. Owners of Samara have probably noticed that when braking frequently at speeds above 100 km/h, the brake pedal begins to “fail.” This defect usually occurs due to overheating of the brake fluid. Intense friction occurs between the pads and discs, as a result, the parts of the drum mechanism can heat up to 600 degrees.
Disadvantages of TRT
Naturally, where there are advantages, there are always several disadvantages:
- First of all, it is worth noting the price, which is significantly higher than that of drum brakes.
- The need for high-quality adjustment, which may cause a call to the service center.
- Poor-quality installation leads to the fact that the safety of the car is reduced - the car skids.
- In the case of the VAZ-2109, like any other VAZ model, the installation of an anti-aircraft protection device is not a certified event and may result in a fine from the traffic police.
- If you get into an accident, most likely, the expert will find you at fault, since the improvements to your car will be illegal.
- The lack of high-quality tuning can lead to the fact that the rear wheels can brake much better than the front wheels, which is fraught with serious consequences and emergency situations.
In other words, self-installation of the HCD on the VAZ-2109 is recommended only if you are confident in your capabilities. Otherwise, it is recommended to contact a service center. Despite the fact that the safety of your car with such tuning will increase, you may encounter problems with the traffic police, since such improvements are not legal.
Necessary materials
If you decide to install the HTD yourself, then you will need the following materials:
- Directly disc brakes, machined under the hub by 0.6 cm. The diameter of the disk should be 24 cm. Please note that it is not necessary to grind the disk itself. If you want to leave it unchanged, then you need to groove the hub.
- Front calipers and hoses.
- Faceplates necessary for attaching calipers. You will have to tinker with this part, since it is quite unusual and requires separate manufacturing to the exact dimensions.
- High quality pads that fit true to size.
- 12 bolts M10 × 1.25 with groovers.
- 8 spacers. You can use timing belt tensioner roller washers for the VAZ-2108.
When you have acquired all the necessary materials, it’s time to proceed directly to the replacement. The procedure is performed in several stages.
Stage 1. Removal of the PTA
First of all, you need to remove the wheel. After this, you need to loosen the handbrake cable and bring the pads together. The guide pins are unscrewed using a 12mm wrench.
If the car is old or the brakes have not been changed for a long time, it is recommended to treat the seats with a wire brush, and also lubricate all running surfaces with WD40. This will help you remove the brake drum without much effort.
Please note that even if the drum is tight, you need to remove it gradually, gently tapping it with a hammer along the entire circumference. If you do not want to damage the part, then use a hammer with a rubber tip or a rubber gasket.
Next, remove the tension spring and guides by prying them off with a screwdriver. After this, the brake pad needs to be lifted up, the spacer bar removed and the pad and tension spring removed.
To remove the second block, you need to remove the handbrake lever from the cable. The bolts that secure the hub to the beam should be treated with WD 40 and unscrewed with a split or regular 17 wrench.
At the last stage, the brake tube of the hub is dismantled. After this, you can begin installing the HCD.