Tail lights of VAZ 2114. Replacement, diagram, connection
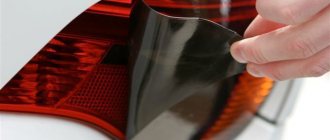
One of the most problematic places in domestic cars is the rear lights of the VAZ 2114. In most cases, the problem lies in low-quality, unreliable rear light circuit boards. As a result, contact with incandescent lamps disappears or is lost over time.
Often the problem is solved by using brute force, by striking the body or base of the lamp. However, such actions do not completely eliminate the problem; periodic failures in the operation of the turn signal, side lights or brake lights occur.
Replacing rear lights on a VAZ 2115 yourself
The VAZ 2115 car is a modern, sought-after type of vehicle. The machine has various operational and technical features that repeatedly attract owners of this unit. Undoubtedly, there are a number of features and advantages of such a vehicle, but rear lights play an important role. Not everyone, even the most experienced driver, knows that the absence of rear lights or their damage can lead to a variety of negative consequences, so it is necessary to promptly replace such a part.
Replacing the rear light of a VAZ 2115 can be carried out by competent and competent service center specialists, or directly by the owner of the car.
Features of the rear lights
The lights in the VAZ 2115 car play a significant role due to the fact that they are aimed at ensuring the safe movement of the car when participating in road traffic. Based on experience and various features, professionals recommend: if the unit fails, then it undoubtedly needs to be replaced almost at the same moment. There are a number of parts that need to be replaced, but often a comprehensive replacement of such components is performed.
Purpose of rear lights in a car
Cars, trucks, trailers and semi-trailers are equipped with high-quality tail lights. Such an element or part is an integral part of the car. It performs a warning and alarm function for vehicles that are behind. Using rear lights, you can inform other road users about the following actions:
- braking;
- turning;
- backwards;
- indicate the location of the vehicle at night.
The rear dimensions of the car consist of several light bulbs. Modern tuning capabilities provide a wide selection of LED lamps, which not only have a certain lighting according to their color characteristics, but also differ in various capabilities. Experienced service center experts recommend that VAZ 2115 owners replace rear lights only using an original part from the manufacturer.
Step-by-step instruction
Experienced professionals who have repeatedly replaced VAZ 2115 rear lights have created specialized step-by-step instructions for owners of this car brand. It is believed that if the replacement is carried out using the steps presented below, the rear lights will function even better than before. To carry out such activities, you will need one single key. Therefore, there is no need to use a wide range of different tools.
- open the trunk;
- bend the trim to provide free access to the dimensions;
- Unplug the power connector. To carry out such an activity, it is necessary to tighten the block with the wires, but there is no need to make excessively sudden movements so as not to damage the fragile wires.
- press the specialized latch;
- remove the cover on which the specialized board and light bulbs are located;
- remove the headlight using the key. That is, you need to remove the headlight fasteners and disconnect it from the body;
- After dismantling the old dimensions, you can begin installing the new part.
- assembly is carried out according to a similar principle, but in reverse order.
Functionality check
Upon completion of the installation of new parts, it is necessary to check the functionality before finally tightening the nuts. This is due to the fact that light bulbs or wires often fail due to incorrect actions of vehicle owners. If after testing the headlight functions in the same mode, then the part can be finally secured, and at this point the replacement of the VAZ 2115 rear light is considered complete.
Replacing a VAZ 2115 headlight
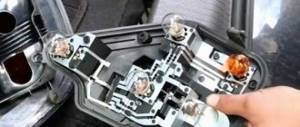
Design of the rear lights of the VAZ 2114
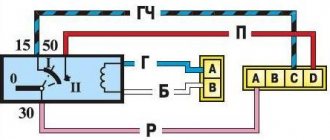
In order to carry out repairs, diagnose and eliminate emerging problems, it is necessary to understand the design and diagram of the rear lights of the VAZ 2114. The rear light design consists of three main elements:
- back cover;
- boards with fasteners, connections for connecting light bulbs;
- external decorative cover, light diffuser.
Connection diagram for wires of components (lamps):
- direction indicators;
- overall glow;
- signaling (brake lights);
- fog lights;
- signs for reversing.
Causes of breakdowns
The most common reasons for node failure:
- the narrowest point in the entire structure is the elastic board;
- in second place, banal burnout or mechanical damage to light bulbs;
- the third reason is a problem with the fuse or relay;
- oxidation of contacts;
- broken wiring.
First of all, it makes sense to check those elements that do not require removing the entire headlight (for example, fuses, relays). Then check the quality of the connections, the presence of oxidation and the voltage supply level to the illuminator. The last step is to disassemble the taillight, remove and inspect the board.
Replacing the rear lights of a VAZ 2114
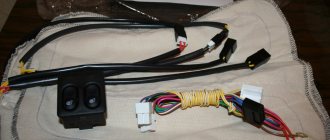
To remove the rear lighting equipment you will need:
- key to "8";
- Convenient Phillips screwdriver.
All work consists of seven simple steps:
- The first step is to open the trunk of your car. If it is filled with things that may interfere with the work process, free up the interior space.
- In order to gain unhindered access to the rear light housing, it is necessary to remove the decorative fabric trim. It is attached using several self-tapping screws, which can be easily unscrewed with a screwdriver. We remove the casing so that it does not interfere with the future process. On more modern VAZ 2114 models, the trim is attached using regular fabric Velcro.
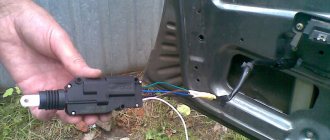
- We feel for the contact chip that is attached to the headlight circuit board and carefully pull it out of the connector. In this case, do not shake the chip from side to side; carry out all manipulations extremely carefully.
- Now is the time to remove and remove the board itself. To do this, press on the special plastic clamp and pull the product out of the headlight housing.
- At this stage we will unscrew the mountings of the rear lights. Using an “8” wrench, we will need to unscrew one nut from the four mounting studs, which are located in the corners of each lamp.
- All that remains is to disconnect the device body from the car body. To do this, grab the headlight with both hands and pull it towards you.
- The reverse connection of the rear lights on the VAZ 2114 is carried out in a similar way, as well as the removal process.
Why don't FZH work?
There are several reasons why FZHs can fail. Let's try to understand them.
| Cause of malfunction | What to do |
| Lamp burned out | Replace the burnt out bulb with a new one, check the condition of the contacts |
| The fuse is broken | Check, replace if necessary. A fuse can lead to loss of functionality of the entire contact circuit |
| There is no ground on the board | The board is located under the lamp. Simple repair to fix the problem |
| The contacts have oxidized and become coated | Cleaning contacts is not difficult |
| The wiring is broken | You will have to diagnose the condition of the circuit, check the integrity of the wiring using a tester and a visual method |
| The contact on the headlight film has burned out | You will need to clean the contacts and replace the elements if necessary. |
| There is a breakdown in the gearbox mechanism | In such a situation, the issue of gearbox malfunction will have to be resolved. |
| The frog (sensor) has failed | Check the condition of the reverse sensor, replace the device if necessary |
There are a lot of reasons for the failure of the FZH, so the driver must know exactly how to eliminate this or that type of breakdown.
Block ZF
Removing the rear light board
To remove the board, you will need to perform a few simple manipulations:
- Open the trunk;
- Remove everything unnecessary from the space so that it does not interfere with your work;
- Remove decorative trim;
- Remove the plastic casing;
- Remove the back panel;
- Having gained access to the socket and the license plate lamp, you can remove the devices;
- Remove the reversing sensor mounting studs and the headlight itself.
Many people confuse the reverse sensor with the speed sensor, since these devices are located in close proximity to each other.
Dismantling works
Checking the functionality of the sensor
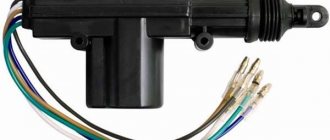
If the taillights do not turn on, the culprit may be the reverse sensor, that is, a frog in the people.
Remove the contacts from the sensor and clamp them together, then turn on the ignition. If the light appears, the sensor needs to be replaced. If there is still no light, the integrity of the circuit is broken, but everything is fine with the frog itself.
Replacing the sensor is quite simple:
- Place the car on a pit or overpass;
- Apply the handbrake;
- Remove the protection from the bottom, opening access to the gearbox;
- Remove the contacts from the old sensor;
- Place an empty container under the sensor and remove the frog. The container is needed because when the device is removed, oil will leak out of the gearbox;
- Remove the old frog, insert a new one in its place;
- Let the car sit for a while;
- Check the oil level inside the gearbox;
- If necessary, add oil to the required level;
- Reassemble.
Article on the topic: Replacing the release bearing on a VAZ 2114, the principle of checking it
Such repairs can be done with your own hands, and the cost will be approximately 250 rubles. This is exactly how much a new sensor for a VAZ 2114 costs now.
Problem with the light bulb
It is not uncommon for taillights to stop functioning normally due to the failure of the bulb itself.
- To replace it, you need to disconnect the block with wires and remove the contact panel from the flashlight. Here you just need to squeeze the side latches to remove the plastic panel;
- Apply a little pressure on the cartridge and unscrew it counterclockwise;
- Check the condition of the contacts and wiring;
- Screw in a new light bulb that matches the previously installed one;
- If necessary, before screwing in the new lamp, clean the contacts and test the wiring with a tester. There may be a break in the circuit, so a new light bulb will not work.