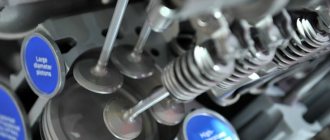
During engine operation, natural wear and tear occurs on its rubbing and contacting parts, including valves, rockers, and camshafts. The gap in the “camshaft cam-rocker valve” drive increases, a knocking noise appears. They call it “valve knock”.
It is clearly distinguishable against the background of other noises, is heard at regular intervals, and its frequency is less than the frequency of any other knock in the engine. Sometimes this valve knocking noise disappears completely after the engine warms up. If you have this clicking noise, it’s time to think about adjusting the thermal gap (later adjusting the valves) between the rocker and the camshaft cam. It is better to time the valve adjustments to coincide with changing the engine oil.
Why? Dust, dirt, sand that accidentally gets into the engine during adjustment will be removed along with the old oil and oil filter.
Thermal clearances are checked and adjusted on a cold engine.
For intake valves (2, 3, 6, 7) the gap is set to 0.15 mm, and for exhaust valves (1, 4, 5, – 0.2 mm.
 For intake valves (2, 3, 6, 7) the gap is set to 0.15 mm, and for exhaust valves (1, 4, 5, – 0.2 mm.
 It is not at all necessary to memorize which intake and which exhaust valves, just look at the intake and exhaust manifolds. The intake valves will be located opposite the intake manifold pipes, and the exhaust valves will be located opposite the exhaust manifold pipes.
Try to set the gap as accurately as possible. With a large gap, severe wear of the rocker, camshaft cam and valve end occurs, and with a small gap, the valve plates burn out.
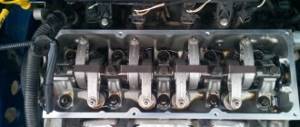
Before adjusting the valves, you must first check the fastening of the camshaft bearing housing, the alignment of the marks on the crankshaft pulley and the camshaft sprocket, and tighten the chain.
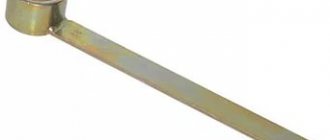
You can adjust it in two ways, using probes or using a special device with a micrometer. Adjusting with feeler gauges is a long and imprecise operation. Uneven surfaces between the rocker and the camshaft cam are not taken into account; accordingly, the gap will be plus or minus a kilometer. Therefore, it is better to give preference to a bar with a micrometer. All eight valves can be adjusted easily, accurately and quickly within 18-22 minutes. It is impossible to make a mistake in the adjustment order, since the valve number is indicated on the bar and at what angle the crankshaft must be turned to adjust it. Even a beginner can easily handle the procedure.
Signs of valve failure on Niva 2121
The manufacturer regulates this work to be carried out every 45 thousand mileage.
But quite often there is a need to adjust them much earlier, due to many reasons. Many experts recommend adjusting the valves at intervals of at least 20 thousand kilometers in case of frequent maximum engine load. This indicator is primarily due to the quality of domestic spare parts, which wear out quite quickly even under ideal operating conditions.
The appearance of a metallic knock in the upper part of a running engine, very similar to the sound of a sewing machine, will mean an increased gap between the camshaft cam and the valve tappet. This reason is caused by increased wear of the installed adjusting washer or camshaft cam. If such a sound occurs, it is necessary to adjust the valves as soon as possible, which will avoid major problems.
Much also depends on the quality of the engine oil, which has a significant impact on the degree of wear of power unit parts.
The use of high-quality oil guarantees good lubrication of parts, which will significantly extend the service life of the camshaft and other engine components.
In this case, the need to adjust the valves occurs after a mileage of 30-35 thousand kilometers, and it is quite possible that it will only be necessary to measure the valve tappet clearances.
Video: VAZ 2121 NIVA Valve adjustment
In order to measure the thermal clearances of valves on Niva 2121, you must perform the following procedure:
- Remove the cylinder head cover.
- We turn the crankshaft as it rotates until the marks on the camshaft drive sprocket and the bearing housing align.
- In this case, the mark on the crankshaft pulley should be located opposite the long mark located on the timing cover. Which corresponds to the position of the top dead center in the fourth cylinder (end of the compression stroke) - it is necessary to adjust the inlet valve of the 3rd cylinder and the exhaust valve of the 4th, that is, the 6th and 8th cams. The report is from the camshaft sprocket.
| Crankshaft rotation angle, degrees | No. of adjustable valves (cams) |
| 0 | 8 and 6 |
| 180 | 4 and 7 |
| 360 | 1 and 3 |
| 540 | 5 and 2 |
We rotate the crankshaft 180°, which also corresponds to moving the ignition distributor slider 90°, and adjust the next pair indicated in the table above.
To check and adjust the gaps, do the following:
- Insert the required feeler gauge into the gap between the valve lever and the camshaft cam. The probe should move with little effort. If it does not fit, or moves too freely, we make an adjustment.
- Use a seventeen-size open-end wrench to loosen the locknut, and use a thirteen-size wrench to turn the adjusting bolt and achieve the required clearance. When tightening the lock nut, the gap may become slightly off, so it is worth checking it again.
- After carrying out a full adjustment cycle, turning the crankshaft again, we check and, if necessary, adjust the clearance to the desired level.
Do-it-yourself Niva valve adjustment
After a certain period has passed, the valves must be adjusted for each car. In this material we will analyze in detail how this procedure is performed, what tools are needed for this, and what you should pay attention to when adjusting Niva valves. This instruction is relevant for the following Niva models: 21213, 21214, 2121.
Why do you need to make adjustments?
Adjustment of Niva valves is required for the power plant to operate normally. Our task is to maintain the gap between the valves set by the manufacturer. If the distance between the parts exceeds the permissible norm, the driver hears unpleasant noises made by the car engine.
When the valves are too tight, the power plant cannot produce maximum power, dynamics suffer and fuel consumption increases. You can find out how often this procedure needs to be carried out in the car’s operating manual; the procedure is also indicated there.
As the experience of owners of domestic models of this brand shows, correct valve adjustment is enough for 20 thousand kilometers. Determining that the gaps need adjustment is quite simple: grinding, clattering and other noises appear, which become especially loud at medium and low speeds.
Tools and preparatory work:
An essential tool for configuration.
Despite the importance of adjustment, this procedure requires a minimum number of tools and materials:
With this read: Replacing the engine sump gasket for a VAZ 21214
➥Set of probes. If it is not there, then buy a feeler gauge with a thickness of 0.15 mm (for the exhaust valve) and 0.20 mm (for the intake valve). ➥Open-end wrenches 13 and 17. ➥Rags and brush for cleaning.
nivaexpert.ru
How to adjust valve clearances on a Niva 2121 with your own hands - step-by-step instructions
And so, now let's move on to step-by-step instructions for adjusting valve clearances on Niva 2121:
- Remove the cylinder head cover.
- We turn the crankshaft as it rotates until the marks on the camshaft drive sprocket and the bearing housing align.
- In this case, the mark on the crankshaft pulley should be located opposite the long mark located on the timing cover. Which corresponds to the position of the top dead center in the fourth cylinder (end of the compression stroke) - it is necessary to adjust the inlet valve of the 3rd cylinder and the exhaust valve of the 4th, that is, the 6th and 8th cams. The report is from the camshaft sprocket.
- Crankshaft rotation angle, degrees No. of adjustable valves
- We rotate the crankshaft 180°, which also corresponds to moving the ignition distributor slider 90°, and adjust the next pair indicated in the table above.
- To check and adjust the gaps, do the following:
- Insert the required feeler gauge into the gap between the valve lever and the camshaft cam. The probe should move with little effort. If it does not fit, or moves too freely, we make an adjustment.
- Use a seventeen-size open-end wrench to loosen the locknut, and use a thirteen-size wrench to turn the adjusting bolt and achieve the required clearance. When tightening the lock nut, the gap may become slightly off, so it is worth checking it again.
- After carrying out a full adjustment cycle, turning the crankshaft again, we check and, if necessary, adjust the clearance to the desired level.
- Remove the cylinder head cover.
- We turn the crankshaft as it rotates until the marks on the camshaft drive sprocket and the bearing housing align.
- In this case, the mark on the crankshaft pulley should be located opposite the long mark located on the timing cover. Which corresponds to the position of the top dead center in the fourth cylinder (end of the compression stroke) - it is necessary to adjust the inlet valve of the 3rd cylinder and the exhaust valve of the 4th, that is, the 6th and 8th cams. The report is from the camshaft sprocket.
- Angle of rotation of the crankshaft, degrees No. of adjustable valves (cams)
- We rotate the crankshaft 180°, which also corresponds to moving the ignition distributor slider 90°, and adjust the next pair indicated in the table above.
- To check and adjust the gaps, do the following:
- Insert the required feeler gauge into the gap between the valve lever and the camshaft cam. The probe should move with little effort. If it does not fit, or moves too freely, we make an adjustment.
- Use a seventeen-size open-end wrench to loosen the locknut, and use a thirteen-size wrench to turn the adjusting bolt and achieve the required clearance. When tightening the lock nut, the gap may become slightly off, so it is worth checking it again.
- After carrying out a full adjustment cycle, turning the crankshaft again, we check and, if necessary, adjust the clearance to the desired level.
Installation of adjusting bolts on a Chevrolet Niva
New hydraulic compensators, as has already become clear, are expensive, and the guarantees that they will not knock again are minimal. It is for these reasons and because of the price dispute that adjusting bolts can be installed.
The work is done the same, but you will have to adjust the valves separately and assemble the engine a little differently.
Video about replacing hydraulic compensators with bolts on a Chevrolet Niva engine
Assembly Features
- It is necessary to thoroughly clean all bolt wells.
- We mount the plates and tighten the new bushings.
- Next, tighten the bolts and install new springs with rockers.
- We install the camshaft in its place and tighten the chain. There is no need to install the oil ramp yet.
Now it is necessary to adjust the valves, and this is done in the same way as on any other car of the VAZ family.
- The valves are adjusted using a wide probe or indicator.
- When the mark on the camshaft is aligned, that is, in the fourth cylinder, we adjust valves 8 and 6, then rotate the crankshaft 180 degrees, adjust 7 and 4, then 3 and 1, and finish with 2 and 5.
Such work is inconvenient due to the fact that adjustment is required every 10-15 thousand kilometers.
Valve clearance
The valve clearance of 0.15 mm , which is set with a feeler gauge, must be carried out only on a cold engine. If this value is less, then they may simply burn out, and if it is more, they will start knocking.
- Posts: 29
- From: Kozmodemyansk
October 10, 2012, 10:46 pm #1 123
Hello guys! please tell me how to adjust the eight-valve valves on a Chevrolet Niva injector
- Posts: 19537
- From: Petrozavodsk
- Lada Priora
October 11, 2012, 10:00 #2 123
vova19, October 10, 2012, 22:46, #1
Hello guys! please tell me how to adjust the eight-valve valves on a Chevrolet Niva injector
Doesn't it have hydraulic compensators?
- Posts: 6865
- From: Tambov
October 11, 2012, 10:10 #3 123
Yes, it has hydraulic compensators
- Posts: 29
- From: Kozmodemyansk
October 11, 2012, 10:24 #4 123
Guys, I just did engines for VAZ 2101 2109 bus groove 3105 there I can easily adjust the valves by two turns of the crankshaft 0 and 360 and the valves are ready without problems, etc. But I’ve never encountered hydraulic compensators, for me this is the first on the Internet, I can’t find details on how to eliminate the cause of the valves knocking on my father’s Chevrolet Niva at a temperature when the engine heats up to 40 they stop knocking and when the temperature rises to 90 they ring. help with this problem, maybe you have a website, I can read everything there in detail, how to do it all?
- Posts: 6865
- From: Tambov
October 11, 2012, 10:39 #5 123
What year is the car?
- Posts: 6865
- From: Tambov
October 11, 2012, 10:40 #6 123
You need to install new hydraulics or adjusting bolts. One out of two
- Posts: 19537
- From: Petrozavodsk
- Lada Priora
October 11, 2012, 10:43 #7 123
vova19, October 11, 2012, 10:24, #4
Guys, I just did engines for VAZ 2101 2109 bus groove 3105 there I can easily adjust the valves by two turns of the crankshaft 0 and 360 and the valves are ready without problems, etc. But I’ve never encountered hydraulic compensators, for me this is the first on the Internet, I can’t find details on how to eliminate the cause of the valves knocking on my father’s Chevrolet Niva at a temperature when the engine heats up to 40 they stop knocking and when the temperature rises to 90 they ring. help with this problem, maybe you have a website, I can read everything there in detail, how to do it all?
They say this is a fairly common problem on the Chevrolet Niva. A guy I know had one too. As the specialists explained to him, the solution is either compensators or change to a conventional mechanism. He chose the second option. Now I'm happy as an elephant.
- Posts: 6865
- From: Tambov
October 11, 2012, 10:51 #8 123
Serega_karel, October 11, 2012, 10:43, #7
They say this is a fairly common problem on the Chevrolet Niva. A guy I know had one too. As the specialists explained to him, the solution is either compensators or change to a regular mechanism. He chose the second option. Now I'm happy as an elephant.
Common mistakes when adjusting valves on Niva 2121
When turning the ignition key there was a loud bang - they forgot to remove the ratchet key. Tighten the ratchet nut to a torque of 101.3-125.6 N.m.
The engine started, but stalled when the choke button was pressed in - they forgot to insert the vacuum brake booster hose into the vacuum booster. If you put the car in gear and the car doesn’t move, remove the car from the jack :-)