The valve mechanism refers to the engine's gas distribution system. The efficiency of the power unit depends on its correct settings. Cars of the Lada Largus family are equipped with Renault engines with one gas camshaft and 8 valves - the K7M engine - and with two camshafts and 16 valves - the K4M engine. An important parameter for adjusting valves is the gaps between them and the camshaft cam. They must strictly comply with technical regulations. Sixteen-valve K4M engines are equipped with hydraulic compensators, and they do not provide the ability to adjust the clearances.
When valve adjustment is required
Engine valves increase in size when exposed to high temperatures. For this reason, adjustment can only be carried out correctly on a cold engine. A schematic diagram of the valve mechanism is shown in the figure.
Lada Largus engine valve mechanism diagram
- Clearance adjustment nut.
- Lock-nut.
- Plate.
- Crackers.
- Spring.
- Oil scraper cap.
- Camshaft cam.
- Rocker.
- A – Thermal gap.
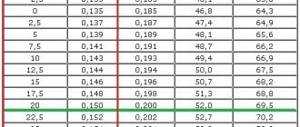
According to the manufacturer's regulations, thermal clearances must strictly comply with the following values:
- for exhaust valves – 0.25-0.30 mm;
- for intake valves – 0.01-0.15 mm.
It is recommended to perform the adjustment every 100 thousand kilometers, as well as when extraneous metallic sounds appear in the head and the camshaft clicking at idle.
Adjusting valve clearances
| Author: pakhan74 Published: 1852 days ago (October 6, 2015) Logbook: My Log Category: Uncategorized Edited: 5 times - last October 25, 2016 | +10↑ Votes: 10 |
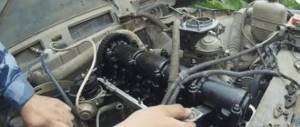
Today the weather was good, there was nothing to do, I decided to check the gaps. I opened the hood, removed the air vent, and blew off the dust.
I unscrewed eight 8mm bolts and saw the “insides”
I jacked up this drive wheel, I’m right-handed and it’s more convenient to turn with my right foot
I spun the wheel until the letter “Fe” appeared. Then I had to lie, because the shaft was already in the right position. But that doesn't always happen
TDC of the first cylinder corresponds to the letter F on the pulley, or the green mark on the shaft.
I turn the wheel towards myself, adjusting the next edge on the shaft, which corresponds to TDC 3 cylinders
In the same way I adjust the edge without marks - this is the 4th cylinder
And the fourth side with the mark - cylinder 2
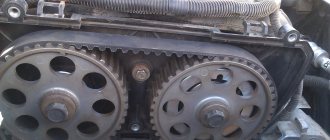
A couple of pictures of the timing belt
The image has been reduced. Click to see original.
← How to quickly repair a tubeless tire
Create your own logbook, and you will be able to share with forum members your opinion about Largus, useful developments, installed additional information. equipment and tuning, trips and travel! To create a logbook, you must register on the site.
Tags: valve clearance adjustment, engine
Popular in in-flight magazines
DRL Traveling on Largus Fuel consumption Armrest Mileage Discs Radio To1 First impressions Buying Largus Electrics Covers for Largus Bumper net Modifications HBO Speakers Rear view camera Wipers Interior lighting Brake light Tuning Tires and wheels Check valve Tuning lights Noise insulation Winter tires Rugs Largus DVR Rki-19 Winter operation Roof box PTF Tail lights Izhevsk Car audio Injectors Mudguards Washer reservoir Hood stops Low beam lamp Installing a cabin filter Parking sensors Thresholds Lada Largus LED Carpet covers Floating idle speed Trunk lighting Tinting Trunk shelf Trip to the sea Hood seal Accident Owner's review Fender liners Walkie Talkie Additional Socket Eyeglass case Replacement 5th gear
Comments (20)
| Andrey-174 October 6, 2020 at 08:18 pm +1 | |
|
| Den 73 rus October 6, 2020 at 09:28 pm 0 | |
|
| burnt October 6, 2020 at 09:33 pm 0 | |
|
| Den 73 rus October 6, 2020 at 09:37 pm 0 | |
|
| burnt October 6, 2020 at 09:50 pm 0 | |
|
| burnt October 6, 2020 at 08:31 pm 0 | |
|
| Dima October 6, 2020 at 08:41 pm 0 | |
|
| Andrey-174 October 6, 2020 at 08:48 pm 0 | |
|
| LarqusMen585 October 7, 2020 at 07:21 0 | |
|
| pakhan74 October 6, 2020 at 09:01 pm 0 | |
|
| pakhan74 October 6, 2020 at 08:59 pm 0 | |
|
| burnt October 6, 2020 at 09:18 pm 0 | |
|
| pakhan74 October 6, 2020 at 09:25 pm 0 | |
|
| Andrey-174 October 7, 2020 at 06:59 0 | |
|
| pakhan74 October 7, 2020 at 09:01 0 | |
|
| Kuryan October 7, 2020 at 11:46 am 0 | |
|
| pakhan74 October 7, 2020 at 5:31 pm 0 | |
|
| Kuryan October 8, 2020 at 11:24 am 0 | |
|
| Dima October 8, 2020 at 03:35 pm 0 | |
|
| starryway October 29, 2020 at 10:33 pm 0 | |
|
| Add a comment | RSS comments feed |
Additional comments:
Adjustment procedure for an 8-valve engine
The Lada Largus valves are adjusted in accordance with the technical regulations of the manufacturer. First, you need to place the car on a level surface, jack up the front wheel, engage fourth gear, open the hood and remove the air filter housing, disconnecting all the pipes. Then you should remove the high-voltage wires from the spark plugs, the connector from the ignition module, release the wiring harnesses and take them towards the passenger compartment.
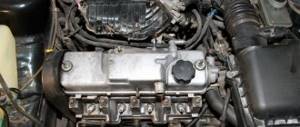
Before removing the valve cover, you need to wipe it so that when removing it, dust or dirt does not get on the valve mechanism or the block head. For convenience, you can remove the ignition module.
The next stage is setting the top dead center (TDC). To do this, you need to slowly rotate the jacked wheel and make sure that the letter “F” appears on the stiffening rib of the camshaft drive gear. In this case, the piston of the first cylinder will be at TDC on the compression stroke, and both valves will be closed. Cylinder numbering starts from the flywheel side. Armed with a set of feeler gauges, pliers and a 10 mm wrench, you can make the adjustment yourself.
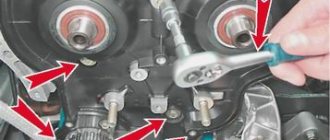
A feeler gauge with a thickness of 0.15 mm is used for the intake valve, and 0.25 mm for the exhaust valve. They need to be inserted sequentially into the gap between the rocker adjustment screw and the valves. The feeler gauge must fit in with a slight interference fit, otherwise the gap must be adjusted. While holding adjusting nut 1 with pliers (see Fig. 1), you need to loosen lock nut 2 with a 10 mm wrench. Then set the required gap with nut 1 and lock it with nut 2, holding it from turning with pliers.
Engine characteristics
The initial version of the 1.6 liter engine with a power of 105 hp. With. was designed for AI-92 fuel. After the requirement to increase the environmental standard to Euro-5, some adjustments were made to the engine design, which is why the number of horses was reduced to 102. However, the Largus 16-valve engine did not undergo any major changes. The eight-valve version of the power unit initially produced 87 hp. s., and after the eco-standard - 84 l. With. As a result, the Romanian-made engine was replaced with a domestic version, maintaining the volume of 1.6 liters. More details about the motors:
- LADA Largus 8-valve. The initial model of the power unit was installed from a Renault K7M with an output of 84 hp. s., as stated earlier. The only difference from the similar K4M is the cylinder head. Later, it was decided to replace the engine with a domestic version, using the VAZ 11189 as a basis with a torque of 140 Nm and 87 hp. With. Already on Largus under the B0 platform, French engineers redid the engine mounts: from the body to the subframe.
Consequences of incorrect adjustment
The optimal value of thermal clearances was determined by analyzing the operation of the valve mechanism, gas distribution system and carrying out accurate calculations. With an increased distance, noise appears when the engine is running, especially when it is not warmed up, due to shock loads that negatively affect the entire timing system. This can lead to desiccation of the valve, its jamming, and when it meets the piston at TDC, the gap bends the valve on Largus.
Large thermal gaps do not allow the combustion chamber to be effectively filled with the working mixture, which reduces engine power and impairs the efficiency of its operation.
Too small thermal clearances reduce compression, lead to strong heating of the valve and seat and lead to their burnout. In such a situation, not only does camshaft wear increase, but more serious damage to the timing system may also occur. In both the first and second cases, the result of incorrect adjustment will be the replacement of valves on the Lada Largus, and the entire set will have to be changed
The valve mechanism is an important part of the engine timing system. Modern 16-valve engines are equipped with hydraulic compensators that automatically maintain the required thermal clearance throughout the entire service life of the vehicle. But most cars use traditional valve mechanisms. Adjusting thermal gaps is not a very complicated procedure that almost every car enthusiast can do. But special attention should be paid to this operation, since if the adjustment is incorrectly performed, a major overhaul of the engine may be required.
Lada Largus 8 valves is the most affordable option for a practical station wagon. Initially, the model was equipped with an 8-valve engine from the Renault K7M series of the same displacement of 1.6 liters. True, the previous power unit had to be imported from Romania, which, given the fall of the ruble, turned out to be simply unprofitable, so the manufacturer switched to the domestic analogue of the VAZ-11189.
Gasoline power unit Lada Largus VAZ-11189 with a power of 87 hp. with a displacement of 1.6 liters, it replaced the VAZ-11183 injection engine developing 82 horsepower. The new lightweight piston group from Federal Mogul managed to increase the power and efficiency of the power unit. Of course, the engine is not distinguished by enchanting dynamics and low fuel consumption, but its relatively simple design and maintainability allow us to talk about a good option for our harsh operating conditions.
Lada Largus valve adjustment
Lada Largus. Insufficient oil pressure (low oil pressure indicator light is on)
Causes of drop in oil pressure
There is a light on the instrument panel that indicates emergency oil pressure in the engine. When it lights up, it is a clear sign of a problem. We'll tell you what to do if the oil pressure light comes on and how to fix the problem.
The oil check light can come on for two different reasons: either low oil pressure or low oil level. But what exactly does the oil light on the dashboard mean, only the operating instructions will help you find out. It will help us that, as a rule, budget cars do not have a low oil level indicator, but only a low oil pressure indicator.
Insufficient oil pressure
If the oil light comes on, this means insufficient oil pressure in the engine. As a rule, it lights up only for a few seconds and does not pose a great threat to the engine. For example, it can light up when the car rolls heavily during a turn or during a cold start in winter.
If the low oil pressure light comes on due to a low oil level, then this level, as a rule, is already critically low. First of all, when the oil pressure light comes on, check for the presence of engine oil. If the oil level is below normal, then this is the reason for this lamp to light up. This problem can be solved simply - you need to add oil to the required level. If the light goes out, we rejoice, and do not forget to add oil on time, otherwise this could result in serious problems.
If the oil pressure light is on, but the oil level on the dipstick is fine, then another reason why the indicator could light up is a failed oil pump. It does not do its job of ensuring sufficient oil circulation in the engine lubrication system.
In any case, if the oil pressure or low oil level light comes on, the car must be stopped immediately by pulling to the side of the road or to a safer place and turning off. Why do you need to stop right away? Because if the oil in the engine has depleted significantly, then the engine may stop and break down, with the prospect of very expensive repairs. Don't forget that oil is very important to keep your engine running. Without oil, the engine will fail very quickly - sometimes in just a few minutes of operation.
This situation also occurs when the engine oil is changed to new one. After the first start, the oil pressure light may come on. If the oil is of good quality, it should go out within 10-20 seconds. If it does not go out, the reason is a defective or non-functioning oil filter. It needs to be replaced with a new quality one.
Oil pressure sensor malfunction
The oil pressure at idle speed (at approximately 800 - 900 rpm) should not be less than 0.5 kgf/cm2. Sensors for measuring emergency oil pressure come with different response ranges: from 0.4 to 0.8 kgf/cm2. If a car is equipped with a sensor with a response value of 0.7 kgf/cm2, then even at 0.6 kgf/cm2 it will turn on a warning lamp, signaling a kind of emergency oil pressure in the engine. To understand whether the oil pressure sensor is to blame for the light coming on or not, you need to increase the crankshaft speed to 1000 rpm at idle. If the light goes out, then the oil pressure in the engine is normal. If not, then you need to contact specialists who will measure the oil pressure with a pressure gauge, connecting it instead of the sensor. Cleaning the sensor helps prevent false alarms. You need to unscrew it and thoroughly clean all the oil channels, because the cause of false alarms of the sensor may be due to blockages.
If the oil level is normal and the sensor is working
First of all, you need to check the oil dipstick and make sure that the oil level has not increased since the last check? Does the dipstick smell like gasoline? It is possible that gasoline or antifreeze is getting into the engine. It’s easy to check the presence of gasoline in the oil; you need to dip the dipstick in water and see if gasoline stains remain. If yes, then you need to contact a car service; the engine may need to be repaired. If there is a malfunction in the engine, which is caused by the oil pressure light coming on, it is easy to notice. Engine malfunctions are accompanied by loss of power, increased fuel consumption, and black or blue smoke coming out of the exhaust pipe.
If the oil level is normal, then there is no need to worry about a prolonged indication of low oil pressure, for example during a cold start. In winter, at low temperatures, this is an absolutely normal effect. After parking overnight, the oil drains from all lines and thickens. The pump needs a certain time to fill the lines and create the necessary pressure. Oil reaches the main and connecting rod journals earlier than the pressure sensor, so wear of engine parts is eliminated. If the oil pressure light does not go out for about 3 seconds, it is not dangerous.
What you can do yourself
Measuring engine oil pressure The problem of low oil pressure is greatly complicated by the relationship between lubricant consumption and level drop with the overall pressure in the system. In this case, a number of malfunctions can be eliminated independently.
If leaks are detected, the problem is quite easy to localize and solve. For example, oil leakage from under the oil filter can be eliminated by tightening or replacing it. The problem with the oil pressure sensor, through which lubricant flows, is solved in a similar way. The sensor is tightened or simply replaced with a new one. As for seal leaks, in this case you will need time, tools and skills. In this case, you can replace the front or rear crankshaft oil seal with your own hands in your garage with an inspection hole.
Timing diagram Lada Largus 8 valves
- 1 - crankshaft toothed pulley
- 2 - coolant pump toothed pulley
- 3 - tension roller
- 4 - rear protective cover
- 5 - camshaft gear pulley
- 6 - timing belt
- A - boss on the rear protective cover
- B - mark on the camshaft pulley
- C - mark on the oil pump cover
- D - mark on the crankshaft pulley.
Another feature of the engine is the location of the water pump (pump), which is rotated by the same timing belt. That is, in case of coolant leaks or characteristic noise/whistle/hum in the timing drive area, checking the belt is mandatory. If the pump bearing crumbles and the belt comes off, then in addition to replacing the water pump housing and belt, you will also have to go through the cylinder head, removing bent valves from there.
Checking and adjusting thermal clearances of K7M engine valves
To compensate for thermal expansion of the valve relative to the valve lever, a gap is designed between the end of the valve end and the lever. With an increased gap, the valve will not open completely; with a reduced gap, it will not close completely.
We check the gaps and adjust them when a characteristic knocking sound of the valves appears. There is a ringing knock at the top of the cylinder head.
Be sure to adjust the gaps after repairing the cylinder head.
The gaps should be measured on a cold engine, approximately 20˚ C.
The gap should be 0.2 +0.05 mm for the intake valves. For exhaust valves, the clearance should be 0.4 +0.05 mm.
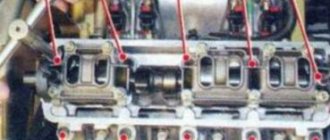
The intake valves relative to the body of the Largus car are closer to the windshield.
A number of exhaust valves are located closer to the radiator of the engine cooling system.