Replacing the clutch on a Lada car will require a lot of time, effort, money and experience. Many car enthusiasts practice DIY repairs due to the high cost of professional services.
Prevention is complicated by the fact that the VAZ design has a pre-installed subframe that limits access to the units. In order to provide methodological assistance to owners of technical equipment, using the Lada Vesta car as an example, we will consider the process of independently replacing the clutch.
Procedure for replacing the clutch Lada Vesta robot
- Open the hood.
- We remove the battery assembly.
- We dismantle the air filter, housing, air ducts.
- We snap off a number of sensor-controllers.
- In the car interior we remove the plastic inserts, gearbox selector, and electric drives.
- We hang the car using a hydraulic lifting mechanism.
- We dismantle the wheels.
- We drain the waste into an empty container.
- We dismantle the pallet protection.
- Remove the right drive shaft.
- We dismantle the starter and actuator.
- We separate the flywheel and the body of the robotic box.
- We substitute the telescopic support.
- We remove the AMT from under the car.
- Remove the clutch module assembly.
- We carry out preventative maintenance and install new parts.
- We reassemble the structure.
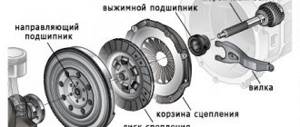
Clutch LADA Vesta
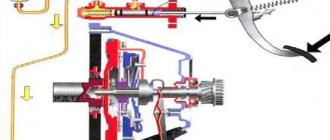
The AvtoVAZ company installs a single-plate dry clutch on its cars. The clutch on a manual transmission is hydraulic, and on an automatic transmission it is electromechanical.
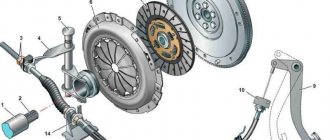
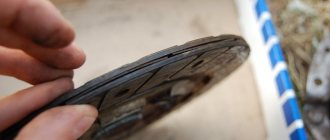
What is the clutch made of? The first part is the driven disk, and the second is the pressure disk assembly or simply “basket”, as drivers call it.
The basket consists of a steel casing into which a pressure disk is installed.
The LADA Vesta clutch basket and disc were developed by the German company LuK. AvtoVAZ received the right to produce German products at its plant in the city of Ulyanovsk.
Replacing the clutch on a Lada Vesta manual transmission with your own hands
- We jack up the front part of the car or install it on the inspection channel, depending on the location of the repair.
- We remove the wheels, mudguards, subframe.
- We dismantle the battery, blocks with wires.
- Remove the air filter housing and cleaning element.
- Removing and replacing clutch cables as necessary.
- We dismantle the starter, hydraulic drive, right drive shaft.
- Remove the sump protection and rear engine mount.
- We fix the motor on the traverses.
- We separate the mechanical housing from the flywheel.
- After preventative maintenance and replacement of worn-out elements, we reassemble.
Adjusting the clutch sensor on Lada Vesta
The main function of the clutch is to disengage the transmission from the engine before shifting. This article will tell you how this mechanism works on the Lada Vesta and how to replace it yourself.
Features of the design and operation of the clutch and its drive in versions with manual transmission
The clutch consists of 2 parts: a driven disc and a “clutch basket”, which combines a pressure plate and a casing with a diaphragm spring.
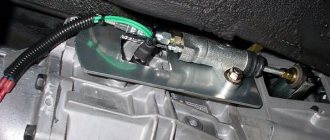
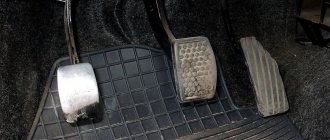
The drive is designed as follows. A clutch pedal with a position sensor is mounted in the interior. It is connected to the master cylinder. The latter is connected through a pipeline to the working cylinder, which is structurally combined with a release bearing mounted in the clutch housing.
When you press the pedal, a piston in the master cylinder pushes fluid into the line. It enters the working cylinder and it moves the release bearing along the splines on the input shaft of the gearbox. The bearing, resting against the petals of the diaphragm spring of the clutch casing, presses it. Thanks to this, the pressure and driven disks move away from the flywheel and the rotation of the crankshaft is not transmitted to the gearbox.
The clutch used in an automated transmission differs from a similar mechanism in a manual transmission in the design of the drive - it is electromechanical and controlled by the ECU.
Symptoms and possible causes of malfunctions are shown in the table below.
| Problem | Cause |
| There is a sound coming from the clutch housing that gets louder when you press the pedal. | release bearing worn out |
| Noise when engaging clutch |
|
| There is a crunching sound when shifting gears; disengaging requires effort |
|
| The pedal is pressed without effort |
|
| When we sharply press the gas pedal, the engine speed increases, but the car accelerates with a delay |
|
| Jerks, pecks when we turn on/off the clutch |
|
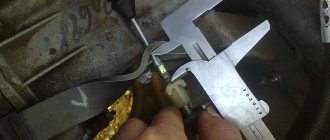
Required tool: ruler or caliper.
This is done as follows:
- Turn off the ignition and raise the parking brake lever.
- Disconnect the wire block from the sensor.
- Turn the element counterclockwise a quarter turn.
- Measure the distance from the body to the cap at the end of the rod. It should be 17-18 mm. To adjust, you need to pull the rod away from the body.
- Reinstall the sensor.
- If you have difficulties, look at the picture at the beginning of the article
Required tool:
- inspection hole;
- assistant;
- wheel chocks;
- jack;
- supports – 2;
- keys: wheel, 18 mm (2 pcs.);
- socket heads: 8, 10, 13, 16, 17, 18, 30 mm, Torx E10;
- bits: Torx T20;
- centering mandrel;
- mounting blade;
- hexagon – 5mm;
- tetrahedron – 8mm;
- empty container for transmission oil – 5 l;
- screwdriver: slotted, Phillips;
- hammer;
- barb or metal rod.
The procedure is as follows:
- Drive into the inspection hole, engage the parking brake, and place chocks under the rear wheels.
- Pump out the brake fluid from the brake system hydraulic reservoir to a level below the fitting to which the clutch hoses are connected.
- Loosen the wheel bolts and hub nuts on the front wheels, raise the front of the car on a jack, install the supports and remove the jack.
- Remove the wheels.
- Remove the gearbox: Unscrew the 13 bolts securing the engine splash guard (protection) and the lower clutch housing cover..
- Remove the battery and its shelf.
- Remove the air filter housing.
- Disconnect the gear selection cables by pressing the lock on the gearbox housing and disconnect the cable end. Press the fasteners securing the cable sheath to the box body. Remove the cable from the repair area.
- Disconnect the hose supplying the brake fluid to the clutch slave cylinder and drain it.
- Disconnect the wiring connectors: oxygen sensor, reversing light switch.
- Drain the oil by unscrewing the plug with a 17" socket (21807) or a square socket (JR3 / JR5).
- Remove the left fender liner by removing the screws using a T20 Torx bit and removing the clips using a slotted screwdriver.
- Place a jack under the gearbox and lift it, unloading the left power unit support.
- Unscrew the pinch bolt from the steering gear driveshaft and disconnect it from the steering column.
- Remove the starter by unscrewing the nut from the power contact with a “13” socket and 3 mounting bolts with an E10 socket.
- Disconnect the stabilizer struts from the shock absorber struts by unscrewing the nut from the ball joint pin with a 16mm socket, holding the pin from turning with a hexagon.
- Remove the rear engine mount by unscrewing with a socket and an 18mm wrench the 3 bolts securing the mount to the front subframe and gearbox housing.
- Disconnect the ball joints from the steering knuckles by unscrewing the nuts with a 18mm socket.
- Remove the front subframe longitudinal members,
- Remove the subframe by unscrewing the 4 bolts securing it to the body using a 18mm head.
- Remove the front wheel drives: unscrew the hub nuts, pull the outer CV joint shank out of the hub. With the mounting blade resting on the inner CV joint, push the drive out of the gearbox.
- Remove the bolts securing the gearbox to the cylinder block.
- Remove the left power unit support by unscrewing with a 16" head the 4 bolts securing it to the body, and unscrewing with a 18" head the 2 bolts securing the support to the gearbox.
- Remove the unit from the vehicle.
The process of replacing the clutch on this unit differs from the previous one only in that before removal it is necessary to disconnect the wire blocks from the electric clutch and gear selection, the shaft speed sensor and the reversing light switch.
Required tools and consumables:
- capacity 0.5 l;
- thin hose;
- bottle of brake fluid;
- slotted screwdriver.
The procedure is as follows:
- Fill the hydraulic reservoir with brake fluid to the Max mark.
- Remove the protective cap from the bleeder fitting.
- Place the hose onto the fitting. Place the second end of the hose into a jar filled 1-2 cm with brake fluid so that it is immersed in the liquid.
- Use a slotted screwdriver to pry the spring clamp of the supply tube and lift it 1 click.
- Pull the tube tip back 1 click.
- Wait until air bubbles stop coming out of the tube. To speed up the process, you can press the clutch pedal several times.
- Return the tube tip and spring clip to their original state.
- Install the engine splash guard, battery and battery shelf.
Adjustment of the hydraulic clutch drive on manual transmissions during operation is not provided. After replacing the clutch on an automated transmission, you will need to contact a service station to reset the drive adaptation. The process of replacing the clutch yourself is a complex and time-consuming procedure. Therefore, if problems arise with this unit, it is recommended to contact a service station.
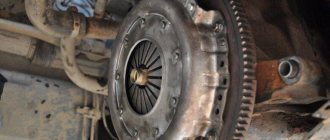
Where is the clutch located
In Lada Vesta with AMT, manual transmission equipment, the clutch is installed under the bottom of the car, behind the flywheel. Access to elements for preventive maintenance after preliminary hanging with a lift, dismantling of attachments.
Clutch device of a Lada Vesta car on a manual gearbox
On Lada Vesta cars with a manual transmission, a hydraulic clutch drive is installed, the purpose of which is to disengage the clutch when the pedal is pressed.
What happens is using brake fluid that enters the clutch cylinder from the master cylinder. If problems arise with the operation of the clutch, do not rush to look for a replacement clutch disc; there may be a breakdown in the hydraulic drive system; inspect the brake fluid supply hoses for cracks and leaks. In addition, it is necessary to monitor the condition of the brake fluid and change it when necessary.
Clutch replacement resource. Consequences of missing deadlines
The manufacturer indicates in the operating manual the average clutch replacement interval for:
- Manual transmission: 65 –80 thousand km;
- AMT: 120 – 140 thousand km. for the clutch under warranty.
Depending on operating conditions and driving style, the interval may be increased. The consequences of violating or ignoring replacement deadlines are not the most rosy, since we are talking about the safety of the driver and passengers. Often the cause of an accident is a malfunction of the clutch or transmission of a technical device.
When to change the clutch on Vesta
If the car was purchased new and the warranty period has not expired, in the cases described, replacing the clutch under the Lada Vesta warranty will be mandatory.
- Jerking when starting off. Some drivers, when contacting an official dealer, indicate a similar problem. Indirectly, the factor indicates wear of the friction lining, and may also indicate problems with setting up the device.
- Delay in the car's response to a sharp press of the gas pedal. If the car stalls when accelerating, this is a clear reason for contacting service.
- When changing gears there are jerks and jams. If the clutch discs are initially installed misaligned, the friction lining will wear incorrectly.
- Device resource exhaustion. Each part on a car has a certain service life. Such a reason is not a reason for warranty replacement, since wear under natural conditions occurs quite slowly.
- Extraneous noise during acceleration and gear shifting, accompanied by jerking or jerking of the car.
Signs you need to replace your clutch
- increasing pedal free play;
- slipping of the driven disk under engine load, sudden increase in speed;
- there is a burning smell in the engine compartment and inside the car;
- when shifting to higher gears, clicks, blows, and jolts are heard;
- increasing and decreasing speeds is carried out with a short pause or delay;
- transmissions are randomly “knocked out” at times.
Replacing the clutch on a robotic gearbox (AMT) Lada Vesta
After we have dismantled the robotic box, the process of which is described above, we proceed to:
- If the pressure plate is defective, we inspect its integrity and check for cracks.
- Using keys “8”, “10” we unscrew the basket fasteners and remove both disks.
- We inspect the release bearing and drive lever. We replace parts with new ones as needed.
Service station experts strongly recommend replacing all elements modularly and not leaving used ones, even if there are no signs of wear or wear. After installation, we do not adjust the hydraulics, since the electric drive will do this automatically.
Clutch device of a Lada Vesta car on a robotic gearbox (AMT)
Lada Vesta cars that have a robotic transmission use a specially designed electronic clutch drive. This type of drive does not require additional fluids or assistance from other components of the car; instead, it directly acts on the clutch fork. This type of drive can last many times longer than a hydraulic one, and in addition, it does not require constant maintenance at all.
Replacing the clutch on a manual gearbox Lada Vesta
After dismantling the mechanical transmission, the step-by-step process is described above, we install new elements:
- basket;
- release bearing;
- damper.
We install the units in reverse order. Unlike an electric drive, a mechanical drive requires mandatory bleeding. To do this, perform the following steps:
- Unscrew the cap of the brake cylinder expansion tank.
- We are replenishing the missing amount of bunkers.
- Jack up the front part and remove the wheel.
- From the back of the brake caliper, we put a rubber hose on the grease fitting and unscrew it.
- Pour the pillbox into a container.
- As soon as the liquid becomes transparent, air bubbles come out, tighten the grease fitting.
By analogy, we bleed the air on the right caliper. We check the level of the bunker in the expansion tank and top it up according to the level.
Conclusion
The process of replacing a clutch at home is quite complicated. For an inexperienced motorist this is an impossible task. Strictly follow the given recommendation to make the process easier. When purchasing parts, check the numbers and articles. Do not purchase cheap analogues of dubious origin, without a guarantee of quality.
Replacing the clutch on Lada Vesta cars
It is highly not recommended to replace the clutch yourself; this can only be done if you have a specialized tool, as well as many years of experience as a car mechanic, and even with these conditions, after replacing the clutch yourself, you risk leaving your car without a factory warranty, since In this type of work, you will have to touch and dismantle several important components of the car at once.
The most logical thing to do is go to a specialized service; the amount you will have to pay for such work starts from 3 thousand rubles, depending on the service you choose; naturally, this service from an official dealer will cost several times more. It is unlikely that you will be able to save on labor costs, but it is possible to do this on spare parts. Any car service center, including the official one, will not refuse you the installation of spare parts that you provide to them yourself. It is no secret that when ordering spare parts for a car from an official dealer, you can see completely inadequate amounts in the price list; in this case, the most logical thing to do is to find these spare parts yourself and ask them to install them. However, be careful when choosing a clutch for a Lada Vesta car with a manual transmission, since different transmissions were installed on this modification of the car, and accordingly, each has its own clutch disc.
Reviews
| № | Positive |
| 1. | Dmitry Nikolaevich (drive2.ru): replaced the hydraulics at 80,000 km. I think that for a domestic car the resource is more than good. |
| 2. | Semyon Mikhailovich (prom.ua): for three years of active use of the equipment, nothing broke, I just carried out diagnostics and replaced fluids. |
| 3. | Sergey Ivanovich (drom.ru): I change the bunker every 45,000 km, there are no complaints about the hydraulics. |
| 4. | Konstantin Nikolaevich (rozetka.ua): after buying the car, I immediately drained the oil, bunker, antifreeze, and replaced them with new, imported ones. |
| 5. | Vladimir Vyacheslavovich (Auto.ru): on the recommendation of the master, at the next maintenance I replaced the release bearing, mileage 74,000 km. |
| 6. | Nikolay Vasilyevich (Auto.Mail.Ru): after the third winter the clutch went off, I contacted the official dealer, they replaced it under warranty. |
| 7. | Svyatoslav (drive2.ru): my positive review of the car, mileage 68,000 km, no major breakdowns. |
| 8. | Sergey Semenovich (drive2.ru): finally, the quality of the Russian automobile industry has improved, cars have become worthy competitors to European brands. |
| Negative | |
| 9. | Vitaly Vladimirovich (prom.ua): the first problems with hydraulics began in the winter, I went to the service station, carried out diagnostics, and replaced a number of parts. |
| 10. | Alexander Vladimirovich (Bibika.ru): instead of the required 65,000 km, the clutch lasted only 48,000 km, after which the basket flew. |
| 11. | Valentin Timofeevich (drive2.ru): on Grant, the hydraulics were implemented better and of higher quality. |
| 12. | Semyon Vasilievich (Avtodispatcher.ru): at the third maintenance I replaced the clutch disc, the mileage was not great, it failed before the due date. |
What details need to be checked?
All listed spare parts must be replaced at the first sign of wear. Due to the low price, this is not difficult to do immediately when installing a new clutch.
First of all, you need to check the clutch release fork. If the seat is damaged, it is better to install a new part. Spare part price: 200-300 rubles.
The clutch fork support is another risk area. At the first sign of wear or play of the ball, the part should be replaced. Spare part price: approximately 200 rubles.
The guide sleeve of the release bearing is also often deformed by 70-80 thousand kilometers. If you or the technician notice even minor damage, it is better to install a new guide. Spare part price: 500-600 rubles.
You can buy all of the above at StoVesta with free delivery within the city.