A few words about car audio systems
To create good acoustics you need a high-quality audio system and its correct placement. There are two main types of acoustics: component and coaxial. In terms of price, the component system loses to the coaxial system: it is much more expensive. The second option involves three-way (low, mid, high frequencies) or two-way speakers. The components of such a system “produce” narrowly targeted sound.
The component system creates surround sound by using speakers with different frequencies installed at different points in the car. The mid-frequency speaker is installed in acoustic podiums on the VAZ 2114 in the front doors. Using special spacer rings, you can turn the speaker towards the driver. The doors will need soundproofing to prevent rattling.
There are several options for installing high-frequency speakers, the most preferable is mounting on the front pillars. With this arrangement, the tweeters, in combination with mid-frequency speakers and a subwoofer, create a deep, “surround” sound. The last component, responsible for transmitting low frequencies, exists in two main versions:
- active (with its own sound amplifier);
- passive (an external amplifier is used).
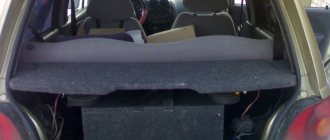
Subwoofers are divided according to the presence or absence of a housing into open and closed. Subwoofer enclosures come in different types: classic (box), barrel, hidden enclosure (often in the free volume of the trunk). Open (“free-air”) bass acoustic components are mounted in doors and armrests between seats. The most common “object” for installation is the VAZ 2114 acoustic shelf.
To create high-quality acoustics, all subwoofer options are installed towards the top or towards the trunk. If a VAZ acoustic shelf is chosen for placement, good sound insulation and a strong position of the dynamic head are required. In this case, the rear factory shelf needs to be modified, that is, pasted with soundproofing materials or weighted with plywood.
Modification of the factory acoustic shelf
To tune the rear shelf you will need.
- Sheet of plywood (thickness - 20 mm, width - 33-34 cm).
- Jigsaw.
- Epoxy adhesive.
- Wood putty.
- Knife.
- Self-tapping screws.
- Sandpaper.
- Carpet.
- Construction stapler.
The acoustic shelf of the VAZ 2114 consists of two layers. First you need to cut off the part of the shelf where the speakers are installed using a sharp knife. Make a template for the part by attaching it to a sheet of plywood. Cut along the outlined contours with a jigsaw. Attach with epoxy glue to the back of the shelf part. The resulting protrusion of the plywood part above the part of the “original” shelf can be removed.
To do this, you need to cut a piece of plywood 2 mm thick in the shape of the cut part of the shelf and attach it to 20 mm plywood. The remaining roughness is removed with wood putty and treated with sandpaper. The finished part of the shelf is covered with carpet: first glue is applied, then the fabric is secured with a construction stapler.
Modified in this way, the rear shelf avoids sound distortion from speaker vibration, since the speakers are mounted on a harder surface and more tightly. Soundproofing the rear shelf will help achieve high-quality acoustics. To carry out this “operation” you will need.
- Vibration-absorbing material for the first layer (Vizomat, Vibroblast, Bimast) - 1 sheet.
- Sound-absorbing material (Bitomast, Accent) - 1 m².
- A smoothing roller (metal) or a round, hard object.
- Technical hair dryer (the power of a regular hair dryer may not be enough for long-term operation).
We cut a sheet of vibration-absorbing material into pieces of the required size, heat it with a hairdryer and apply it to the back shelf, smoothing it with a hard roller. Paste with Vizomat or Vibroplast from 50 to 80% of the area, Bimast - from 40 to 60%. Sound-absorbing material must cover 100% of the surface. When covering with materials, it is advisable to prevent the formation of air bubbles.
The acoustic properties of speakers installed in such a rear shelf will be improved by absorbing vibration from low-frequency sound waves. A more radical and labor-intensive option would be to make an acoustic shelf yourself.
Manufacturing
Acoustic shelves for VAZ 2114
In principle, there is nothing difficult to make. You will need to arm yourself with a little patience (and Moscow was not built right away), follow the instructions clearly, and have the necessary tools and materials at hand.
What do you need
Acoustic shelves for VAZ 2114
To successfully carry out the operation, you must prepare the following:
- Plywood – a sheet 18 mm thick is suitable;
- A piece of material for reupholstery - carpet is ideal, but if the interior is upholstered in leather or leatherette, then for a harmonious perception we replace the carpet with a piece of the corresponding material.
Note. Carpet is good because it is very convenient to work with. This material has amazing obedience if you know how to handle it.
- Glue for carpet - the best option is aerosol or Nairit;
- Stain;
- Special staples for an 8 mm stapler (for wood) and the furniture stapler itself;
- Painting tape;
- Several self-tapping screws.
As for tools, you should have a good jigsaw, a plane and a drill or, better yet, a screwdriver on hand.
Installing an acoustic shelf on a VAZ 2114
Manufacturing process
- First, you will need to prepare a template for the future acoustic shelf, which you can either cut out yourself (which is much more difficult, but individual preferences will be preserved) or transferred to paper from some source (you can download a ready-made sample from the Internet);
Read more: Adr brake pads for VAZ reviews
Acoustic shelf VAZ 2114 and its template
- We place a sheet of plywood on the table and transfer the template onto it. Don't forget about the holes for the speakers, the edges for the rear pillar outlets and the rubber band for the rear window;
- First we cut out the folding part of the future shelf;
- All parts must be covered with stain, do not forget to attach the stiffener and screw the hinges;
- We use carpet to pull both halves of our shelf;
- We install the shelf on the car.
How to install an acoustic shelf on a VAZ 2114
Nothing complicated, as we see. When working with your own hands, it is highly recommended to use visual aids: video reviews, photos - materials, diagrams and drawings. Many step-by-step instructions for making shelves for different tastes and colors can be found on our website. A self-made shelf will not only eliminate problems with sound, but will also provide an opportunity to save a lot of money, because the price of a good acoustic shelf in stores is not small.
I decided to get rid of the shelf I bought and regretted that I bought it.
because for this money I made such a shelf that no one else has, having looked through all the in-flight magazines about the acoustic shelf for the VAZ and decided to make it myself, since I looked on the internet and it costs 400 grams, but I looked closer and realized that there is nothing to pay that kind of money for such a squishy shelf. I searched and found 5 types of shelves like people make and decided to make a little bit of everything from each drawing and in the end the 6th shelf was made, it took a lot of time but it’s worth it and everyone likes it. In general, I took shelves from an old cabinet and board like plywood for the top layer, then I bought screws from a hardware store: wood screws 3.5 x 32 -40 (pcs); 3.5 x 45 - 10 (pcs): for metal 3.5 x 35 - 10 (pcs); Self-drilling screw with hexagonal head 2 (pcs); Furniture corners at 90 degrees - 2 (pcs); Glue 88 - 4 large tubes of 120 (ml); Bauxite resin - 2 liters; Sound carpet - 3 square meters per (32 grams per 1 square) A3 graph paper - 4 sheets, drawing set; Electric jigsaw, grinder, metal disc and planer, brush, regular bandages and metal slats 3 (pcs) I remembered drawing, which was my favorite class at the university
Making your own shelves for acoustics
To make the rear shelf you will need.
- A sheet of plywood 10 mm thick (MDF or chipboard).
- Carpet (non-woven, highly stretchable material). 0.5 m with dimensions 150x80 cm is enough.
- Glue for plywood and carpet (special for this fabric or universal glue 88).
- Self-tapping screws up to 25 mm long.
- Drill.
- Jigsaw.
- Cardboard for making a template and drawing tools (compasses, pencils, rulers).
- Sanding machine or sandpaper.
- Construction or furniture stapler, staples for it.
The template is applied to a sheet of cardboard and then tried on in the machine. A piece of 133x57.5 cm is cut out (with a margin for adjustment). We transfer the drawing to plywood. After cutting down the two outer pieces, we carry out another fitting. Next, we make another template from plywood to accurately determine all the angles. They may interfere with closing the trunk. Let's see if the shelf interferes with locking the luggage compartment.
We measure the radius of the speakers and transfer the resulting dimensions to the layout. Let's start cutting out the shelf, cover and holes for the speakers with an electric jigsaw. The edges of the slots must be carefully sanded. Where the trunk lid opens, sanding is done on both sides. Then we measure the carpet along the entire length of the folding part with a margin of about 5-6 cm.
Apply glue to the bottom part, attach the carpet, and so on along all edges. It is better to apply the glue in parts so that other areas do not dry out. There is no need to apply a thick layer, as the fabric may become saturated. We secure the edges with a construction stapler, placing the staples as close to each other as possible. The carpet is elastic, but you don’t need to stretch it much. After finishing with carpet, the acoustic shelf should dry within 24 hours.
The next stage is fastening the hinges for the moving part. Self-tapping screws should not interfere with the operation of the hinges. We try on the speakers and cover the remaining part of the acoustic shelf with carpet. We install the hinges, try on the shelf and install the speakers. The considered option does not require dismantling the standard sidewalls; the acoustic shelf is installed on them using self-tapping screws.
A home-made acoustic shelf for a VAZ will cost 1.5 times less than a purchased one and can be compared with the factory version in terms of quality.
DIY rear shelf of VAZ 2114
In principle, the manufacturing technology is not complex or unique. All you need is a good drawing, the necessary materials for production and some available tools. Installation does not require special conditions or special knowledge; all you need is good, detailed instructions and a little free time. So, here's a list of what we need:
- Plywood with a thickness of at least 17-18 millimeters (compliance with the size is extremely important);
- Upholstery material. When choosing it, be guided by what material the interior of a particular car is lined with. If fabric is used, then the ideal option for reupholstering would be carpet, which easily lends itself to all sorts of influences.
- Construction stapler with metal staples for woodworking.
- Glue, screws, masking tape.
- Jigsaw.
- Screwdriver.
- Sandpaper or grinder.
- Drawing of the rear shelf of a VAZ 2114.
- Ruler or tape measure.
Read more: Kia rio 3 engine
When all the tools and materials are available, it’s time to start manufacturing.
For convenience, we will divide the entire production into 8 stages:
- The first and very important thing is to have an accurate and high-quality drawing. The need is determined by strict adherence to the required dimensions. In other words, a good template will ensure the further production of a workpiece of the required shape and dimensions, allowing the shelf to ideally fit in the car. It is best to transfer the template onto a full-size sheet of paper or tracing paper.
- Now you need to transfer the template to the surface of the plywood; this will require some care, patience and accuracy.
- When all the lines and dimensions of the rear shelf of the VAZ 2114 are transferred to the material, it’s time to pick up a jigsaw and cut the material according to the outlines marked on it.
- To give smooth, neat outlines, use sandpaper or a sanding machine to grind down the uneven corners of the material.
- We cover the surface of the plywood with stain or any other coating that protects the wood from adverse factors. Allow the product to dry in a place protected from moisture or rain.
- Now is the time to reupholster the product with carpet. To do this, prepare pieces of material of the required size, apply them to the surface of the wood, apply tension and secure the fabric to the plywood using a metal staple and a stapler. Carry out similar measures in relation to the holes for installing speakers.
- The seventh step involves installing fasteners and hinges (in cases where you are using a folding structure).
- The final stage is installation of the finished product directly into the car interior. An important task is to attach the new shelf to the factory ones; to do this, take the self-tapping screws and screw them into the standard sidewalls with a screwdriver. In addition, the final fastenings and connections are installed. Audio equipment is installed and connected, operation is tested.
Upon completion of all activities, it is recommended to test the endurance of the product under various road conditions. Drive your car at different speeds over potholes and potholes and listen carefully to how the new shelf behaves (are there any creaks or vibrations).
As you can see, making the rear shelf of a VAZ 2114 with your own hands is quite a feasible undertaking.
Acoustic shelf for VAZ 2114
An acoustic shelf for a VAZ 2114, made of plywood and covered with carpet, will improve not only the interior of the car. On the VAZ 2114, the acoustic shelf is a component that solves several problems at once: sound output improves, squeaks in the trunk disappear, speakers can be installed in any size, even the largest ones.