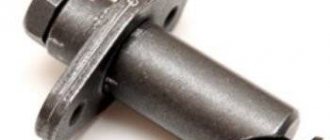
Mechanism characteristics
This element performs the function of adjusting the chain tension in the gas distribution mechanism drive. It is installed on all cars with this drive. The hydraulic chain tensioner compensates for low tension. Over time, the part wears out. When the motor is running, the chain constantly rotates and tends to stretch. It gets to the point where the part jumps one or more teeth. As a result, incorrect gas distribution occurs. As a result, late or early closing of the intake and exhaust valves occurs. Chain stretching is completely normal. Over its lifespan, it can stretch one to two centimeters. The hydraulic chain tensioner smoothes out this stretching.
Consequences of a broken timing chain
A broken timing chain has become a real horror story for drivers. This is especially common for beginners. It's no secret that the timing belt, like most car parts, has a finite lifespan. After the timing life has been exhausted, it must be replaced.
As for the consequences of a broken timing chain, it all depends on the design of the power unit. When an engine is running, its pistons continuously move up or down from one dead center to another. During the fuel and air intake stroke, the piston moves to bottom dead center and opens the intake valve. When release occurs, the piston is already moving towards top dead center. And when he reaches it, all valves must be completely closed.
When the timing chain breaks, the camshaft stops rotating and the valves stop in the position in which the chain broke. The crankshaft in the engine continues to rotate, and the pistons are directed towards the open valves. Some engines provide the ability to avoid contact of the pistons with the valves through special recesses. In this case, the consequences will be limited to immobilization of the car. But there are situations much worse.
This is interesting: How to remove the steering wheel of a Lada Priora
Modern engines often have multiple valves. They were designed to develop maximum power, so piston recesses are not provided. When the pistons meet the valves, the latter bend and fail. You can avoid breaking all the valves at once if the timing chain breaks at idle. When driving at high speed, the entire set will need to be replaced after a break. At high speeds, the valve guides may also burst, which may even lead to the replacement of the cylinder block. Twin-shaft engines are generally more susceptible to such severe damage.
So, as a result of a broken timing chain, we have a domino effect. First, the valves are bent, then the camshaft along with the bearings is destroyed, then the cylinder head fails, and finally the connecting rods and pushers are bent.
How does it work?
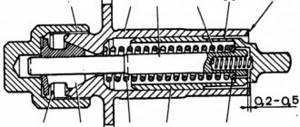
The principle of operation of the element is based on the operation of a spring. As oil from the line flows through the valve body, the plunger presses against the plastic tension shoe. Some engines use a lever with an asterisk. Thus, continuous contact of the surface of the working element is ensured. When engine speed changes, the element plunger moves back. The spring is compressed.
Damping of vibrations occurs due to the flow of lubricant through the plunger and body. The oil pressure is controlled by the hydraulic tensioner ball valve. When the chain is pulled, a plunger is pulled out of the housing. The retaining ring moves along the grooves to ensure proper tension. The unit also compensates for thermal expansion that occurs as the engine warms up.
How to check the hydraulic chain tensioner?
It is necessary to monitor the appearance of new knocks in the engine compartment. If impacts are detected at the cylinder head cover, this indicates a faulty tensioner. These sounds are clearly audible when the accelerator pedal is suddenly released.
What are the reasons why the hydraulic chain tensioner of the 406 engine has become unusable? This could be a jammed plunger or a hole in the ball valve, causing a discrepancy in oil pressure. The plastic shoe itself (or the sprocket, if any) and the damper also wear out.
How to change?
If the symptoms described above are observed, an urgent replacement of the hydraulic chain tensioner is necessary. To do this we need a new element, as well as a set of heads. Using a 10mm wrench, unscrew the fitting of the cylinder head cooling tube and move it upward.
Next, we find two fastening nuts for the tensioner itself. We unscrew them with the same key. We take the protruding part of the mechanism with our hands and remove it from the seat. It is worth noting that the hydraulic chain tensioner has its own gasket, which also needs to be replaced. Before installing a new element, carefully coat the seats with silicone sealant. Install the gasket and tighten the bolts. By the way, before installation you need to remove the transport stopper. This element is needed to prevent the tensioner from discharging (so that the plunger does not come out of the body) during transportation. To “charge” the element and bring it into working condition, after assembly you need to press the negative screwdriver onto the part with great force. As a result, the hydraulic tensioner housing, under the action of the spring, will move into the cover until it stops.
The plunger itself will produce the proper chain tension through the sprocket or shoe (depending on the design features of the engine). Before “charging” you need to carefully tighten all the bolts. Otherwise, this will lead to premature wedging of the element. Don't forget to reinstall the fitting. After installation, start the engine and check it for extraneous sounds.
Replacing the timing chain
Required tools and materials
There are single-row and double-row timing chains. Both types have advantages and disadvantages. The single row chain adds some power to the engine and helps reduce noise. A double-row chain makes more noise, but it is also more reliable. The number of links also plays an important role. If you install a new chain on an old VAZ-2102 with a power unit with a volume of up to 1.3 liters, then the chain will have 114 links. For later VAZ models, the chain will have 116 or more links. And so on, as volumes increase.
When choosing a chain, it is worth considering a number of other factors:
- Purchase timing chains only from official sales representatives, avoiding various types of spare parts dealers.
- The timing chain is not a part you should skimp on. Between cost and reliability, definitely choose the latter.
- Carefully inspect the purchased chain for manufacturing defects. Defects can manifest themselves in play between links, bends, the presence of small debris in the chain tensioner, etc.
To replace and tension the timing chain yourself, you will need the following tools:
- 6 mm hex key;
- heads with 12, 13, 14 edges;
- chisel and small hammer;
- rags;
- buckets for liquids;
- torque wrench;
- adjustable wrench;
- wooden block;
- degreaser and sealant;
- actually, a chain.
Removing the chain
Before installing a new timing chain, you must carefully remove the old one. In some cases, it is necessary to remove the engine top cover. Dismantling begins with removing and unscrewing the ignition coil wires. Next, remove the air hoses from the valve covers, and then the right engine mount. The plug is unscrewed and the engine oil is drained into prepared buckets. It is necessary to completely drain the oil and remove the filter. Then the antifreeze is drained from the radiator in the same way. Then the radiator is dismantled, the inlet pipe clamp and the generator drive belt are removed.
Next, you should begin dismantling the cylinder head. Its cover is secured with four screws. The screws are unscrewed and the fan is removed. The engine pan is unscrewed (to do this, remove the muffler) and the screws securing the pump pulley are loosened. There is a space between the side of the crankcase and the crankshaft. A wooden block is placed here. Then the crankshaft pulley is removed, and then the pump pulley. Under this pulley there is a gasket that also needs to be removed. The oil pump is also temporarily dismantled. Next, the chain is directly dismantled.
This is interesting: The most stolen cars
First, the chain guide is removed. Then the tensioner and bar are removed. Next, the bottom bar is put on the pin and the chain is removed. Use a screwdriver to remove the lower gear. After removal, you can compare the new and old chains: the first chain should have a slightly longer length.
Installing a new chain
Before installing a new chain, it is necessary to thoroughly lubricate it with oil. The assembly process is repeated in reverse order. All parts are cleaned. Use a rag and degreaser to clean the side of the engine. The mark on the chain being installed must match the markings on the pulleys. After installation, the side of the engine is lubricated with sealant, then the bolts are tightened to secure the cover. Wait for the sealant to dry and perform all reinstallation.
Adjusting chain tension
This process is necessary in order to partially eliminate excess noise.
When making adjustments, it is important not to leave dents or scratches, which can then become clogged with dirt. To avoid this, make or buy a light mat and lay it on the fenders of the car before starting work.
For adjustment you will need: a starting handle, a wrench for the chain tensioner locking nut and pliers.
The adjustment is carried out as follows:
- Using a wrench with a diameter of 13 millimeters, the tensioner cap nut is loosened.
- Using the starting handle, the crankshaft rotates one and a half turns. As a result of loosening the fixing nut, the tensioner springs acting on the shoe with a vulcanized rubber lining through the plunger will automatically set the correct chain tension. The vehicle must be installed on a level platform convenient for work, and the wheels must be secured with stops. The gearshift lever must be moved to the neutral position. Next, the chain is adjusted.
- The fixing nut is tightened.
- The starting handle is removed.
Quite often, the noise of the camshaft drive chain is especially noticeable at low engine speeds. In this case, the adjustment operation needs to be repeated.
What do you need to know when replacing the timing chain?
Replacing the timing chain is a responsible process. As a rule, in engines with a timing chain drive, the location of the chain drive can be front or rear. In the first case, the drive is installed on the side where the drive element is located. In the second, the drive is located on the gearbox side. The front location of the chain drive is most often found on cars, since repair and maintenance of such a drive is much simpler.
According to manufacturers, the drive element most often breaks as a result of non-compliance with the conditions specified in the vehicle’s operating manual. The timing chain is directly connected to the tensioner. The tensioner may fail if low-quality engine oil is used. Its service life also depends on the pressure in the lubrication system. Over time, the pressure in this system decreases and the chain will not be tensioned correctly. There is also a tension adjustment for this.
After all installation operations, the operation of the engine is checked. If signs of malfunction persist, parts should be checked for wear. For example, the reason for the persistence of excess noise may be wear of the damper, etc.
Is it possible to repair the old one?
An old hydraulic chain tensioner can be repaired in 60 percent of cases. But first you need to make sure that it is faulty. To do this, press the spherical end of the element with your finger. If it does not press, then the tensioner is jammed.
This occurs due to the skew of the locking ring. It has small burrs at the ends of the cut. They are the ones that interfere with the operation of the element. The disassembled tensioner must be thoroughly washed in kerosene and the locking ring replaced. Its outer diameter is 16.6 by 3 millimeters. The ring can be made from spring wire. It happens that the ball valve fails - it allows excess oil to pass through. To check its tightness, you need to remove the plunger and spring from the housing. Insert the latter with the end (spherical) part into the housing hole. Press the opposite end of the element with your finger. If there are large traces of oil leakage, the part must be replaced. From the factory, small discharges are allowed through two marks on the end of the tensioner housing. They serve to remove air from the inside of the mechanism. You can try to wash the element, thereby restoring it. But the result is not always effective. To do this, you need to wash the ball valve in gasoline or kerosene, pressing it with a thin wire through the oil hole. If flushing does not produce results and the element still leaks oil, it should be replaced.
ISAI
The procedure for installing the “ISAI” tensioner on Zhiguli cars.
1) Turn the shaft approximately 1 quarter turn. 2) Remove the standard tensioner, remove the remaining gasket, and wipe the seat. We check the freedom of movement of the tensioner shoe with a screwdriver or other suitable object. The shoe, after pressing it, should return under the weight of the chain. 3) Try on the “ISAI” tensioner. And, making sure that it is completely seated in its place, secure it by first applying sealant around the flange (installed without a gasket). 4) Unscrew the cap nut and remove the retainer from it (a piece of aluminum wire), screw it back into place by hand until it stops. 5) Turn the shaft approximately 1 revolution as the engine moves. 6) Start the engine. No further adjustments are required.
The procedure for installing the “ISAI” tensioner on a Niva 21214 car.
Remove the oil line. Next, follow the installation procedure on the Zhiguli car.
The procedure for installing the “ISAI” tensioner on “Gazelle”, “Volga” and other cars with ZMZ engines.
1) Remove the air filter and anything that interferes with access to the tensioners. 2) Unscrew the aluminum cover of the lower tensioner, first placing a container under it to drain the oil. Remove the factory tensioner. 3) Unscrew the aluminum cover of the upper tensioner and remove the standard tensioner. Wipe the seat. 4) Try on the upper tensioner “ISAI” - it should sit in its place until the flange stops. If this does not happen and the tensioner does not reach the end, then turn the shaft slightly until the chain slackens on the tensioner side. 5) Secure the upper tensioner. 6) Following the same rules, install and secure the lower tensioner. 7) Unscrew the cap nuts, remove the clamps (pieces of aluminum wire) from them and screw them into place until they stop by hand. Turn the shaft approximately 1 revolution as the engine moves. 9) Start the engine.
Tensioners on ZMZ engines can be installed either simply with a gasket, or by slightly lubricating it with sealant, taking into account that excess sealant can clog the oil groove.
When reloading the “ISAI” tensioner, keep it clean as Dirt that gets on the screw can damage it. If, nevertheless, dirt gets under the screw and the tensioner begins to jam, then this can be corrected in the following way: in the place where the screw jams, you need to fix it with a cap nut with a lock (if it is lost, you can replace it with an M4 nut) and then tap with the nose screw against any massive object (vise, hammer, sledgehammer, etc.) and then turn the screw in different directions. Any debris caught between the threads will be destroyed and the screw will become mobile. You can also wash the tensioner (kerosene, diesel fuel) under pressure from the cap nut while turning out the screw.
Installation errors:
1. The chain branch on the tensioner side is tense. It can be eliminated by turning the number of shafts while the engine is running. (With a key, crank, hands on the pulleys, moving the car manually in gear) A quarter turn of the number of shafts is enough. 2. New chain and double gasket under the cylinder head (Usually they installed 76 gasoline on classics. Nowadays this practice is rare, but we’ll still point out this reason) 3. The tensioner adjusting screw is not screwed in completely. Loosen the cap nut, holding the tensioner and the screw itself, with the fingers of your left hand, and turning the body with your right hand, tighten the screw to the end, and slightly back, thereby removing the wedge, since after installing the ANC and unscrewing the cap nut, the screw should work and not remain wedged in the body. 4. They mixed up the ANC classics and the ANC CHEVY NIVA. (Where are the hydraulics, engine 21214) YSAI tensioner to replace the hydraulic tensioner, longer than on the Classic. Therefore, the ANC will not go all the way to the classics if the chain is not worn out. It is installed only instead of hydraulics on engines 21214. (Niva, Chevy Niva). 5. The seat in the block head is dirty. Clean it clean.
Errors when working with the tensioner:
Without reading the instructions, unscrew the cap nut without loading the adjusting screw. In such cases, the propeller may jam at the end of the stroke due to the inertia of takeoff. The cause is eliminated with the help of pliers. (if you can’t give in with your fingers), holding the end of the screw where there is no thread, remove the wedge and charge the tensioner back, twisting it with your fingers until it stops, and slightly back, thereby removing the wedge with the tensioner fully charged. It is not recommended to turn the screw using a screwdriver through the rod under the cap nut.
Spring breakage.
Over all the years of observation and feedback from ANC ISAI clients, no spring failures have been noted. (Only if handled incorrectly, when turning the cap nut and turning the rolling). Still, let’s consider this situation. Let's say the spring breaks. There will be no sudden jump of the chain, since the adjusting screw will not screw back in instantly. This may take more than one hour. When you release the gas, the chain will begin to manifest itself gradually, becoming stronger each time. If such suspicions arise, you will have to unscrew the cap nut of the tensioner and verify your suspicions through the slot for the screwdriver. If the spring is intact, then the rod will hardly move forward (clockwise) (maximum a quarter, half a turn), and with reverse torsion (counterclockwise), the resistance of the spring will be felt and the rod will return to its place when the screwdriver is removed. If the spring is broken, then the screwdriver will move without resistance both forward and in the opposite direction. In this case, you should do the following: Using a screwdriver, screw the rod clockwise until it stops (without making much effort, just select the play) Insert (stuff) a piece of paper, rubber band or something else into the cap nut. The goal is to immobilize the axis of the rod, thereby preventing it from screwing in independently from engine vibration. As a result, we get a simple tensioner that requires periodic adjustment (Like a standard VAZ one with a collet clamp). So, even if a force majeure situation occurs during a long-distance trip, then by carrying out the steps described above, you can not only get home safely, but also continue to operate the car indefinitely, guided only by timely maintenance. every 10 thousand. km. (Operation manual for classics) If tensioners of other types break down (on long trips), the results may not be so reassuring.
Manipulating the tensioner during engine repair.
When repairing the motor (removing the cylinder head, replacing the chain, timing belt, etc.), the tensioner itself does not need to be removed, but only returned to its original (charged) state. This can be done either immediately, before removing the cylinder head, or after. The first option is preferable; it prevents dirt from getting on the tensioner screw, which in the future can negatively affect its performance. To charge the ANC, you need to: use a properly sharpened screwdriver to unscrew the rod with the slot (after unscrewing the cap nut) counterclockwise, while holding the adjusting screw on the reverse side with something only to prevent it from being unscrewed back. As soon as the screw reaches the stop, then, holding it on the reverse side from unscrewing, we tighten the cap nut, inserting a lock into it, the same piece of aluminum wire, or an M5 nut. Paper or rubber will not work in this case. It may not hold the working spring (as opposed to a broken one, as described above in the previous paragraph). Do not tighten the cap nut too much, so as not to deform the thrust washers inside the tensioner.
Another useful function of the slot on the rod is to check the condition of the chain if there is any suspicion of its condition. Let's say you hear a suspicious noise in the motor, and you want to make sure that the ANC is working and the chain is not completely stretched. In this case, unscrew the ANC cap nut, first make sure that it rests against the shoe and is not stuck (try clockwise), and then, unscrewing the rod with the slot (counterclockwise) with a screwdriver, count the revolutions. The full output of the tensioner is 10 revolutions. Accordingly, if the rod is turned out 5 turns, then there are still 5 turns left. Such simple arithmetic.
Possible cases of installation of ANC ISAI in emergency situations.
If for some reason the damper breaks and the chain rattles (with a standard or some other tensioner), but there is no immediate opportunity for repairs, then the situation can be saved by ANC ISAI, just install it in the place of the broken one, and drive until better times, until the opportunity arises for service. On a classic, a break in the damper leads to damage to the seat on the aluminum head, and all subsequent installations of dampers will also end in failure, due to misalignment and poor fit. And in this case, ANC ISAI will get rid of the problem, since it is able to work without the damper itself, and the newly attached damper will last for a long time.
In the photo below, the result of over-tightening the tensioner cap nut.
The threaded part of the cover is torn off. The "master", apparently, did not read the instructions, and tightened it as required for a VAZ tensioner with a collet clamp. Notice how much force the lid withstood. The metal was pulled under the cap nut, and only then broke off. (click on photos to enlarge)
Manual chain tension
To eliminate the characteristic knocking sound of the chain drive in the valve cover area without changing the element itself, you can manually tighten the part. Let's look at how this procedure is performed using the example of a VAZ-2106 car. Here a sprocket is used in the tensioner.
So, first you need to remove the air filter with housing and casing. Next, unscrew the tensioner (not all the way) and make 2-3 revolutions of the crankshaft. This can be done with a regular key, setting it to the third position. After several rotations of the crankshaft, the chain drive is engaged. Next, check the level of its tension by pressing your finger on the links. It should not sag by two or more centimeters. When the chain is properly tensioned, the hydraulic tensioner is tightened and the attachment is assembled in the reverse order. This procedure must be repeated whenever knocking noises appear in the engine compartment.
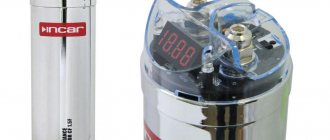
Automatic chain tensioner (Pilot) 21214 for VAZ Niva, Chevrolet Niva
Dear customers, in order to avoid errors when sending the automatic chain tensioner “Pilot” for VAZ 21214 engines on VAZ 4x4 cars (NIVA, VAZ 2123 / Chevrolet Niva), indicate your car model and year of manufacture in the “Comment” line.
The automatic chain tensioner (ANT) “Pilot” is designed for installation instead of the standard chain tensioner on VAZ 4x4 cars (NIVA, Chevrolet Niva). ANC “Pilot” does not require maintenance after installation and fully automatically tightens the car chain as it stretches. It differs favorably from its analogues in that it does not require an oil line, which eliminates chafing and loss of oil pressure. There are no plunger elements in the design, which eliminates jamming of the tensioner!
The tensioner moves in increments of only 1 mm, allowing optimal chain tension monitoring. Due to the adjusted spring tension force, the ANC “Pilot” practically does not wear out the chain tension shoe. As a result of the installation, engine noise is significantly reduced, and the service life of all timing components is increased due to correct chain tension.
During operation, the Pilot product operates automatically and does not require adjustment operations or maintenance.
The warranty period for the product is up to 25 years from the date of sale, subject to compliance with the operating rules.
The result of using an automatic tensioner on VAZ 21214 engines.
The service life of all timing drive parts increases several times due to constant monitoring of chain tension and eliminating the possibility of increasing parasitic loads in free chain branches.
Improved engine performance due to precise valve timing.
The chain is tensioned regardless of whether the engine is running or not.
Other article numbers of the product and its analogues in catalogues: 21214100610000РМ.
VAZ-2121, VAZ 21213-21214i, VAZ 2123, VAZ 2131 with engine 21214.
Any breakdown is not the end of the world, but a completely solvable problem!
How to independently install the VAZ-21214 automatic “Pilot” chain tensioner on a VAZ 4x4 family car.
AvtoAzbuka online store, repair costs will be minimal.
Just COMPARE and BE SURE!!!
Don't forget to share the information you find with your friends and acquaintances, because they may also need it - just click one of the social networking buttons located above.