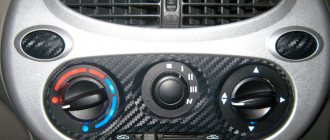
Even experienced motorists will not immediately understand what a UAZ 2206 or 452 is. But as soon as you say “Loaf”, everything falls into place. This is a fairly popular car in Russia and the CIS countries, which began to be produced back in 1965. The car has several modifications, but the car has not changed significantly from year to year. One of the weak points of the Loaf is its front heater, that is, the body heater. If it fails, replacement is required. In order not only to replace the stove, but also to improve the entire heating of the vehicle, it is recommended to install a NAMI type system with increased power. Such equipment will fully satisfy the needs of the driver and his passengers. Although some people use stoves from VAZ.
Independent replacement of the stove on a UAZ Bukhanka.
Reasons for replacing the heater
Before you start removing the stove from the UAZ Bukhanka, you should figure out exactly why such manipulations are carried out, and whether they make sense. Some motorists and experienced owners of this car recommend removing and installing a new stove even when the old standard system is working normally. And if forced replacement is required, then it is even better to dismantle the old equipment and install a more efficient and modern system. In total, experts identify several main reasons for replacing the heater:
- Performance. The standard system demonstrates performance of only 4 kW. This is quite small for a car of this size and volume of internal space. It can provide warmth to the driver and front passenger, but rear passengers may experience a heating deficiency;
- Air flow. The maximum air flow rate in a standard system is 150 m3. With OUR this value is 3 times higher, that is, equal to 450 m3 per hour of operation. Therefore, heating will be carried out faster and more efficiently;
- Cabin filter. The standard equipment installed on the Bukhanka from the factory simply does not have a cabin air filter. This forces people inside the car to breathe dirty, unpurified air. The new heater has a filter;
- Noisy. If we compare the factory system and the new interior and body heater, the low noise level during operation also speaks in favor of the latter. This is an additional plus for comfort;
- Recirculation mode. A pleasure that the factory heater does not have. Due to the recirculation of cabin air, the stove will work better and with fresh air.
These reasons are more than enough to start removing the old stove from your UAZ Bukhanka and install new NAMI equipment.
Dismantling works
You should start with how to remove the stove on a UAZ Bukhanka. The procedure is not the simplest, but many car enthusiasts do an excellent job with their own hands. Here you will need to adhere to a certain sequence, act carefully and simply take your time. Otherwise, you risk breaking something that will be useful to you on your Loaf.
- The first step is to get rid of the existing antifreeze or antifreeze in the stove. To do this, at the bottom point of the bracket for fixing the pipes leading to the stove, you need to unscrew the drain plug. Prepare an empty container for draining in advance;
- The remaining coolant is drained through the cooling system. On modern radiators installed on the Bukhanka, there may be no drain valve. Then you will have to drain it by disconnecting the lower pipe on the radiator. Also place a container under it;
- The standard loaf heater is fixed by using 4 M6 bolts. To unscrew them you will need a regular size 10 wrench;
- The designers have not thought everything out perfectly, so unscrewing these bolts yourself will be problematic. They obviously saved money on the cage nuts. Therefore, you need to hold it on one side and twist it on the other. The solution may be the help of a friend, or the use of a handy device to protect against rotation;
- When you manage to unscrew the mounting bolts of the standard heater, you can also remove the buttons on the additional panel. In principle, remove the panel itself, since everything you need comes with the new stove. Plus, during the reinstallation process it will interfere. Even if you plan to install the same panel, it is better to temporarily dismantle it;
- The connector responsible for power supply should be disconnected from the heater. Additional resistance is also removed, since it will not be needed in the future;
- Disconnect all cooling fluid supply pipes, after which the standard heater can finally be completely removed from the Loaf;
- Don't forget to also remove the device that controls your air intake. Get rid of the flaps in the same way.
At this point, the dismantling stage of work on replacing and connecting a new stove for the UAZ Bukhanka can be considered completed. Next, you will have to install new equipment to create a more efficient heating system inside the car. Before you start, we recommend that you additionally clean all accessible areas from possible contaminants, treat metal surfaces with anti-corrosion compounds, and remove rust where it has already appeared. Preventive maintenance will only extend the life of not only the heating, but also the entire car.
Modernization of new equipment
Now comes the turn of installing a new heating system suitable for Soviet and domestic Bukhanka. We will consider installation using NAMI as an example. This design will weigh a total of about 7.6 kilograms. At the same time, standard equipment with much lower performance and characteristics weighs almost 9 kilograms. The NAMI heater is designed to use a plastic housing. The main weight comes from the engine and radiator of the heating system. Before starting installation, it is worth performing certain upgrades. The thing is that for some reason they decided to use a sealant made from foam rubber on the new stove from NAMI. This is an extremely short-lived material that can soon wear out, lose its characteristics and simply collapse. Plus, foam rubber instantly absorbs water, and getting rid of it will be problematic. Instead of foam rubber, it is best to use technical polyurethane foam. Refinement involves performing the following procedures:
- All foam rubber used by the manufacturer should be removed from the heater;
- a blank from more practical and effective polyurethane foam is cut to the size of the old seal;
- a new seal is glued using waterproof glue;
- depending on the thickness of the polyurethane foam sheet itself, 1 or 2 layers may be required;
- if another layer is needed, glue it on top of the first after it has had time to set.
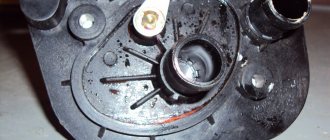
It is not necessary to glue the second layer right away. Try attaching a single-layer option and see how well it satisfies your needs. That is, act according to the situation. You can add the second layer in just a couple of minutes. Make a second blank from polyurethane in advance and keep it in a visible place, in case something happens. The heater used for the Loaf has another problem that requires attention before installing a new system. This is the absence of a drainage hole through which trapped water can escape. Due to the fact that there is no drainage, water will constantly accumulate in the front cavity and saturate the cabin filter. The drying process will take too much time. In this case, the evaporating moisture will begin to create not the most pleasant odors that penetrate directly into the interior of the Loaf.
Drainage can be done with your own hands. For such purposes, it is even provided for the presence of a special unused hole in the body of the stove equipment. There is a hole on the right side near the cabin filter that should be plugged with some suitable dense material. Regular automotive sealant will do the job perfectly. But the hole on the left side is exactly what you will need to organize drainage. The diameter will be sufficient to pass the windshield washer pipe through it.
Installation of the heating/ventilation system Loaves
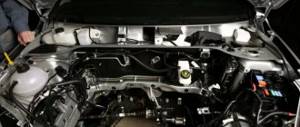
Few people know, but this family of all-wheel drive SUVs has been produced since 1957 - and this is one of the old-time record holders in the domestic car market. This car can rightfully be called universal: it is used in enterprises, in agriculture, and by private owners for fishing/hunting/picnic trips. Famous for its maneuverability and maintainability, it, unfortunately, does not meet modern standards in terms of comfort for the driver/passengers. Let's consider the general design of the car cooling system and consider its main disadvantages.
In freight-passenger UAZ car-type vehicles, a closed liquid cooling system is used. In this case, the coolant circulates along the line in a forced mode, ensured by the operation of a water centrifugal pump. The coolant volume for an SUV, depending on the modification, is in the range of 13.2-15.3 liters.
The cooling system design is standard, dual-circuit. The antifreeze circulation line is built according to a ring diagram and includes the following components:
- main radiator;
- pipes;
- thermostat;
- water pump;
- electric fan;
- heater radiator;
- temperature sensor;
- air ducts
Installation process
In practice, dismantling and removing is always much easier than installing. Therefore, this process should be approached as responsibly and carefully as possible. In fact, drainage is a must. But it's better with him than without him. If you decide to go the no-drain route, then the first step is to install an air intake flap. It is much easier to tighten it while the stove is removed. The complete installation process will be considered, including the organization of the drainage system.
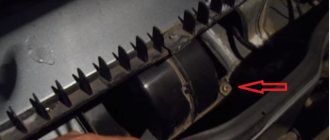
- Make a mark for drilling a hole in the body to install a drain pipe. The holes should be immediately treated with anti-corrosion compounds so as not to create a hotbed for the spread of rust throughout the body with your own hands;
- The new heater is screwed into its rightful place in the Loaf;
- Cut out a small tube. One end will need to be flared to obtain a wide enough base that looks like a funnel. To do this, you can take a metal rod, the diameter of which is slightly larger than the diameter of the tube, heat it and insert it;
- Automotive sealant is applied around the hole. The tube is installed with a funnel in the upward direction, and the joint is again coated with another layer of sealing compound. On the reverse side you will also need to secure the tube with sealant;
- After hardening, the sealing agent polymerizes, that is, it becomes durable and resistant to mechanical stress. Plus everything will be quite sealed;
- The NAMI stove comes with a pair of aluminum plates. They are needed due to the fact that you dismantled the air intake control system at the previous stage. Therefore, the air intake itself will be rigidly fixed on these plates. When the stove is installed, this will not be very convenient, but it is possible;
- The installation should be carried out in such a way that there is space in the form of a small gap around the perimeter between the edges of the car body and the hatch of your air intake. A gap of 1 centimeter will be more than enough. This gap will allow oncoming air to enter the interior of the Loaf;
- This is not the most optimal option, since in such a situation the outside air will actually not be able to flow by gravity. The way out of the situation would be to modernize the air intake flap. Or you will have to constantly turn on the stove motor;
- Now you can lay a line to supply coolant to the heater. The problem with the Bukhanka is that it was created as a car for army needs, and therefore all the comfort is provided only for those sitting in the cabin. And residual heat enters the cabin;
- This modernization needs to ensure comfort for the driver and front passenger. Here you will need to route the hoses accordingly;
- First, a hose is led from the engine to the lower pipe on the front heater. A stove valve is also installed here, blocking the flow of moving cooling liquid. The faucet used is a standard one, but you can also install some kind of swivel type tap. The crane itself is first dismantled and transferred to the cabin in order to be able to control its operation without leaving the car;
- When installing the faucet, consider the location of the control levers. When you turn the lever to the right, the tap should open;
- The upper tube, which removes coolant from the Bukhanka cabin heater, is connected to the lower pipe of the cabin heater. Since we will eventually get the highest point in the line in this way, to eliminate air from the system we will need to additionally install a valve to release excess air;
- A similar tap should be installed at the outlet of the interior heater. This will be the second highest point in the system. It is better for such purposes to use an outlet valve such as a tee of the cooling system. GAZ produces excellent faucets suitable for these tasks;
- The inlet of the engine pump will need to be connected to the upper pipe of the interior heater.
The installation is almost complete. But the work is not finished yet, since the electrical component remains.
Electrical work
To finally install the system, you will need to make a connection, providing power to the new heating.
- First of all, connect the ground. It is always marked with a black wire, so it will be difficult to confuse it;
- The mass is fixed to any metal part of the car body. It is optimal to secure it somewhere under the Loaf's torpedo. But here you can choose another option;
- It is recommended to enclose the positive wire in a sheath of corrugated material and extend it to the left side of the machine, where the fuse box (fuse block) is located;
- In total, the block provides for the presence of 4 fuses. The fourth of them is distinguished by the fact that it is under constant voltage. And the first 3 are controlled through the ignition switch;
- Since the heating equipment has its own fuse, it can be connected with a positive wire to any of the first 3 terminals on the block. But it is imperative that the connection be from above, that is, to the standard loaf fuse;
- Start the ignition to check the functionality of the heater motor. If everything is functioning, then you can install the panel;
- Do not forget to first connect the rod for controlling the stove faucet directly to the faucet itself;
- Once connected, check operation. When the tap lever is positioned to the left, it should be open, and when turned to the right, it should close. If this is not the case for you, you will have to turn the faucet over;
- Try on the panel and choose the best way to place it. The best solution here would be to make 3 holes in the panel from the new stove for additional buttons. Moreover, it is recommended to place the holes slightly below the middle of the panel so that they do not rest against the heating system motor;
- Make two holes in the bottom of the dashboard and a couple more holes in the floor tunnel of the Loaf. This will be required to fix the new panel;
- Connect the stove rod control unit to your panel, fix it in its new place with self-tapping screws;
- Now you need to install the rheostat of the stove motor control system, put plastic covers on the control levers and insert all the buttons.
At this point, the process of installing and connecting a new heater can be officially considered complete. The procedure is not the simplest, so beginners should not undertake such work on their own. Consult with specialists or enlist the support of more experienced motorists who will be able to help you and advise you if something happens. After completing all the work, be sure to check whether all pipes have been properly connected, how efficiently the heating system motor operates, and how the heater tap moves. After this, feel free to fill the system with high-quality cooling liquid, use faucets to remove excess air and test the operation of the stove in real conditions. As practice shows, installing such equipment makes it possible to improve the operation of the heating system by 2 times compared to the standard system. Plus, there is a filter that will need to be changed periodically, as well as a function for recirculating air in the cabin.
Removing and installing the heater of a UAZ Patriot car
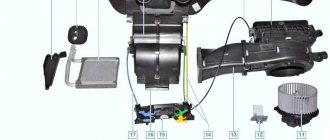
The interior heater is removed after dismantling the instrument panel in the following order:
You will need: 10mm wrench, Phillips screwdriver
We drain the liquid from the engine cooling system (see “Replacing the coolant in the UAZ Patriot”).
Disconnect the wire from the negative terminal of the battery.
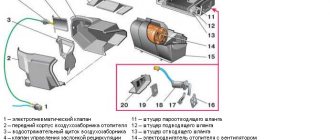
We unscrew the two screws securing the right air duct 20 (Fig. 1) to the air intake and the screws 21 fastening the air ducts.
If necessary, remove the additional resistor installed in the right air duct 20.
Disconnect the right air duct from the left air duct 22.
We unscrew the nut securing bracket 16 of the left air duct to the front panel, remove the washer and take out the plastic sleeve, unscrew the two self-tapping screws securing the left air duct to the heater body and separate the left air duct from the heater.
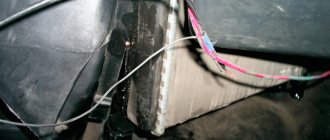
Loosen the hose clamps on heater valve 14 and radiator pipes 2 (Fig. 2) and remove the hoses.
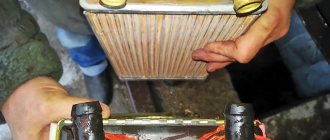
Unscrew two screws 5 with washers, remove cover 4 and seal 3.
Remove radiator 2 from the heater niche.
We unscrew two self-tapping screws 21 (Fig. 3) securing the air duct for blowing the feet of passengers located on the three-seater seat.
We disconnect the front 20 and middle 19 parts of the air duct from the rear part 18, remove the air duct.
If necessary, unscrew the self-tapping screws and separate the front and middle parts.
We unscrew the three nuts securing the heater, two nuts on the brackets 11 (see Fig. 1) and one in the pipe for the air duct for heating the feet of the rear passengers), remove the washers and the plate.
We remove the heater from the bolts of the front panel, take out the plastic bushings.
Unscrew the screw securing the lever 10 of the upper and the screw securing the lever 7 of the lower heater damper.
Remove the heater control levers from the damper axles.
If necessary, remove staples 25.
Separate the left and right heater casings.
Remove the upper and lower dampers from the heater casing.
We loosen the clamps 4 securing nozzles 5 and 24 for heating the driver and passenger feet, remove the nozzles from the guide pipes.
If necessary, unscrew two self-tapping screws 3 and remove pipe 2 for heating the driver’s feet.
We install the heater in the reverse order.
We remove the body heater control mechanisms in the following order:
Remove the handles from the heater control panel 23.
Unscrew the three screws located under the handles and remove the remote control cover.
Unscrew the screws securing the remote control and remove it
We remove brackets 12 for fastening rods 6, 8,9 on the remote control and release their ends from the fastening of the corresponding levers.
Remove the brackets 12 securing the heater damper rods and disconnect the heater damper rods 6 and 9 from the levers.
Remove bracket 12 for fastening the rod from heater valve 14 and disconnect the heater valve control rod.
The recirculation damper control is removed after dismantling the air intake.
Unscrew screw 11 (Fig. 4), nuts 13 and remove the gearmotor 14 of the recirculation damper drive 1 from the studs.
Install the heater control panel and assemble the recirculation damper control in the reverse order.
Remove the fan in the following order:
Disconnect the battery.
Disconnect the wires from the fan motor.
Remove the manifold cooling hose 3 from the electric motor pipe 5.
Unscrew nuts 6, remove washers 7 and 8.
We remove the electric fan and spacer bushings 9. To avoid imbalance, it is not allowed to remove the fan wheel 4 from the electric motor shaft 5.
Dismantle the recirculation damper in the following order:
Unscrew the nuts securing the air intake to the front panel and remove the air intake.
Remove the neck 16 of the air intake with the water deflector shield and seal.
Remove the six self-tapping screws and remove the top housing.
Separate the upper part of the air intake housing, first disconnecting the mounting brackets.
Assemble the heater air intake and install it in the reverse order.
Pay attention to the correct installation of the fan casing and air intake seals.
Removal and disassembly of air ducts is carried out in the following order:
Remove the instrument panel complete with air ducts. Nuts 7 (see Fig. 3) simultaneously serve to secure the instrument panel and the windshield blower air duct.
Unscrew the bolts 4 and remove the windshield blower air duct.
Remove nozzles 14 by prying them off with a flat-head screwdriver.
Unscrew two nuts 11 and remove one self-tapping screw 8, which secure air ducts 10 (screw on top) and 22 (screw on bottom) to the instrument panel.
While rocking slightly, remove each of the air ducts one by one from the seals and from the body of the central air duct 23.
Unscrew the four nuts 11 securing the central air duct 23 and remove it.
Install the indicated air ducts on the instrument panel in the reverse order, paying special attention to the correct position of the seals.
Let's look at everything in pictures
Remove the instrument panel (see “Dashboard of UAZ Patriot”).
We unscrew the bolts securing the windshield blower air duct (Fig. 5).
The windshield defogger duct is attached to the front panel with two bolts.
Remove the air duct (Fig. 7).
Disconnect the wire blocks from the additional resistance terminals of the heater motor.
We unscrew the three screws securing the air duct to the heater (Fig. 9).
We unscrew the two screws securing the heater air intake (Fig. 10).
We unscrew one nut securing it to the front panel (Fig. 11).
Remove the air duct (Fig. 12).
Loosen the clamps (Fig. 13).
Disconnect the hoses from the heater radiator pipes (Fig. 14).
Remove the cable fastening bracket (Fig. 15).
We disengage the cable from the crane lever (Fig. 16).
We unscrew one nut securing the heater to the front panel on the left side (Fig. 17).
We unscrew one nut securing the heater to the front panel on the right side (Fig. 18).
We unscrew the screw securing the lower air duct to the heater pipe (Fig. 19).
We remove the heater assembly with the control unit.
If the heater radiator does not need to be removed, then the hoses do not need to be disconnected in order to avoid depressurization and air entering the cooling system, just remove the heater by moving the radiator to the side.
We install the heater and all removed parts in the reverse order of removal.