diadya-fedor 12 Nov 2006
In the fall, garbage appeared - when refueling, gasoline splashed out every once in a while.
That is, we put the gun in the tank, put the bracket on and oops - after a few seconds the gun clicks, and half a glass of foamed gasoline splashes out of the neck. Now this disgrace has become constant and occurs several times per refueling. As a temporary measure, you have to fill it with “the smallest stroke”, pressing the trigger so that it just starts to flow in a thin stream, and then the cutoff is triggered once every 10 seconds. If you press harder, the infection splashes out again. By searching on the Internet, I found out that judging by the symptoms, the tank ventilation is to blame, as I understand it, it was dirty somewhere along the hose running parallel to the filling hose of the neck. Accordingly, the idea arose to remove the neck and clean all those tricky holes there. And here the question arises - how to remove it correctly? I looked from under the bottom of the car, lying under it - my first thought was that I needed to remove the rear wheel and get it out of the arch. Is there a better way? I didn't find anything clear about this in the manual. And in general, has anyone here already treated such a problem as mine and can give me some advice? Look, it's not bent, it's broken where the tank ventilation hose is. Should I touch the tank neck? find an air hole in it and use a hard, blunt wire to poke around there. Good luck!
Uncle Tom 13 Nov 2006
In the fall, garbage appeared - when refueling, gasoline splashed out every once in a while. That is, we put the gun in the tank, put the bracket on and oops - after a few seconds the gun clicks, and half a glass of foamed gasoline splashes out of the neck. Now this disgrace has become constant and occurs several times per refueling. As a temporary measure, you have to fill it with “the smallest stroke”, pressing the trigger so that it just starts to flow in a thin stream, and then the cutoff is triggered once every 10 seconds. If you press harder, the infection splashes out again. By searching on the Internet, I found out that judging by the symptoms, the tank ventilation is to blame, as I understand it, it was dirty somewhere along the hose running parallel to the filling hose of the neck. Accordingly, the idea arose to remove the neck and clean all those tricky holes there. And here the question arises - how to remove it correctly? I looked from under the bottom of the car, lying under it - my first thought was that I needed to remove the rear wheel and get it out of the arch. Is there a better way? I didn't find anything clear about this in the manual. And in general, has anyone here already treated such a problem as mine and can give me some advice?
There was exactly the same situation this summer. The whole trick I had was that at one of the gas stations a craftsman simply pushed an external safety valve into me with a pistol. a plastic piece of garbage with a metal cap that the gun itself bends back. is right in plain sight. If you can’t see it, then it’s possible that someone pushed it deep down into you. For me, it finally went down 30 cm and stood across! But it was not visible visually the first time. you insert the gun and after a few seconds the gun snaps open and gasoline spills onto the road. Look, maybe it will help? And be sure to check the ventilation.
A good tank is a strong tank
A few words about the materials from which fuel containers are made, because, as we have already said, they must be especially durable and airtight. Today you can find the following options:
- steel;
- aluminum;
- plastic.
We recommend: Is it possible to pour transmission oil into the engine: what is the difference from engine oil?
They all have their pros and cons. For example, steel is very strong and it is very difficult to penetrate such a tank with anything. Although, on the other hand, this material is too heavy and is also susceptible to corrosion.
Aluminum is another matter - it is light and does not rust, but other nuances come up here, for example, the high cost of producing such containers and low impact resistance.
As for plastic tanks, their undeniable advantages are lightness, ease of manufacture and the ability to give them any shape. The only significant drawback is micro-leakage of fuel at the molecular level through the walls, but this drawback is easily eliminated with special chemical treatments.
Peter Tiger 13 Nov 2006
In the fall, garbage appeared - when refueling, gasoline splashed out every once in a while. That is, we put the gun in the tank, put the bracket on and oops - after a few seconds the gun clicks, and half a glass of foamed gasoline splashes out of the neck. Now this disgrace has become constant and occurs several times per refueling. As a temporary measure, you have to fill it with “the smallest stroke”, pressing the trigger so that it just starts to flow in a thin stream, and then the cutoff is triggered once every 10 seconds. If you press harder, the infection splashes out again. By searching on the Internet, I found out that judging by the symptoms, the tank ventilation is to blame, as I understand it, it was dirty somewhere along the hose running parallel to the filling hose of the neck. Accordingly, the idea arose to remove the neck and clean all those tricky holes there. And here the question arises - how to remove it correctly? I looked from under the bottom of the car, lying under it - my first thought was that I needed to remove the rear wheel and get it out of the arch. Is there a better way? I didn't find anything clear about this in the manual. And in general, has anyone here already treated such a problem as mine and can give me some advice?
Fuel tank: device, flushing, design.
The volume of the fuel tank of a modern car, as a rule, allows you to travel at least five hundred kilometers. It does not matter what is used as fuel - gasoline, diesel fuel or liquefied gas. So what is this important element of the fuel system?
A fuel tank is a container for safely storing a certain type of fuel, preventing its leakage and emissions due to evaporation. It is installed in the most protected place. Thus, on passenger cars it is usually placed under the rear seat, since this area is least susceptible to deformation in a rear impact. On trucks, the tank or tanks are located along the sides between the front and rear wheels. This is due to the fact that most impacts in the event of an accident are one way or another in the forehead, and the chances that someone will fly into the side, and even more so into the fuel tank, are quite small. In addition, they run on diesel fuel, which, unlike gasoline, does not detonate.
amotsarack Nov 13, 2006
This is what I looked at first. Actually, that’s what the question was, there’s nothing to replace it with, namely how to remove it. As for the valve, I have a plastic plug with a mesh, and it seems to be successfully bent to the side with a gun. When I refueled for the first time in a newly purchased car, at first I decided that it was some kind of tricky filter, I didn’t insert the gun all the way and started to fill it. How it hit me In general, there is a feeling that when refueling, the air displaced from the tank simply does not have time to escape. I can’t say anything about the condition of the tank’s ventilation, because the plug on the neck is kind of left-handed, similar to a Zhiguli oil plug, and I’m not sure about its complete tightness. But no effects of suction or, on the contrary, the release of vapors when opening are observed. Now, if I somehow buy an original plug, then I’ll find out. Okay, I’ll get a piece of thick wire somewhere and try to find a hole in the air hose. By the way, does anyone remember this hole before the mesh or after?
Fuel tank ventilation system
The fuel tank must constantly maintain pressure equal to atmospheric pressure. The tank ventilation system is responsible for this. Modern vehicles are equipped with a closed fuel tank ventilation system to prevent potential pressure drops or increases.
- When fuel is taken from the tank, the pressure in it drops and a vacuum (vacuum) occurs. The ventilation system qualitatively eliminates this effect. If the pressure in the tank drops, the safety valve will allow the required amount of air into the tank. This valve is located in the filler cap and allows outside air to flow in only one direction.
- During the refueling process, excess air enters the tank and fuel vapors are formed. The system will effectively displace these excesses, which are displaced through a special pipeline for ventilation. The ventilation pipeline is located parallel to the refueling pipeline and ends in a container in which gasoline vapors accumulate. The specified container is connected to the adsorber of the fuel vapor recovery system. The ventilation pipeline additionally has a gravity valve. This valve prevents the risk of fuel spilling from the tank as a result of the vehicle overturning or tilting up to 45° or more.
- If the fuel in a closed tank heats up, gasoline vapor appears and the pressure in the tank increases. The ventilation system neutralizes the increase in pressure and equalizes it to atmospheric pressure. In this case, the fuel vapor recovery system is directly involved.
Why is it necessary to clean the fuel pump mesh? When is it better to change and how to clean the fuel pump mesh? How to properly remove the fuel pump, subtleties and nuances.
How to determine why the fuel pump does not pump or works poorly. Fuel rail pressure, pump diagnostics. Wiring, relays, fuel pump fuses.
The causes of whistling and increased noise during operation of the fuel pump are overheating of the pump. How to diagnose and fix the problem yourself. Tips and tricks.
Cleaning a car injector without removing the injectors. Methods for cleaning injectors with removal on a cavitation stand. Ultrasonic and hydrodynamic cavitation.
Mechanical and electric fuel pump, design and principle of operation of the device, types of pumps and main malfunctions, operating features
Installing a carburetor instead of an injector, features of the process of replacing the injection system. Replacing the carburetor with electronic fuel injection. Recommendations.
Login
Removing and installing the fuel tank filler neck
Fuel tank filler neck design
1 — Main hose for filler neck 2 — Clamp 3 — Clamp 4 — Sealing gasket 5 — Mounting flange 6 — Cover
Tightening force of threaded connections, Nm
5. Unscrew the mounting screws and remove the sealing flange.
10. Remove the filler neck protector.
11. Remove the bolts of the brackets securing the evaporator tube to the filler neck.
12. Remove the bolts securing the filler neck bracket to the body.
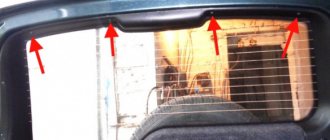
1. Without closing the access door, install the fuel plate (A) with the rubber seal (C) and insert the filler neck into the intake hole on the inside of the wheel arch. Align the neck, install the cup (B) (see also) and tighten the mounting screws.
If the edges of the seal are bent inwards, straighten them using a screwdriver.
2. Place the main hose on the lower section of the filler neck tube (the overlap should be about 35 ÷ 40 mm) and secure it firmly with a clamp.
Make sure that the clamps do not touch the ventilation hose and the rear suspension beam!
3. Proceeding in a similar manner, install the ventilation hose (the overlap when fitting the hose onto the tube should be 25 ÷ 30 mm). 4. Tighten the bolts securing the filler neck support bracket to the body with a force of 7.4 Nm. 5. Tighten the evaporator hose bolts. 6. Further installation is carried out in the reverse order of dismantling the components. Make sure that the filler neck elements do not come into contact with the suspension elements.
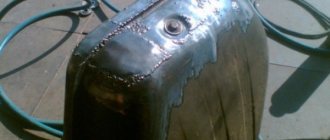
Replacing the filler neck (gas tank pipe)
In my practice, there were many cases when, when removing the gas tank on a VAZ 2110, I had to cut off the hose or even the filler neck, since everything was stuck so tightly that it was simply impossible to do otherwise. If for some reason you have damaged the gas tank filler pipe, then the article below will show you the process of replacing this part with a new one.
Tools you will need to complete this job:
- Phillips screwdriver
- Head for 8 mm, 10 and 13 mm
- Ratchet handles
- Extension Cords
- Penetrating lubricant
- Flat blade screwdriver
Removing and installing the tank filler neck on a VAZ 2110
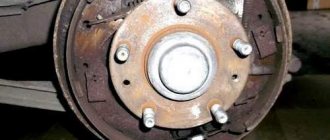
So, the first thing you need to do is remove the rear right wheel and first jack up the car to make it easier to carry out all the repairs. After this, unscrew the clamp bolt that secures the hose and pipe.
Now we go up a little higher and unscrew the neck fastening nut using a 13 mm wrench. This is clearly shown in the photo below.
And another clamp is located above. There you will need a key for 10.
And remove the clamp, putting it aside so as not to lose it. Next, open the gas tank flap and remove the rubber casing.
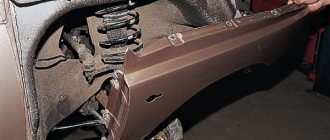
And now you can carefully move the filling pipe down to bring it to a more convenient position.
And now all that remains is to disconnect the hose from the top of the pipe, which is shown in the photo. We loosen the clamp that tightens this thin hose.
And after trying a little, we remove the hose from the tube:
Now the neck is almost completely freed, and all that remains is to disconnect it from the hose from below, the clamp of which we unscrewed at the very beginning.
After which we remove it without any problems. The end result is shown in the photo below.
The price of a new neck (filler pipe) of a gas tank on a VAZ 2110 is about 1000 rubles, but the same version can be bought at a disassembly site for half the price. Installation occurs in reverse order.
Design and operation of the fuel tank ventilation system
An important condition for the normal functioning of the unit is maintaining a constant pressure inside its body, which should be slightly above atmospheric pressure (the increase is achieved due to fuel evaporation). However, too much pressure can cause the housing to rupture. The ventilation tube is responsible for regulation. It has a built-in valve with which the pressure is regulated. On modern car models, this valve is electromagnetic and is regulated by the control unit taking into account the readings of various vehicle sensors.
Also, a gravity valve is installed on the ventilation system of modern cars, the condition of which depends on the position in space. It prevents fuel spills when vehicles overturn in the event of an accident.
Gas tank flap: the secrets of the iron door
Why is the gas tank flap on the left on some cars, on the right on others, and why do we even look for it?
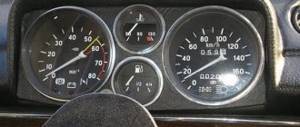
One of my colleague Konstantin Vasiliev’s publications about the “secret” buttons and functions of the car ended with useful advice. If you don’t know or have forgotten which side your fuel tank flap is on, you just need to look at the instrument panel: in most cars, next to the gas pump icon, there is an arrow that tells you where the tank opens. I was surprised that many people really don’t know about this “secret”. Okay, but what do you do if you need to refuel, you forgot where the gas tank flap is, you can’t get out of the car, and there’s no arrow? I will give an elementary answer to this question at the end of the article. And the riddle itself made me think about such a seemingly prosaic thing as a gas tank flap. In particular, about why on some cars it is on the left, on others on the right, and why we are looking for it in the first place, and Kostya Vasiliev gives advice.
Who's fumbling with his right hand?
It’s hard to believe, but neither motorists nor representatives of car companies often know the exact answer to this question. But how many versions there are! There are both funny and serious ones.
Let's laugh first. Some dreamers argue that the left or right location of the fuel tank neck (and, of course, its hatch) depends on which hand the designer is better at - right or left. Or who he cares more about, right-handers or left-handers. This, of course, is complete nonsense. Although I wonder how many modern car designers are left-handed. Or maybe there will be ambidexters who can use both hands equally? Also a topic for publication... Okay, stop joking. Enough for now.
Realistic version: the location of the tank neck and, accordingly, its flap depends on the direction of travel in the country of origin. It is easy to notice that on most European cars the hatch is on the right, and on Asian cars it is on the left. This is explained by both safety (it is better to fill the tank from a canister from the side of the road than from the roadway) and convenience (they say that the driver’s door at a gas station will not be damaged by the pump or its fence, and gasoline vapors will not get into the cabin). However, on many American cars, gas tank flaps are often located on the left - despite the left-hand drive, and Americans care about convenience hardly less than Europeans or Asians. And it's really convenient to open the car door, take two steps back and insert the gun into the tank instead of walking around the car twice.
Car fuel tank design
The gas tank consists of the following elements:
- sealed housing - a container that contains fuel during engine operation;
- ventilation tube - ensures the removal of excess air formed during refueling, and also normalizes pressure, which changes due to expansion or contraction of the fuel due to changes in ambient temperature;
- filler neck - a pipe that has access to the outer part of the car body and is intended for filling the tank with fuel;
- intake pipe - a small tube through which fuel flows to the cylinders;
- drain - a hole that is intended for emergency replacement of fuel in case of contamination (in its normal state it is blocked by a plug);
- sensor – a sensor with a hollow float that determines the fuel level and sends a corresponding signal to the vehicle’s electronic control unit;
- filters – they clean the fuel before supplying it to the cylinders, removing coarse particles of dirt and dust that may end up in the fuel.
Conventionally, one of the components of a car tank includes a fuel pump, which pumps fuel from the gas tank to the cylinder group. It is not part of this unit, but the functions of the pump are closely related to the functions of the tank. In many car models, the device is built directly into the tank.
The tank is made from various metal alloys. Most often used to create it:
- steel – commonly used in trucks and SUVs;
- aluminum – tanks made of this metal are installed on passenger cars.
Also, some vehicle models have gas tanks made of an impact-resistant polymer composition. Their main advantage is lightness. After all, the weight of even the most durable plastic is several times less than the weight of metal.
As for the size of the car tank, it is usually made so that one full refueling is enough to cover 500 - 600 km. On most passenger cars, the tank capacity is 50 - 60 liters. On trucks and SUVs it is much larger.