Features of connecting LED bulbs
Appearance of LEDs
The scope of application of LEDs is quite wide - from the production of TV equipment to lighting in residential and commercial premises. However, not every master knows how to connect small lamps. Everyone distinguishes three methods of LED installation:
- consistent;
- parallel;
- combined.
In addition, the LED lamp can be connected to a 220 Volt network. In any case, the connection is made only to direct current sources.
Connection principles
Current-voltage characteristic of LED
To install LED lamps, there are several important principles that should be followed:
- It is important to observe polarity when connecting the LED. Otherwise, it will fail faster or will not light up at all.
- The location of the anode and cathode is indicated on the bulb base in the form of notches and green dots.
- It is prohibited to mount lamps of different colors in series in one line and on one resistor. This affects their performance and, in principle, their glow.
- Information about polarities can be found in the LED technical documentation.
For every 12 V you can connect no more than 6 LEDs.
Types of power supplies
Transformerless power supply
Each 12V LED should only be connected to a power source with the same voltage. Moreover, the IP must have a stabilized output current. The easiest and most desirable way is to connect the LED to the following 12 V power sources:
- Transformerless power supplies (power supplies). They have a current-setting resistor at the output and a quenching capacitor. But in such power supplies there is no stabilizing protection. This greatly affects the life of the light bulbs during power surges.
- Car battery. If you connect an LED to a battery, you need to select a resistor based on power and resistance.
- Unstabilized power supplies. Their main components are a capacitor, a rectifier and a step-down transformer. Such power supplies are relevant for objects with stable voltage.
- Switching power supplies. As an example, you can take a computer power supply. If the user is not bothered by the noise of coolers, you can use it
The cost of a new 12-volt power supply depends on the design option (with or without a housing) and on the power, calculated in Watts.
Calculation of LED connections in 12 and 220 volt circuits
A separate LED cannot be connected directly to a 12V power source because it will burn out immediately. It is necessary to use a limiting resistor, the parameters of which are calculated using the formula: R= (Upit-Upad)/0.75I, in which R is the resistance of the resistor, Upit and Upad are the supply and drop voltages, I is the current passing through the circuit, 0.75 – LED reliability coefficient, which is a constant value.
As an example, we can take the circuit used to connect 12-volt LEDs in a car to a battery. The initial data will look like this:
- Upit = 12V – voltage in the car battery;
- Upad = 2.2V – LED supply voltage;
- I = 10 mA or 0.01A – current of a separate LED.
According to the formula above, the resistance value will be as follows: R = (12 – 2.2)/0.75 x 0.01 = 1306 ohms or 1.306 kohms. Thus, the closest would be a standard resistor value of 1.3 kOhm. In addition, you will need to calculate the minimum resistor power. These calculations are also used when deciding how to connect a powerful LED to 12 volts there. The actual current value is preliminarily determined, which may not coincide with the value indicated above. For this, another formula is used: I = U / (Rres. + Rlight), in which Rlight is the resistance of the LED and is defined as Up.nom. / Inom. = 2.2 / 0.01 = 220 Ohm. Therefore, the current in the circuit will be: I = 12 / (1300 + 220) = 0.007 A.
As a result, the actual voltage drop of the LED will be equal to: Udrop.light = Rlight x I = 220 x 0.007 = 1.54 V. The final power value will look like this: P = (Usupply - Udrop)² / R = (12 - 1.54)²/ 1300 = 0.0841 W). For practical connection, it is recommended to increase the power value slightly, for example to 0.125 W. Thanks to these calculations, it is possible to easily connect an LED to a 12 volt battery. Thus, to properly connect one LED to a 12V car battery, you will additionally need a 1.3 kOhm resistor in the circuit, the power of which is 0.125 W, connecting to any contact of the LED .
The calculation of connecting an LED to a 220V network is carried out according to the same scheme as for 12V. As an example, we take the same LED with a current of 10 mA and a voltage of 2.2V. Since the network uses alternating current with a voltage of 220V, the calculation of the resistor will look like this: R = (Up. - Up.) / (I x 0.75). By inserting all the necessary data into the formula, we get the real resistance value: R = (220 - 2.2) / (0.01 x 0.75) = 29040 Ohm or 29.040 kOhm. The closest standard resistor value is 30 kOhm.
Next, the power calculation is performed. First, the value of the actual consumption current is determined: I = U / (Rres. + Rlight). The LED resistance is calculated by the formula: Rlight = Up.nom. / Inom. = 2.2 / 0.01 = 220 Ohm. Therefore, the current in the electrical circuit will be: I = 220 / (30000 + 220) = 0.007A. As a result, the actual voltage drop across the LED will be as follows: Udrop.light = Rlight x I = 220 x 0.007 = 1.54V.
To determine the power of the resistor, the formula is used: P = (Upit. - Upad.)² / R = (220 -1.54)² / 30000 = 1.59 W. The power value should be increased to the standard 2W. Thus, to connect one LED to a network with a voltage of 220V, you will need a 30 kOhm resistor with a power of 2W.
However, alternating current flows in the network and the light bulb will burn in only one half-phase. The light will flash quickly at 25 flashes per second. For the human eye, this is completely invisible and is perceived as a constant glow. In such a situation, reverse breakdowns are possible, which can lead to premature failure of the light source. To avoid this, a reverse directional diode is installed to ensure balance in the entire network.
How to determine LED polarity
Determining LED polarity by appearance
All 12 volt LEDs (white, red, blue and other colors) have an anode and a cathode (polarity). These must be taken into account when connecting LEDs. Polarities can be determined in one of the following ways:
- By design. One of the legs on the light bulb base is always several mm longer. This is the anode. It is marked with a “+” sign or a green dot.
- One bowl inside the flask. If you look closely, you can see two crystals on it. The larger one represents the cathode. The smaller one is the anode.
- Using a multimeter. To do this, the device must be set to “Dialing” mode. Then the probes of the device are brought to the cathode and anode. The first one is black, the second one is red. When they are positioned correctly, the light bulb should glow. If this does not happen, it means that the master incorrectly identified “+” and “-”. You need to change the position of the probes. If this does not help, the LED is simply faulty.
Sometimes craftsmen determine the polarity of LEDs using a battery. But it's painstaking. It is better to use the above methods.
Calculation of a quenching resistor for an LED
First of all, let's figure out how to calculate the resistance of the quenching resistor, what it depends on and what power the resistor should be to power the LED from the power source. The current (I) flows through the resistor and the LED from the same source. The voltage across the resistor is equal to the difference between the supply voltage and the voltage across the LED (VS-VL). Here we need to calculate the resistance of the resistor (R), at which voltage I will flow through the circuit, and voltage VL will flow across the LED.
Let's assume that we will power the LED from a 5V battery; as a rule, this supply voltage is used to power microcontroller circuits and other digital equipment. Let's calculate the voltage value across the quenching resistor, for this we need to know the voltage drop across the LED, this can be found in the reference book for a specific LED.
It will be interesting➡ How to read the designation (marking) of resistors
Approximate voltage drop values for LEDs (AL307 and other low-power ones in a similar package):
- red – 1.8…2V;
- green and yellow – 2…2.4V;
- white and blue - 3...3.5V.
Let's say that we use a blue LED, the voltage drop across it is 3V. We calculate the voltage on the quenching resistor – Udres = Upit – Ulight = 5V – 3V = 2V. To calculate the value of the quenching resistor, we need to know the current through the LED. The rated current of a particular type of LED can be found in the reference book. For most low-power LEDs (like AL307), the rated current is in the range of 10-25mA.
Let's assume that for our LED the rated current for its sufficiently bright glow is 20mA (0.02A). It turns out that a voltage of 2V will be extinguished across the resistor and a current of 20mA will pass. Let's perform the calculation using the formula of Ohm's law:
R = U / I = 2V / 0.02A = 100 Ohm.
In most cases, a low-power resistor with a power of 0.125-0.25 W (MLT-0.125 and MLT-0.25) is suitable. If the current and voltage drop across the resistor are very different, it would not hurt to calculate the power of the resistor:
P = U * I = 2V * 0.02A = 0.04 W.
Thus, 0.04 W is clearly less than the rated power even for the lowest-power resistor MLT-0.125 (0.125 W). Let's do the calculation for a red LED (voltage 2V, current 15mA).
- Udream = Upit – Ulight = 5V – 2V = 3V.
- R = U / I = 3V / 0.015A = 200 Ohm.
- P = U * I = 3V * 0.015A = 0.045 W.
When connecting LEDs, do not forget that they have polarity. To determine the polarity of the LED, you can use a multimeter in continuity mode or an ohmmeter. The use of quenching resistors is justified for powering low-power LEDs; when powering high-power LEDs, you need to use special LED drivers and stabilizers.
Calculation of a quenching resistor for an LED.
Methods for connecting LEDs to a 12 volt power supply
Connecting an LED via a voltage stabilizer
To connect an LED to 12 volts, if its voltage is only 3V, you will have to compensate for the excess of 9 volts through a resistor or zener diode (which is ineffective), or connect the ice lamps in series, three at a time.
Red and yellow LEDs can be connected in groups of five at a time, since the voltage drop is below 2.2 Volts.
Before calculating the resistor, you need to find out the operating voltage of each light bulb. It is measured independently or information obtained from technical documentation.
12 V LEDs are connected only through a stabilizer. When it comes to connecting a strip of lamps in an IP, it is important to know that they have a limiting resistor designed for each group of several LEDs.
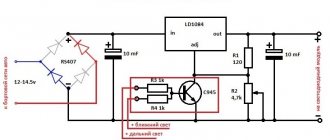
Connecting an LED through a resistance to 12 volts in a car (via a resistor)
Let's start, as in the paragraph above, with the option of connecting the LED to a voltage of 12 volts through a resistor. In order for you to better understand how the voltage drop occurs, we will present several options. When 3 LEDs are connected to 12 volts, 2 and 1.
Connecting 1 LED through a resistance to 12 volts in a car (via a resistor)
So we have an LED. Its supply voltage is 3.3 volts. That is, if we took a 3.3 volt power source and connected an LED to it, then everything would be great. But in our case, there is an increased voltage, which is not difficult to calculate using the formula. 14.5-3.3= 11.2 volts. That is, we need to initially reduce the voltage by 11.2 volts, and then only apply voltage to the LED. In order for us to calculate the resistance, we need to know what current flows in the circuit, that is, the current consumed by the LED. On average, this is about 0.02 A. If you wish, you can look at the rated current in the datasheet for the LED. As a result, according to Ohm's law, it turns out. R=11.2/0.02=560 Ohm. The resistance of the resistor is calculated. Well, drawing a diagram is even easier.
The resistor power is calculated using the formula P=UI=11.2*0.02=0.224 W. We take the closest one according to the standard series.
Connecting 2 LEDs through a resistance to 12 volts in a car (via a resistor)
By analogy with the previous example, everything is calculated the same way, but with one condition. Since there are already two LEDs, the voltage drop across them will be 6.6 volts, and the remaining 14.5-6.6 = 7.9 volts will remain for the resistor. Based on this, the scheme will be as follows.
Since the current in the circuit has not changed, the power of the resistor remains unchanged.
Connecting 3 LEDs through a resistance to 12 volts in a car (via a resistor)
And one more option, when almost all the voltage is extinguished by LEDs. This means that the resistor will be even smaller in value. Total 240 ohms. A diagram for connecting 3 LEDs to the machine's on-board network is attached.
Finally, all we have to say is that the calculations used a voltage of not 12, but 14.5 volts. It is this increased voltage that usually occurs in the electrical network of the car when it is started. It is also not difficult to estimate that when connecting 4 LEDs, you will not need to use any resistor at all, because each LED will have 3.6 volts, which is quite acceptable.
Serial connection
Serial connection of LEDs
If the master connects a 12 Volt LED in a series circuit, the lamps are assembled in a chain. In this case, the cathode of each previous element is soldered to the anode of each next one.
With this assembly scheme, a current of 20 mA passes through all the bulbs. The voltage level here also consists of the sum of the Volt drop across each of them. Thus, it is forbidden to connect an arbitrary number of light bulbs to one circuit.
If you need to connect a large number of LED lamps in series, you need to take a power source with high voltage and power ratings.
The disadvantages of serial connection include:
- Failure of the entire light chain if one element breaks down.
- The need to purchase a more powerful power supply when installing a large number of lamps.
As an example of a serial connection, consider a standard Christmas tree garland. If one element breaks, the whole thing stops working. Therefore, you need to find the loose contact and solder it again.
Algorithm of actions
The connection of LEDs must be made taking into account the polarity
To connect an LED to 12V DC, you need to understand the basic algorithm:
- Determine the type of power supply, find out its output voltage and overall performance.
- Detect LED rated current, power consumption and voltage.
- Determine the possibility of connecting LEDs to the power supply according to the available parameters.
- Connect and solder the light bulbs observing polarity. The resistor is placed on any part of the chain.
Contacts are carefully isolated after completion of work.
Flashing LEDs
Flashing LEDs look like regular LEDs, they can blink on their own because they contain a built-in integrated circuit. The LED flashes at low frequencies, usually 2-3 flashes per second. Such trinkets are made for car alarms, various indicators or children's toys. LED alphanumeric indicators are now used very rarely; they are more complex and more expensive than liquid crystal ones. Previously, this was practically the only and most advanced means of display; they were even installed on cell phones.
It will be interesting➡ Variable resistor
With a series connection, it is necessary to take into account the voltage drop on each diode, add this amount and subtract the above amount from the supply voltage and for it calculate the current, which is calculated for one LED. With parallel it is somewhat more complicated, when you put a second diode in parallel, you divide the resistor required for one in half, and when there are three, then the resistor value for two diodes must be multiplied by 0.7, when there are four diodes, the value for three must be multiplied by 0.69, for five - the denomination for four is multiplied by 0.68, etc.
With a series connection, the power of the resistor is the same as for one diode, regardless of the number, and with a parallel connection, with each addition of a diode, the power must be increased proportionally. Only parallel and series connections must have diodes of the same type. But I always put a different resistor on each diode, because diodes have a fairly wide range of parameters. And, as practice shows, there is always a weak link.
Material on the topic: how a toroidal transformer works and what are its advantages.
How many LEDs can be connected to 12 Volts
To find out how many LEDs can be connected to 12 V, you need to divide Up by Up. Or it is allowed to proceed from an average value of 2 Volts for each light bulb. Thus, for every 12 V it is allowed to mount no more than 6 LEDs. If we take into account that some part of the voltage (about 2 V) must necessarily go to the quenching resistor, the number of diodes will decrease by one.
The LED voltage is not always 2 V. In addition, when connecting and connecting the LED, it is worth taking into account the shade of the light bulb and its brightness. To determine the exact number of lamps per twelve-volt power supply, you can use a special program.
What LEDs are connected to 12 volts?
To briefly answer the question posed as a subtitle, the answer will be: none! To a non-specialist, such an answer will seem paradoxical, because there are LEDs on sale that, as sellers claim, are designed to be powered by a 12-volt source.
Let us undertake to assert that only LED-based products can be designed for a specific voltage. It is not correct to talk about a specific LED operating voltage. This is due to the physical processes occurring in it when light is emitted.
The main characteristics of these processes are the operating current and the maximum permissible current of the device. Reference books and datasheets indicate the voltages on the LEDs when operating current flows. These values are used for calculating LED designs, and not for selecting a power source.
By the way, the voltage in operating mode only ranges from 1.5 V to 3.5 V. The value depends mainly on the color of the emitted LED. Lower voltages drop on red LEDs; higher values are considered super-bright. Commercially available 12 volt light emitting diodes are not isolated devices.
Twelve-volt LEDs are matrices consisting of several light-emitting diodes. Matrices are LED assemblies assembled from chains of sequentially connected devices.
Each matrix has several chains that are connected in parallel to each other. When they say that an LED is designed for twelve volts, they mean that the voltage drop across a series chain of them when operating current flows is approximately 12 V.
Common Mistakes
LEDs will gradually fail, since the operating current is different for each
Craftsmen often make mistakes when installing LEDs. The most relevant of them:
- Connecting light bulbs directly without a resistor. In this case, the diodes simply burn out.
- Making a parallel connection using one resistor. Such an error threatens the gradual failure of all light bulbs. After all, each has its own operating current.
- Incorrectly selected resistor. In this case, too much current passes through the bulbs, which again leads to them burning out. If the resistance is high, the elements will not glow bright enough.
- Performing a series connection with different current consumption. There are two options here - the lamps will glow with different brightness intensities, or those designed for a lower current will burn out.
- Connecting ice lamps to a network with alternating current 220 without using a diode or other protective components. A voltage of 315 V is supplied to the light bulb, which instantly leads to its combustion.
If you take these errors into account and connect the LEDs correctly, the decorative lighting that the master decided to install at home will work for a long time and properly.