AND
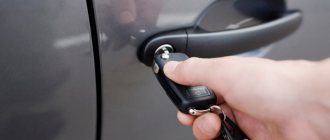
So, the season is already open, I’ll be going to work any day now, so it’s necessary to prepare the car to protect it from drug addicts and hooligans who like to steal music, batteries, etc. Are all classic owners familiar with the method of quickly opening the hood (without any tools) through the grille?! For those who don’t know, I’ll teach you now: The plastic grille is pulled out, through the resulting huge hole in the hood we pull the cable braid and that’s it! Do whatever you want with the engine bay. As a rule, they remove the battery and hand it over at the reception for 400 rubles.
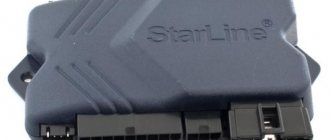
The latest fashion in Ulyanovsk is to unscrew the wheels and drain the gasoline. I will not write the signaling model here, because... it doesn't make any sense. I installed a feedback alarm. All alarms are connected in the same way. Here I will describe which wires go where in order to connect the alarm yourself and save several thousand rubles!
What do we need
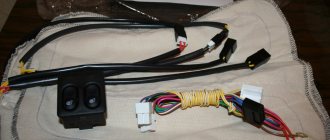
— Alarm (For classics, you should take an alarm without autostart, otherwise you will suffer from suction) — Siren (Not necessary, if you only need a feedback key fob to silently go down to the car and kick the villain.) — Door activators (Not necessary, if not necessary automatic locking/unlocking of doors. For the front doors, activators with a force of 4 kg are sufficient, for the rear doors 6 kg. If desired, you can put the activator on the trunk, there is also 6 kg.) - Wires (Not necessary, if you do not install activators, cross-section 0.75-1mm. It took me about 4-5 meters to arrange everything neatly and leave a reserve in case of repairs.)
For the money
Alarm: from 1,500 to 3,500 rubles. on average Siren: 150-250 rubles. Activator 1 pc. 100-160 rub. Wire 5m, 1mm section. 100-120 rub.
Installation
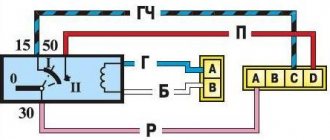
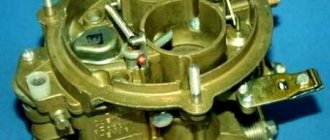
Because On each alarm, the colors of the wires coming out of the connector may differ, so you should use the instructions from the alarm itself to determine which wire is needed for what. It shows schematically where to connect what, but specifically for the VAZ 2106, I’ll write it out myself.
1. To connect to the turn signals, there are usually 2 wires from the alarm (sometimes one). If 2, then you can pick it up at the steering column switch connector. There is one blue wire, the second blue with a black stripe. One wire to one, one to the other.
2. To connect to the standard door opening limit switches, there are usually 2 wires from the signaling system. One for +, the other for -. The VAZ 2106 does not use a positive wire! We don't connect it anywhere. We connect the negative one for the limit switch to the wire that goes behind the tidy, to the left of the rack. There is a white wire with a black stripe coming out there, this is the wire from the driver's door switch. We connect it to it, the alarm will go off when any of the doors is opened.
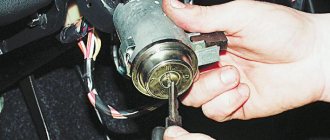
3. We connect the wire that comes from the ignition signal to the 15th contact on the ignition switch.
4. We connect the alarm power supply as follows: (+) we pull the wire from the alarm either to the battery (stupid way), or to the brown wire on the small fuse block, or to the pink/brown wire of the ignition switch. (-) connect the wire to ground, i.e. We fix it on the car body. The main thing is to have good contacts everywhere!
5. We attach the wires that go to the activators like this: green and blue directly to the door activator, the colors of the wires there are the same. Green and blue with black stripes for ground, and the remaining 2 wires, as a rule, are also green and blue, only with red stripes, these are positive contacts that are attached (MANDATORY) through a fuse to any contact where there is a permanent positive (see connecting the alarm power supply in paragraph 4)
6. To connect the siren and the hood switch, take 2 wires, which we pull out under the hood. The siren has 2 wires, the black one is ground, we fix it, for example, under one of the mounting bolts of the siren itself, or somewhere else where there will be good contact with ground, and the red wire is connected to one of the wires that was pulled out from the alarm under the hood ( do not confuse with the wire for the hood switch!). The limit switch has only one contact, this is actually ground, we connect it to the second wire, which was pulled out under the hood. When the limit switch is not pressed, the wire is supplied (-) from the body of the car, to which the limit switch itself is screwed, therefore, the alarm will go off.
7. Connecting the trunk/gas tank lid switch is done in the same way as connecting the hood switch. There is only one wire.
8. Some alarms come with an ignition lock relay. You don’t have to attach it, but if you decide, the principle of the relay is such that there are 2 wires coming from a 5-pin relay. At the ignition switch (to block the starter), we cut the red wire, and solder the relay to the two ends obtained. You need to look at the alarm circuit to see which wire to solder where in order for the relay to function correctly. The blocking relay can be hung not on the starter block, but on the ignition block; in this case, the blue wire with a black stripe coming from pin 15 of the ignition switch is cut. All that remains is to carefully wrap the extra wires into a bundle and hide the whole thing under the dashboard.
Fastening door activators
The activators can be attached in different ways, but I would recommend attaching them as shown in my photo. With this type of fastening, you can throw away the metal plate for installation and not carry around extra rattling debris with you. We cut off the excess part of the knitting needle as in the photo.
What is required to install central locking on 2 doors?
- A working and installed car alarm system with power outputs for controlling door locks.
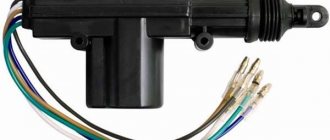
- Activators, actuators, actuators, solenoids, electric drives or, finally, just central locks - 2 pcs.
- The wires are two-core, copper. The diameter or cross-section of each wire must be at least 0.75 square. Length about 3-4 meters.
- Plastic clamps - 10 pieces, maybe more, “in reserve.”
- Other: electrical tape, heat shrink tubing, wire cutters, screwdriver, soldering iron, solder, multimeter, drill, drill bits, electrical extension cord, etc.
Before we begin directly installing central locks, we will analyze each point above in order, in more detail.
1) In this article we will not talk about how to install an alarm yourself, but we will assume that it is already installed. The cheapest option (about 1,300 rubles) is a simple alarm without feedback.
Which model to choose, how to connect correctly, how much it costs and other questions about car alarms will be discussed in another article. Just a few important points to keep in mind.
Firstly, the main alarm unit must have a connector (usually 6-pin) with power outputs for connecting door locks. Secondly, before purchasing, decide in advance whether you need an additional alarm channel. It can be used to open the trunk or, for example, implement the “light path” function and other similar functions. It all depends on your imagination and ideas, so it’s up to you. 2)
Lock activators are not called by any name, so don’t be surprised by so many names. We will stick to this term. The central locking solenoid most likely refers to an electromagnet, which is most often installed to open the trunk. In terms of power (traction force) it is much stronger than plastic activators, but it is also more expensive.
The approximate price for a regular central locking activator with 2 outputs (two-wire electric lock) is 100-120 rubles. a piece. For 2 doors you will need two activators, the total cost is about 250 rubles. The kit for each activator includes a special strip for attaching the central lock and self-tapping screws, as well as a rod, screws and a metal retaining plate.
3) To save insulating tape, copper wires in general insulation around the insulated conductors, but you can also buy them separately (single-core). The cross-section of the conductor must be at least 0.75 square. The current consumption of a conventional electric central locking drive can reach 5A at its peak.
In auto stores you can choose wires of various diameters, colors and lengths. Some are sold in ready-made installation kits or kits. Individually or “by meter,” most often, single (single) wires are found.
We recommend going to a regular electrical supply store and purchasing a two-conductor copper cable (the individual wire of which has a stranded conductor). For example, a PVS 2×0.75 cable (with a polyvinyl chloride sheath) or a PVS 2×1 mm cable is suitable. These wires are used to connect various electrical appliances, power tools and other machines and devices. The cost is about 12-15 rubles per 1 meter.
You can look for special automotive PGVA wires, which are intended for automotive equipment and instruments. They also have polyvinyl chloride insulation and are undoubtedly suitable for connecting central locks.
For reference: PGVA wires are designed for flexible connection of electrical equipment and devices with a low rated voltage (up to 48 V) in temperate, tropical and cold climates. PGVA wire is resistant to vibration loads, cracking, gasoline and oils. When laid alone, it does not spread fire.
When installing additional devices and using a second alarm channel, carefully study the table with permissible current loads. Most likely, to install a powerful solenoid that will open the trunk lock, an additional unloading relay will be required.
Plastic tape clamps will be needed to secure the wires. Purchase at will, 10 pieces will be enough.
On-site diagnostics and repairs
Our specialist will first diagnose the equipment, determine the location of the problem, check how the central locking compressor works, and only then begin to eliminate it. You will not be detained without reason; repair of the central locking compressor is carried out quickly and efficiently.
If the drive, or as it is commonly called the activator, located in the car, does not receive signals, or receives them partially, for example, the doors open and do not close, or the front locks are blocked, does not respond to the trunk, then the reason is in the operation of the activator. We will repair the central locking activator and units in the shortest possible time. It is almost impossible to determine on your own where exactly the system was unlocked. Therefore, it is best to contact our service center, within an hour from the moment of the call we will be near you and your car.
Installation and connection of central locks
Installing the central locking activator in the front door
Installation of the central lock should begin by removing the door trims and other elements that may interfere with installation. Then holes are drilled in each door to install a metal strip on which the door lock activator will be attached.
Having secured and adjusted the plastic activator, we move on to connecting and laying the wires. The task is to bring the wires into the car interior and connect them to the alarm unit.
In order to avoid moisture getting on the wires and further failure of activators and other devices (power windows, door lights), consider laying the wires along the door in advance.
Avoid placing wires at the bottom of the door, as this is where water tends to accumulate.
Central locking activator wire routing
When laying the wire, also pay attention to the most “problem” area, namely the place where the wires bend in the opening between the door and the body.
Door wiring protection tube
The best option is to use a rubber tube through the pipe. This corrugation will protect the wiring from chafing and kinks.
For a competent approach to the matter, as well as in order to be able to easily identify and find the necessary wires (+12 Volts, ground, control outputs from the alarm unit), it is better to remove the instrument panel (dashboard) completely. Thus, you will not only simplify your work on laying wires, but you will also be able to connect, solder and insulate them without much difficulty.
On a VAZ 2106 car, the instrument panel can be removed quite simply (four self-tapping screws and four nuts).
Twist or solder wires?
We recommend purchasing female and male terminals, as well as a special tool for crimping wires. If the activator fails, you can easily replace it with a new one. To do this, you just need to disconnect the terminals, dismantle the old one and connect a working activator.
Twisting the wires and wrapping them with electrical tape is not a reliable option; in this case, it is better to “twist” + “soldering” + “heat-shrink tube”.
How to connect the central locking to the alarm system?
Since the VAZ 2101-2107 car is not initially equipped with a central locking or electric door lock drives, you can install additional electric drives and connect them to the system as follows.
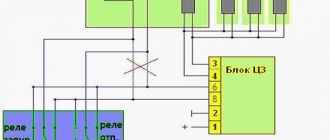
Central locking connection diagram
The blue-white and orange wires of the 6-pin connector of the main unit of the alarm system are connected through 15A fuses to +12 V DC. Green and blue wires to the vehicle ground or, in other words, “ground”.
The white wire is to the blue door lock activator unlock wire, and the yellow wire is to the green power lock wire.
Most Chinese car alarms, especially inexpensive models (APS 2600 SHERIFF, Pantera CLK 355), have blocks similar in structure. Sometimes it seems that Chinese manufacturers only change the label, but the “filling” remains the same. At least, the 6-pin connector itself with power outputs for locks, as well as the colors of the wires, differ quite rarely.
Having familiarized yourself with the central locking connection diagram, feel free to start connecting the wires and checking the operation of the activators. After successful tests, all that remains is to assemble all the removed parts in place and then carry out a “control” check.
Job done, congratulations! The approximate cost is about 500 rubles, excluding the cost of the alarm system.
Operating principle and installation
Panther alarm, useful information, how to install.
Panther car alarm connection diagram Pantera alarm scheme If first you want to save money, you need to install this system only on the most used doors, namely the front ones. The electric locks work without any problems, but if you forget to close the doors yourself, the level of security is noticeably reduced. It is advisable to combine the alarm and central locking, in which case the remote locking will work 100%, and you can be sure of the safety of the car. What exactly does this technology provide?
- Car security improves noticeably, and all because when the remote security mode starts, the doors close automatically;
- The safety of the car, which does not depend on you, increases. For example, you can set doors to close automatically. The door will lock and will not open if someone tries to open it;
- Passenger safety increases noticeably when the ignition is turned on and the doors are closed.
Below we will talk about installation and what main problems arise during the operation of the central locking (CL). What problems will you encounter before and after installation?
- Selecting the type of central lock that suits your car;
- Combination of alarm and central locking for increased efficiency;
- Connecting buttons to control the central locking.
What is central locking? This is a complex mechanism called an actuator, and consists of metal rods that connect to the rear door rod. In the kit you will see an alarm unit and electrical wires for connection.
In order to better understand the principle of operation of the central lock, I suggest watching the video below:
The installation will take several hours and you will need the following tools: the necessary screwdrivers, plastic clips for the trim and self-tapping screws.
The essence of installation of central locking
Of course, if you do not have experience in installing such systems, you will have to try hard. Technical skills and the ability to think correctly will be required. First you need to remove the door trim, which is why it was already said that plastic latches for the trim are needed. The latches are disposable and can be changed very quickly. Once you've got rid of the trim and dust curtain, look at the door and determine the best location for the lock.
Don't forget to consider the movement and mechanism of the glass and window regulator. It may be necessary to install a bracket to properly secure the central locking. To secure the lock, use self-tapping screws; when secured, check the door lock rod, which regulates the raising and lowering of the button that closes the door. The rod, which initially comes with the lock, has a clamp on one side, which is where it is attached to the lock. Accordingly, the design must be suitable for the installation to be successful.
The rod is bent for only one purpose - reducing the length and changing the plane of action. It is necessary that the movement be easy, without difficulty, check the mating parts together. Next you need to lay the wire, it is attached to the door using plastic clamps. Simply pull it through the tube located between the body pillar and the door, approximately in the area of the body hinges. It is needed primarily to protect the wire from abrasion. The kit includes a diagram where the type of wire installation is written; you need to route the wires to the alarm according to the instructions.
When you have installed the lock and navigated to the alarm unit, you can check its functionality. If there are no electrical or mechanical problems, begin reassembling the door trim in the reverse order from what it was during disassembly.
Conclusions, purchasing a central locking system with remote control and other useful information
In order to install a central lock that will close all doors when turning the key, you should purchase a separate central locking unit (small “black box”), as well as a special master activator (5 pins) for the driver’s door, or also for the front passenger door (where there is a lock cylinder and the ability to open the door with a key).
In this case, there is no need to install an alarm, and the process of installing and connecting the actuators is similar to the example above. The only differences are that you will have to lay additional wires for the driver’s door electric lock, and also “figure out” the connection diagram for the central locking control unit.
Repair
In fact, the central lock tends to break not only due to frost. Activators often become unusable.
Activators are one of the important parts of the entire system. In addition to the fact that activators are performers, the driver's door activator is also a sensor. The fact is that the activator on the driver’s side sends a signal to the control unit when it is pressed and closes everything. There are often systems where, in order to lock everything, you need to press the driver's door lock button. This button is screwed to the activator. Based on this, the driver's door activator causes all activators to operate. Here you will need to disassemble the door and see if the button on the activator is pressed; if not, then raise the activator higher, and if the button is pressed but nothing happens, you need to change it.
The second thing that can break is the electrical part of the system. This includes relays and fuses; most often they become unusable. Due to the fact that the relay has become unusable, the system may simply not work. In these cases, the relay must be replaced. The relay may also be in the alarm module. The relay wires in the module may break; in this case, the car will not be locked when the button is pressed. In order to find out which relay is not working in the car or on the module, you need to check all systems separately.
In addition to the relay, fuses in the car can burn out. They are located in the fuse box. It is immediately clear from the fuse body that it is burnt out. In this case, replacing the fuses will help solve the problem.