Modern car radios, or more precisely multimedia systems (head units), are not always effective in terms of reliable reception over long distances. They are usually designed to operate at short distances from large cities where radio transmitting devices and broadcast stations are installed.
If you move 20-30 kilometers from a populated area, the quality of reception deteriorates sharply. If a standard antenna is not enough for reliable reception of broadcast stations, it’s time to think about installing a signal amplifier for a car antenna.
How to choose an antenna for a radio?
First of all, the car antenna must provide radio signal reception at distances from transmitting stations. If the car owner travels only within the city, then active (internal) antennas guarantee a good signal. They are characterized by their small size and ease of installation. In addition, they are reliably protected from various vagaries of weather. The disadvantage of this type is their weak sensitivity, which does not provide good enough signal quality away from the city.
When you move more than 50 km from the transmitting station, you will notice that the connection begins to disappear. Therefore, if you are planning long trips, then in this case you should pay attention to external (passive) antennas. These devices are connected to the radio and operate without electrical power. The disadvantages of outdoor radio antennas are their large dimensions and lack of protection from the influence of the external environment. However, they are highly sensitive and are able to receive even fairly weak radio signals.
Where to install the antenna?
When choosing a car radio antenna, you must first select the location for its installation. Active antennas are designed for installation inside a car. Therefore, they are often attached in the window opening or near it. Also, the internal model can be installed on the windshield or on the rear parcel shelf. When mounting it on glass, you need to make sure that it does not block your view. In addition, it is desirable that the device does not interfere with the passenger sitting next to it.
The external radio antenna must be installed on the highest part of the vehicle. This is necessary in order to ensure high-quality and stable radio signal reception. A common option for installing this type of radio antenna is the roof of a car. However, it can also be attached to the fender of a car. It is not recommended to install the device on a bumper, as strong signal interference may occur.
Which to choose
When faced with the need to choose an amplifier for an antenna, you need to take into account the following features:
- The part should be installed at a short distance from the antenna. Otherwise, the signal quality will deteriorate and the receiver will begin to pick up interference.
- The operating band must cover the required frequency range.
- To protect the device from overloads, you need to use amplifiers with a high dynamic range.
When choosing an amplifier for the antenna plug for a car radio, you need to take into account the noise figure values. They should be minimal.
The main selection criterion is the gain. With small indicators, the quality of reception will not improve.
When choosing an adapter, you should take into account your living conditions. City residents do not necessarily need to buy powerful amplifiers with high gain, but drivers from remote communities will need devices with the maximum value.
Modern antenna adapters are affordable and have extensive functionality. On sale you can find both budget options and powerful devices with built-in signal amplification.
The cost of the second varieties is much higher, but this is justified by a lot of advantages. Drivers also have to choose between domestic and foreign developments. Triad antenna plugs are available on the Russian market and enjoy a good reputation. One of the most interesting developments is the Triad-304 device with a built-in device shutdown function.
When looking for foreign amplifiers for the antenna connector, you need to consider Prologi products. Some models are capable of amplifying both digital and analog signals, and also operate with several antennas.
What kind of service is this?
The quality of signal reception largely depends on the choice of the type of car antenna, its installation location, and compliance with connection rules. Antennas are classified:
- radio, television antennas, communication antennas;
- passive and active;
- external and internal.
Some car models (now extremely rare) use retractable antennas. In most cases, car enthusiasts purchase a standard kit for installing an antenna: the antenna module itself, fasteners, a high-frequency shielded signal cable, and a connector. To properly install the antenna, you need to choose the right installation location, connect the high-frequency cable in strict accordance with the instructions, and make a reliable connection to the signal receiver.
Qualified installation of antenna on a car
ensures its trouble-free operation and flawless operation of the receivers. The work is carried out in a place convenient for the client, where he calls the specialist by phone. This service involves performing a number of operations:
- Preparing the product and vehicle for installation of the device.
- Install the antenna in strict accordance with the instructions.
- Laying the cable and connecting the product to the receiver and, if necessary, to the on-board network.
- Checking the device's functionality.
The process of installing a car antenna depends on its type: internal or external, as well as the design features of the vehicle. Our technicians have the necessary skills in installing and switching both types of devices from domestic and foreign manufacturers.
Installation and connection of the internal active antenna
Products of this kind are popular among car enthusiasts and are characterized by fairly high sensitivity. When installing indoor active antennas, the technician performs the following steps:
- Inspects the product and the vehicle and agrees with the customer on the location of installation on the windshield.
- Marks and prepares the surface for antenna installation.
- Sticks the device and lays the cable to the receiver.
- Connects the device and checks its operation.
Purpose
Modern manufacturers of multimedia equipment for vehicles produce affordable devices with extensive functionality. But such devices do not always demonstrate good quality of radio signal reception, especially if the car is located at a great distance from the radio tower. The purpose of the amplifier is to increase sensitivity.
The antenna adapter for the radio allows you to connect the signal receiver to the playback device if such a function is not provided by the model. In most cases, the antenna is supplied with the radio, and the cost of the amplifier is 200-250 rubles.
Despite the affordable price, the accessory prevents drivers from having problems with interference and poor signal. As a result, the sound becomes stable and the radio station playback will never be interrupted.
There are several signs that indicate you need to purchase a plug. To check the signal level, it is important to determine:
- Is there any sound distortion when displaying videos or playing audio files. Any interference, hissing and other similar phenomena may indicate poor reception.
- Is there any distortion in the picture?
- Has the list of stations received by the device changed?
- Does the signal disappear?
If these problems occur, you should think about choosing an amplification adapter.
Keep in mind
The type of antenna you choose depends on the nature of your travel. If the car is used within urban and suburban areas, it is better to choose a passive whip antenna of medium length, which works well in conditions of reliable reception. When traveling long distances or working in settlements remote from large cities, choose an active antenna. It has a built-in signal amplifier. Typically, such antennas are designed for interior design to prevent moisture from entering the antenna amplifier. However, when entering a city or crossing power lines, such an antenna may become “clogged” with external interference.
Particular attention should be paid to the antenna installation location:
- If there is a standard antenna mounting location (usually in the front part of the roof), it is better to install the antenna in the existing screw connector, this will simplify the work;
- If there is no standard connector, it is recommended to install the antenna as close as possible to the central axis of the car;
- You should pay attention to the placement of the sunroof on the car roof; the antenna wires should not interfere with moving mechanisms;
- The signal will be maximum with the shortest high-frequency cable; it is not recommended to install the antenna in the rear of the car.
The most common reason for replacing the antenna is the purchase of a new radio or installation of another receiving device. In this case, to ensure the highest quality reception, it is necessary to resort to the services of a specialist.
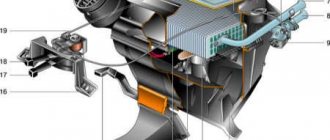
The active antenna has a built-in power amplifier and needs to be connected to a power source. Therefore, it is a little more difficult to install than usual. But if the car is often used outside the city, where the signal from radio stations is weak, then it is irreplaceable. How to connect an active antenna to a car radio?
Recommended Models
When choosing an amplifier for your car radio, you should not skimp. It is highly not recommended to buy devices of dubious quality. Cheap Chinese models get hot and cannot show a good trouble-free service life. Inexpensive ones are often poorly shielded and do not have real characteristics that match the declared ones. There are a number of models that have shown good reliability and efficiency.
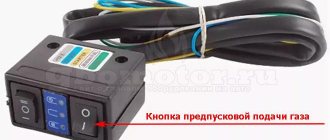
Triad-304
This device is suitable for any car radio. The amplifier is broadband, operates in the FM and short wave ranges. It is externally powered and has 16 dB gain. The built-in bypass works automatically. It is recommended to turn off the model in the city, as it can generate a signal that is blocked by the car radio tuner. To do this, just interrupt the power supply. Recommended use of the device: city with trips to the country.
Prices for Triad-304 on Yandex Market:
LADA
This amplifier offers versatility. It has two switchable gains, 12 and 25 dB. The built-in indicator shows in which mode the device is operating. There is a shutdown function by interrupting the power cable. The model is suitable for both passenger cars when traveling to the country, and for commercial vehicles.
BARF-3
This amplifier has a fairly impressive price tag. However, for the money the user receives reliable shielding, which allows the model to be installed directly near the antenna input of the car radio. The device requires a separate power input and shows a gain of 23 to 25 dB. Recommended for installation on commercial vehicles and luxury cars.
Choosing a location
Active antennas have a compact design and are attached using a special adhesive mounting pad or double-sided tape. Therefore, you can choose any installation location inside the cabin. Most often, preference is given to the windshield near the front passenger seat. This is due to its location near the radio and convenient installation of cables into the car's trim.
Placing on the roof has an advantage in signal reception, but is more difficult. Oxidation of metal parts and deterioration in reception quality are also possible.
When choosing a place where the antenna will be installed, you should adhere to the following rules:
- Cables should not be routed near sources of interference.
- They must be carefully hidden under the car's skin so as not to create discomfort during driving or breakage due to negligence.
Antenna amplifier power supply
Modern models are connected via the receiver connector directly to the car radio. With this connection, a radio signal is supplied from the active antenna. In the reverse order, the required voltage of 12 volts is supplied to the amplifier through the other pair.
On models where such a connection is not provided, the antenna amplifier must be connected to the power supply independently in two versions:
- Power connection via fuse box.
- Independent connection to power via the car radio.
Step-by-step instructions for installation inside the cabin
Installation depends on the configuration of the selected model, but the general principles are practically no different. All features will be additionally indicated by the manufacturer.
- Degrease the antenna installation area with an alcohol wipe or other product.
- We place the triangle included with the device at the installation site, which facilitates correct positioning of the antenna.
- In the phases of the triangle, install the mounting disk and remove the triangle.
- Glue orientation strips that will help you correctly position the receiving parts of the antenna.
- The signal receiving antennae are installed on the pin of the mounting disk by gradually peeling off the film and fixing it in accordance with the reference stripes, after which they can be immediately removed.
- To lay the cable, remove the side trim of the car.
- We secure the wires using zip ties to the car's standard wiring or to the glass washer hose.
- For the convenience of further installation, it is necessary to dismantle the glove compartment of the car.
- We remove the radio from the socket to gain access to the connectors and wires.
- The blue power wire from the ISO connector connects to the power wire of the antenna amplifier.
- We connect the wire responsible for sending the signal to the corresponding connector on the rear panel of the head unit.
- The quality of work performed and signal reception are checked.
- All wires are neatly placed in the landing window of the radio.
- The radio is installed in place and fixed.
- The glove compartment and the removed lining are mounted back.
Receiving an AM Signal - How the Radio Works
Here's a real world example. When you tune your car's AM radio to a station—for example, 680 on the AM dial—the transmitter's sine wave transmits at a frequency of 680,000 hertz (the sine wave repeats 680,000 times per second). The DJ's voice is modulated onto this carrier wave by changing the amplitude of the transmitter's sine wave. The amplifier boosts the signal to 50,000 watts for a large AM station. The antenna then sends the radio waves into space.
So how does your car's AM radio - the receiver - receive the 680,000 hertz signal sent by the transmitter and extract information (the DJ's voice) from it? Here are the steps:
- Unless you are sitting next to the transmitter, your radio needs an antenna to help it pick the transmitter's radio waves out of the air. An AM antenna is simply a wire or metal stick that increases the amount of metal with which the transmitter's waves can interact.
- Your radio requires a tuner. The antenna will receive thousands of sine waves. The tuner's job is to separate a single sine wave from the thousands of radio signals that the antenna receives. In this case, the tuner is configured to receive a signal of 680,000 hertz. Tuners work on the principle of resonance
.
That is, tuners resonate
at one frequency and amplify it, ignoring all other frequencies in the air. It's easy to create a resonator with a capacitor and an inductor (look up how oscillators work to see how inductors and capacitors work together to create a tuner). - The tuner forces the radio to accept only one sine wave frequency (in this case, 680,000 hertz). Now the radio must extract the DJ's voice from this sine wave. This is done using a part of the radio called a detector or demodulator. In the case of AM radio, the detector is made with an electronic component called a diode
. A diode allows current to pass in one direction but not the other, so it cuts off one side of the wave, like this:
- The Next radio amplifies
the cut signal and sends it to the speakers (or headphones). An amplifier is made up of one or more transistors (more transistors means more gain and therefore more power to the speakers).
What you hear from the speakers is the DJ's voice!
In FM radio, the detector is different, but everything else is the same. In FM, the detector turns frequency changes into sound, but the antenna, tuner and amplifier are basically the same.
,
Step-by-step installation instructions on the roof
If the supplied cable is not long enough, an additional one will be required. The cable must be braided and have a resistance of 75 ohms.
- At the installation site, it is necessary to drill two holes: one with a diameter for mounting the antenna and one with a diameter of 5 mm for an auxiliary one.
- The metal at the installation site is cleaned from the inside of the cabin.
- To avoid corrosion, the installation site is treated with mastic on the inside of the cabin and sealants on the outside.
- For installation, it is necessary to make an insulator (spacer) from copper and fluoroplastic washers to which the cable is soldered.
- The junction of the insulator and the cable must be sealed.
- We install the antenna on the roof and tighten the insulator nut from the inside of the cabin.
- We lay the cable from the antenna to the radio under the car trim.
- We connect the antenna to the radio and check the signal quality. Watch the video on installing the antenna
AutoNews / Reviews / Tests
How to Connect an Antenna to a Pioneer Radio
Connecting a Pioneer radio
Now Pioneer car radios can confidently be called the most needed in our country. connect the sarmatt DVR to how to connect a mirror recorder. The black wire can be connected to how to connect how to connect an amplifier to a radio. Pioneer, how to connect the antenna to can be connected to an mp3 radio. After purchasing the device, every car owner wants to find out how to connect Pioneer radio
, but it’s best to do it yourself. So let's get started!
How to connect a Pioneer radio - methods
It should be noted that connecting the Pioneer radio
can be done in 2 ways:
- Introduction of a standard ISO connector.
- Connecting a radio without standard connectors.
You need to be aware that if you implement the second method of installing the radio, the warranty on the device will no longer be valid, and there is a high possibility of making a mistake when connecting the wires. But, in almost all cases, there is simply no other way out. How to connect ASIC to nicehash setup and connections. How to connect a car radio at home to a computer. For example, this option is the only one in this case if your car does not have a corresponding connector for connecting a radio.
Even if you use an ISO connector, you need to do everything very carefully and make sure in advance that the terminal wiring on this connector is made correctly.
Installing an active bosch car antenna
Guys, I apologize for the incomplete video. How to connect a DVR to the Internet via a router. How to connect an antenna on a car radio. Radio tape recorders have a special wire, usually blue and white.
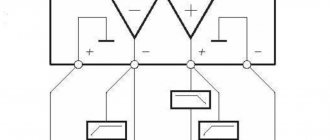
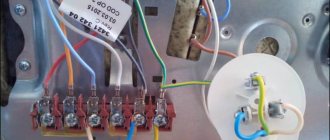
The standard connection diagram for a Pioneer car radio provides for the following wire markings:
- The thick yellow wire is the connection to the car battery. How to connect the antenna to the radio? How to connect several video cards for which the computer does not see anthony for recording. It should be noted that this wire must be connected only through a fuse.
- The red thick wire is connected to the same battery, but through the car’s ignition switch. How to connect ASIC to nicehash? Tips for proper ASIC mining on the nicehash service. This is necessary so that the device functions only when the ignition is on. Some car owners prefer to connect the red and yellow wires, but this risks the car battery being discharged at a completely unexpected moment. Connecting an antenna to a radio often causes some problems for car owners, which you can avoid by reading the article on how to connect an antenna to a radio. How to connect the DVR to the Internet. How to connect how to log into the registrar. Due to the use of this method of connecting the Pioneer , in case of prolonged parking it will be necessary to disconnect the housing terminal from the battery.
- The thick black wire is the connection to the car body or the negative terminal of the battery.
- The white-blue wire is responsible for powering the active subwoofer, antenna or amplifier. After turning on the radio, 12V voltage appears on the wire.
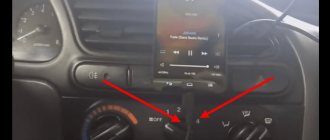
Antenna installation and connection
Having decided on the location, we proceed to installation. The area on the glass where the antenna will be attached is thoroughly cleaned of dust and thoroughly degreased. For this, special alcohol-containing products are used.
Sometimes glass cleaner is already included with the antenna. Usually the main block and receiving antennae are attached to the glass with double-sided tape. All you have to do is remove the protective film and glue the structure onto the glass in the right place. For best effect, press down on the antenna for a few seconds. This will prevent the tape from coming off in the future.
Then comes the turn of laying the wires. They are usually led along the windshield pillar down to the radio. If the antenna is located on the rear window, the wire can be hidden under the roof trim.
Purpose of wires
Now let's look at the purpose of the wire. The standard cable has three separate wires.
- The first is “ mass ”. It is responsible for grounding the antenna, which reduces its sensitivity to extraneous interference. The “ground” must have good contact with any metal element of the body.
- The second wire is power . It serves to provide electrical power to the main antenna unit and is connected to the radio.
- The last wire is conventionally called contact . It transmits the receiving signal. It also connects to the car radio via a dedicated antenna input.
All three wires can be combined into one or run separately.
Typically, in modern models, the contact and power cables are connected into one core. There is a single connector for it on the radio. In this case, the casing of the tape recorder serves as grounding.
The above connection diagram is suitable for all types of antennas without exception.
Now a little about the manufacturers. Oddly enough, among the domestic options there are very worthy ones. For example, receivers have proven themselves well. In terms of signal quality and service life, they are in no way inferior to antennas or Pulsar.
A stable and clear signal to everyone!
Did you like the post? Share with your friends:
Most popular articles
Tell your friends:
Search for what you need:
Alfa Romeo MiTo - technical specifications, information, photos
How to sell a car quickly?
Tuning Mercedes G-class Gelandewagen
Chinese crossover Lifan
Hyundai i40 - review from outside and inside
Street Storm DVR
Keyless entry system
How to connect a car antenna to a radio
Why car air conditioning breaks down and rules for refilling with freon
What materials are best suited for interior reupholstery?
WP-PostRatings
- Which Lexus should I buy for 1 million rubles? (5.00 out of 5)
- Choosing wheels: stamps, casting and forging - which is better? (5.00 out of 5)
- How to tune a car(5.00 out of 5)
- Why does a car air conditioner break down and rules for refilling with freon (5.00 out of 5)
- Hyundai i40 - review from outside and inside (5.00 out of 5)
- Keyless entry system (5.00 out of 5)
- Socket in the trunk of Kia Ceed(5.00 out of 5)
- Painting wheels yourself (5.00 out of 5)
- Useful tips on the topic “how to choose a car” (5.00 out of 5)
- Bi-halogen modules Hella D90MM PREMIUM - installation on Kia Rio (5.00 out of 5)
Tips Sections
Popular Topics
Latest Tips Published
All rights reserved © 2014-2017 Avto-sovet.ru - Automotive tips.
When using blog materials, a direct link to Avto-sovet.ru is required!
Everything for the motorist: maintenance, repairs, manuals and useful tips for operating the car.
Connecting a Pioneer radio - speaker wires
- Right front speaker - the gray wire goes to the “plus” of the speaker, and the gray-black wire goes to the “minus”.
- Left front speaker - connect the white wire to the “plus” of the speaker, and the white-black wire to the “minus”.
- Right rear speaker - the purple wire goes to the “” column, and the purple-black wire goes to its “-”.
- Left rear speaker - connect the green wire to the “plus” of the speaker, and the green-black wire to the “minus”.
The connection procedure is complete, you just need to connect the battery and enjoy the operation of your new Pioneer radio.