VAZ 2110: right front fender - replacement and repair
Right front fender
As you know, on the VAZ 2110 the right front fender not only performs an aesthetic function, but also serves as protection. Often this part of the car body is subjected to mechanical or other impacts that negatively affect the surface or the wing as a whole. In such cases, the front right wing of the VAZ 2110 is subject to replacement or repair, which can be easily carried out on your own.
How to remove the wing
Front right fender VAZ 2110
First, let's find out how to remove the wing from a VAZ 2110 car. Let's get started:
- First of all, you will need to remove the side turn signal, but first disconnect the battery;
Note. Removing the bumper involves removing a special fastening on the right side of the VAZ 2110 car.
- We take out the side turn signal, moving it to the front of the car and removing it from the special hole;
Note. The turn signal housing should also be removed and the lamp socket with the lamp should be moved towards the front.
- We find the bolt at the bottom that secures the buffer on the right side;
- We loosen the nuts that secure the crankcase protection with the bumper of the VAZ 2110 (there should be 5 of them);
- Remove the radiator trim;
- Loosen the front buffer bolts.
Note. The front buffer bolts (there are two of them) are loosened in order to easily move the buffer in the desired direction, thereby gaining access to the nut that secures the front wing mount.
- Unscrew this bolt;
- Then pull out the headlight from this side of the car;
- After this, grab the wheel arch liner and remove it;
- Now you need to unscrew the screws that secure the wing to the body (we are talking about the upper fastenings, which are turned out with a 10 key);
- We do the same with other screws that secure the wing to the body.
Note. During the work, you need to use not only one key, but also a screwdriver with a wide blade, as well as a second key with the same number.
- The wing can be easily removed once there is nothing to hold it in place.
Right front fender VAZ 2110
As for installing a new or repaired wing, the whole process is similar to removal. All stages of work should be done in reverse order.
Note. During installation, the wing should be carefully adjusted to other parts of the body. This is very important and requires special care.
Right wing of VAZ 2110
When installing a new wing, it is also important to observe the following points:
- Install, as stated, in the reverse order of removal;
- Clean surfaces on the car body;
- Install new insulating gaskets between the body and the upper part of the fender, as well as between the A-pillar and the rear part of the fender.
Note. If such gaskets are not available and finding them is a problem, it is recommended to use mastic, which fits perfectly on the surface of the body and seals the cracks.
- The wing must be aligned due to the enlarged holes, doing this in accordance with the gaps and protrusions of the remaining body panels of the VAZ 2110;
- Be sure to coat the wing with an anti-corrosion compound after installation.
How to remove the right front fender
Lada Xray. FRONT FENDER - REMOVAL AND INSTALLATION
Place the car on a two-post lift and brake with the parking brake (electro-hydraulic lift type P 3.2 G).
Open the hood and disconnect the ground wire terminal from the battery (spanner 10).
Loosen the front wheel mounting bolts, hang the car (replaceable head 17, extension, wrench).
Unscrew the front wheel mounting bolts and remove the wheel (replaceable head 17, extension, wrench).
Remove the front bumper in accordance with the requirements of Section 1 of this TI.
Unscrew the bolts securing the headlight unit, remove the headlight unit in accordance with the requirements of TI 3100.25100.20597.
Unscrew three screws 6, Figure 7-1, securing the front wheel mudguard (replaceable Torx T20 head, wrench).
Remove piston 7 securing the front fender flap 2 to the fender (flat-head screwdriver).
Unscrew the clamp 5 securing the shield (flat screwdriver).
Remove holders 4 of the front fender flap, remove the shield (flat-head screwdriver).
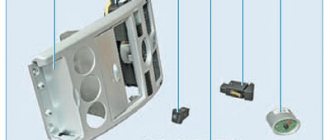
Figure 7-1 – Attaching the front fender flap:
4 – front fender flap holders;
5 – front fender flap retainer;
6 – screw for fastening the apron of the front wheel mudguard;
7 – piston for fastening the front wing flap to the wing
Unscrew nut 2, Figure 7-2, securing the rear part of the front fender 3 (wrench 10).
Unscrew bolt 1 securing the front part of the front wing to the spar bracket (replaceable head 10, knob).
Figure 7-2 – Front fender mounting:
1 – bolt securing the front part of the front fender;
2 – nut securing the rear part of the front fender;
3 – front fender Unscrew bolt 4, Figure 7-3, of the lower fastening of the rear part of the front fender 2 (replaceable head 10, knob).
Open the front door 1 and unscrew the nut 3 securing the rear part of the front fender a few turns (wrench 10).
Figure 7-3 – Lower rear part of the front fender:
3 – lower front fender rear mounting nut;
4 – bolt of the lower fastening of the front fender. Unscrew screw 5, Figure 7-4, fastening the decorative trim 1 of the front fender 2, remove the trim (replaceable head TorxT20, extension, knob).
Unscrew nut 3 of the upper fastening of the rear part of the front fender a few turns (wrench 10).
Figure 7-4 – Upper rear part of the front wing:
1 – decorative trim for the front fender:
3 – upper rear fender fastening nut;
5 – screw securing the decorative trim Unscrew the three bolts 1, Figure 7-5, of the upper fastening of the front wing 2 to the body, remove the wing (replaceable head 10, knob).
Figure 7-5 – Front fender upper mount:
1 – front fender mounting bolt;
2 – front fender Install the front fender in the reverse order of removal, in this case;
-install and pre-tighten the wing fastening bolts (spanner 10, replaceable head 10, extension, wrench).
– adjust the gaps (ensure uniformity of the gaps) between the front fender, hood and front door (ruler, rubber hammer).
– perform the final tightening of the wing fastening bolts, ensuring the requirements for mating the wing with the body panels (spanner 10, interchangeable head 10, extension, wrench).
Present the vehicle to the Quality Control Department. The quality control department will check the vehicle for compliance with the requirements of this TI and TU 017200-254-0023934 in the scope of work performed.
you needed a welding machine to remove or install a wing Today, this process does not require welding work, and even the most inexperienced car enthusiast can remove and install the front wing on a Chevrolet Cruze.
Instructions for removing and installing the front wing of a Sherole Cruze
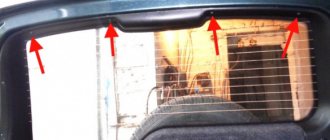
- We place the car on a flat surface and turn the wheels in the opposite direction to the one on which we will remove the wing.
- Using a Torx T15 socket, unscrew the three self-tapping screws securing the fender liner to the car bumper and the two self-tapping screws at the bottom. The required connections are marked in the photo.
- After this, move the fender liner a little and separate the bumper and fender. For connection, a special bracket with latches is used, which are easily separated; you just need to pull the upper part of the bumper towards you.
- Before removing the front fender, we recommend covering the edge of the bumper with tape to avoid accidental scratches.
- Now, slightly pulling the edge of the bumper, unscrew one screw and remove the bumper mounting bracket. It is attached to the wing using rivets that need to be drilled with a 4.2 mm drill. and, pressing the outer latches, pull it towards you and up until it disengages from the wing.
- To attach the bumper mounting bracket during fender installation, you must use rivets with a diameter of 4.8 mm
- After dismantling the bracket, we have access to the two front bumper mounting bolts, which need to be unscrewed.
- Next, open the front door and find another fastening bolt, which we also unscrew.
- On the back of the fender liner, we remove three pistons securing it to the car body, and one piston on its lower part.
- Pulling back the rear part of the fender liner, we see a plastic boot, which is secured with a single piston. We disconnect the piston and pull out the boot, lowering its lower part.
- Now you can unscrew another fastening bolt, which is located behind the boot.
- There is another bolt on the lower part of the wing at the junction with the body sill; unscrew it and use a screwdriver to separate them.
- Using a thin screwdriver, carefully pick up the plastic triangle around the edges and remove it near the side-view mirror. There is another fastening bolt under it, we also unscrew it.
- Now let's move on to the engine compartment. We remove the left wiper, to do this we open the plug at the base and unscrew the fastening nut with a 15mm head, then, shaking it, remove it from the axle.
- We also remove the rubber seal of the hood and engine compartment on the plastic frill.
- Next, we remove the frill itself, to do this we disconnect the four pistons and, separating the halves, pull it out.
IMPORTANT! If you are changing the right wing, it is enough to pull out only the right part of the frill. Do not try to bend the edges of the frill to unscrew the fender fasteners, otherwise it may be damaged.
- Now you need to remove the fuse box cover if you are changing the left fender and the air filter cover if you are changing the right one. Then, using a spanner wrench, we unscrew another bolt securing the front fender of the Chevrolet Cruze, hidden under the influx of the headlight.
- We disconnect the two pistons of the upper plastic wing trim and carefully lift it up.
- We unscrew the screws with which the headlight is attached to the fender and then we gain access to the last two bolts securing the front fender to the car body.
- Now all that remains is to carefully remove the Chevrolet wing and install a new one in its place.
How to remove
, install
the front wing of a Chevrolet Cruze Gone
are the days when in order to remove or install a wing on a car you needed a welding machine. How to remove the front fender - chevrolet car service forum. Now this process does not require welding work, and even the most inexperienced car owner can remove and install the front wing on a Chevrolet Cruze.
Note on removing and installing the front wing of the Sherole Cruze
- We place the car on a level surface and turn the wheels in the opposite direction to the one on which we will remove the wing.
- Using a Torx T15 socket, unscrew the three screws securing the fender liner to the car bumper and two screws from the bottom. Front right fender for Lanos and Sens. The required connections are marked in the photo.
- Then move the fender liner slightly and separate the bumper and fender. Chevrolet Lanos fender How to replace the front fender, the first thing you need to do is remove it. For connection, a special bracket with latches is used, which are simply disconnected; you just need to pull the upper part of the bumper towards you.
- Before removing the front fender , we recommend covering the edge of the bumper with tape to avoid accidental scratches.
- Now, pulling the edge of the bumper a little, unscrew one screw and remove the bumper mounting bracket. The right front fender needs to be removed/mouth, there is no straightening because the maximum is through. It is attached to the wing using rivets, which must be drilled with a 4.2 mm drill. and, pressing the outer latches, pull it towards you and upward until it disengages from the wing.
How to change the wing on a VAZ 2107
The VAZ 2107 brand car is known not only in Russia, but also in neighboring countries. Its production began in the 80s, and production was closed in 2012. A lot of time has passed, but the car continues to be popular. Over time, it is possible that you will get into an accident or cause corrosion to appear. Usually the front fenders are the first to suffer. If any of these troubles happen, then repairing or replacing the damaged front wing on a VAZ 2107 will help maintain its appearance.
Preparing the car for front wing replacement
Before deciding to replace the front fenders, you should make sure that such actions are necessary. If the damage is minor, the part can be straightened. It will cost much less than buying a new wing. If the wing has significant damage, then it is better to replace it.
To replace the front fender yourself, you need to prepare the following tools:
- Drill for drilling holes.
- Angle grinder - grinder.
- A set of wrenches for removing the old and installing a new part.
- Impact screwdriver.
If you plan to replace a part, the first step is to replace the damaged device. This can only be done after dismantling the front door and headlights. To remove the door, you will need to use an impact screwdriver. To remove the front fender, you will also need to remove the front headlight unit on the right or left side, depending on the part being removed. You will also need to remove the wheel, fender liner and front bumper, after which you can begin dismantling and installing a new front wing on the VAZ 2107.
Replacing the front fender - when necessary
When is it necessary to replace the part in question? If you love your car and try to take care of it, then the first sign of corrosion will greatly upset you. However, in this case, you should not remove the part and replace it with a new one. Replacing the front wing on a VAZ 2107 is carried out for a number of the following reasons:
- Corrosion marks in the form of through holes. In this case, you can use soil substances and do without welding, but such repairs will not last long. The best option to prevent further damage to the part by corrosion is to replace it. You can use a repair insert or overlay, but to do this you need to cut out the rotten part and weld the metal overlay. This method is labor-intensive and requires the use of paints and varnishes.
- The part was damaged if the car was involved in an accident. Often it is the front wings that are affected. If the straightening specialist says that the wings cannot be repaired, then it is better to replace them.
To make a replacement, you will need to buy a new or used device. When purchasing, it is important to pay attention to the geometric dimensions of the part, as well as the color. You can do the replacement work yourself at home, but we’ll find out how to do it correctly below.
Removing the old wing
When carrying out dismantling work, you should use an impact screwdriver and WD-40. When it comes to the wing or wings themselves, before removing them it is necessary to clarify that they are secured with welds. To dismantle a wing secured by welding, you will need to use an angle grinder.
How to remove a fender on a vehicle
If your vehicles have been involved in a collision or have suffered some cosmetic damage due to severe off-roading, it is usually necessary to remove one of the fenders to make the necessary repairs. Removing the wing does not require any special tools or knowledge, but once the part is removed it will be very heavy, so you may need an extra pair of hands to help you carry the wing.
Under the hood:
- How to remove a fender on a GMC Sierra
- How to Remove a Fender from a 2002 Ford Explorer
- How to Remove a Fender on a Ford F-250
- How to Remove a Fender from an 87 Chevy Pickup
- How to remove a fender on a Camaro
How to remove a fender on a GMC Sierra
Remove any screws that secure the wheel directly to the fender. There will be six Phillips head screws attached along the wheel.
Remove all bolts securing the fender to the hood panel using a ratchet and turning counterclockwise. There are four bolts holding the two parts together.
Remove all bolts holding the rocker panel to the fender. The fender will be attached with three bolts, depending on the year of your GMC.
Open the truck door on the side where the fender will be removed. Remove all bolts on the post located inside the door jamb.
Raise the GMC hood. Remove the bolts securing the radiator bracket to the fender. Use a socket and ratchet to remove the bolts from the fender.
Slide the fender and remove it from the truck.
Items you will need
- crosshead screwdriver
- ratchet
- Connector
How to Remove a Fender from a 2002 Ford Explorer
Open the hood and remove the three screws around the flasher using a Phillips screwdriver. Remove the flasher.
Remove the two bolts that are now exposed using a socket wrench and an 8mm socket.
Remove the three bolts along the top of the fender and the two bolts along the bottom using a socket wrench and an 8mm socket.
Open the conductor door and remove the two bolts at the front of the door jamb with an 8mm socket and wrench.
Remove one bolt connecting the fender to the bumper using a socket wrench and an 8mm socket.
Remove one bolt from inside the fender using a socket wrench and an 11mm socket.
Remove the screw holding the fender liner to the fender using a Phillips screwdriver.
Remove wing.
Items you will need
- crosshead screwdriver
- Socket wrench
- 8mm socket
- 11 mm socket
How to Remove a Fender on a Ford F-250
Lift the hood and support it with a support like a large stick. Remove the truck support strut by releasing the retaining clips using a small screwdriver and pulling it out sharply.
Remove the housings for the headlights and turn signals. Pull up the headlight clips and disconnect the electrical connectors, then remove the mounting screws for the turn signal housing and slide it forward and out of the truck.
Detach the radiator grille. Remove the plastic trim at the top of the assembly by removing its clips, remove the four top mounting screws, disconnect the bottom half of the clips, and pull it out.
Unscrew the mudguard screws in the fender and remove it. Remove the footrest, if present.
Remove the bolts and clips connecting the fender to the rocker panel and radiator support, open the door and remove the door pillar bolts, and then remove the top bolts along the edge of the engine compartment. Most of these bolts require a hex wrench.
Detach the fender and move it away from the truck. Have a helper support the fender as you remove it to avoid damaging other panels of the truck.
Items you will need
- Big stick
- Screwdriver
- Wrench
- Hex key
How to Remove a Fender from an 87 Chevy Pickup
Remove the front right wheel nuts on the Chevy pickup using a tire iron. Raise the front right side of the truck using a house jack and place the front end of the Chevrolet on the jack stands. Remove the front right tire from the frame.
Remove the screws on the wheel housing cover on the inside and outside of the cover using a screwdriver. Remove the cover from the frame and from the wheel housing.
Remove the mounting bolts from the inner edges of the wheel well that secure the fender to the frame using a ratchet set. Release the plastic locking pins inside the wheel well using a screwdriver.
Remove the mounting bolts from inside the engine compartment that secure the upper fender to the frame using a ratchet set. Lift the fender and pull outward to remove the fender from the Chevrolet frame.
Repeat the above steps for the left wing.
Items you will need
- Iron tires
- Jack
- Jack is standing
- Screwdriver
- Ratchet set
How to remove a fender on a Camaro
Remove the wheel nuts from the wheel. Lift the right side of the front end and remove the wheel from the Camaro.
Remove the wheel well cover by removing the rivets using a flat head screwdriver. Remove the wheel from the Camaro body.
Remove the bolt holding the Camaro's fender to the body inside the wheel well using a set of wrenches. Place the bolts in a place where you won't lose them.
Remove the bolts that secure the fender to the body inside the engine compartment using a set of wrenches.
Remove the Camaro fender from the body and set it aside. Repeat these steps for the left side of the Camaro.
Items you will need
- Jack
- Flat head screwdriver
- Set of wrenches
Related articles:
- How to remove Dodge Ram Fender
- How to Replace a Fender on a Jeep Grand Cherokee
- How to Remove the Front Fender on a Ford F-250
- How to Replace a Honda Accord Fender
- How to replace a Ford Fiesta windshield washer pump
- How to replace a bumper on a Mazda 6