Front brake cylinder repair
1. Remove the corresponding wheel.
2. Remove the brake hose seal from the bracket on the rack.
3. Loosen the hose fitting on the brake cylinder.
4. Use a screwdriver to bend the antennae of the lock washers and remove the two caliper mounting bolts, holding the guide pins by the hexagons with a second wrench.
5. Remove the bolts and remove the caliper and cylinder assembly.
6. Hold the hose fitting by the hexagon with a wrench and unscrew the cylinder from the tip.
Be careful - brake fluid will leak from the hose. Please note that the fitting has a copper O-ring. Replace a badly compressed ring.
7. Clamp the caliper in a vice and remove the two hexagon socket bolts securing the cylinder to the caliper. Remove the cylinder from the caliper.
8. Carefully, so as not to tear the protective cover, remove the retaining ring.
9. Remove the protective cover from the cylinder.
10. After applying compressed air through the brake fluid supply holes, remove the piston from the cylinder.
11. Carefully, so as not to damage the cylinder mirror, remove the sealing ring.
12. If it is necessary to replace the cylinder or the valve itself, unscrew the air release valve.
13. Carefully inspect the cylinder bore and the working surface of the piston. If any signs of wear, damage or severe corrosion are found, replace the cylinder and piston.
14. Replace a damaged, swollen or non-elastic o-ring. It is recommended to replace the ring every time the cylinder is disassembled, regardless of its condition.
15. Install a new sealing ring into the cylinder bore, having previously lubricated it with brake fluid.
16. Insert the edge of the protective cap into the piston groove.
17. Lubricate the cylinder surface and the working surface of the piston with fresh brake fluid. Insert the piston into the cylinder and install the outer edge of the protective cap into the groove of the cylinder body. Install the retaining ring.
18. Install the brake cylinder in the reverse order of removal. Before installing the guide pins, lubricate them with Uniol-1 grease.
19. Remove air from the brake drive hydraulic system (see “How to bleed the brakes”).
Disassembly and assembly of the front brake mechanism VAZ 2114, VAZ 2115, VAZ 2113, Lada Samara 2
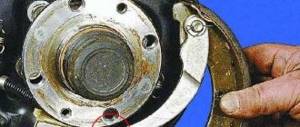
Disassembling the front wheel brake mechanism
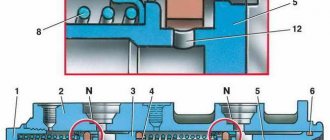
Unscrewing the cylinder mounting bolt: 1 – cylinder mounting bolts; 2 – cylinder; 3 – bolts connecting the cylinder with the caliper
Details of the brake mechanism of the front wheel of Lada Samara 2: 1 – wheel cylinder; 2 – fitting for bleeding the brake drive; 3 – sealing ring; 4 – piston; 5 – protective cap; 6 – retaining ring; 7 – caliper; 8 – pad guide; 9 – brake pads; 10 – protective cover; 11 – guide pin; 12 – guide pin fastening bolt; 13 – brake hose; 14 – bolt securing the cylinder to the caliper
Disconnect the hose from wheel cylinder 2. Unlock and unscrew bolts 1 securing the wheel cylinder to the guide pins, holding the guide pin by the edge with a wrench. Remove the 8 pad guide assembly with pins. Remove the brake pads of the VAZ 2113 VAZ 2115.
Pushing the piston out of the cylinder
Remove the lock ring 6 and the protective cap 5 from the cylinder and piston. Carefully push a stream of compressed air through the fluid inlet to push the piston out of the cylinder. To avoid damaging the piston on the surface of the caliper when pushing it out, install a wooden pad under the piston. Unscrew the bleeder fitting from the cylinder body and carefully inspect the working surface of the cylinder. There should be no scoring, damage or corrosion.
Front wheel brake assembly
Assemble the brake mechanism of the VAZ 2114 in the reverse order of disassembly. In this case, it is recommended to replace O-ring 3 and cap 5 with new ones. Lubricate the cylinder mirror, piston 4 and the sealing ring with brake fluid, and apply graphite grease or Ditor grease to the surface of the piston, install the piston in the cylinder and, without removing any remaining grease, put on the protective cap 5 so that its edges fit into the groove of the piston and cylinder, then install retaining ring 6. Lubricate the guide fingers with UNIOL-1 grease (1.5 g for each finger). Tighten the bolts securing the caliper and cylinder to the pins to the torques specified in Appendix 1, then lock them. Before tightening the bolts, apply sealant to them to prevent corrosion of the threaded part of the connection. After assembling and installing the brake mechanism, restore the fluid level in the reservoir and bleed the hydraulic drive system of the VAZ 2114.
Replacing a wheel cylinder in a car brake mechanism
Step by step procedure:
1. Put the car in first gear.
2. Secure the front wheels by placing support blocks under them.
3. Remove the wheel on which the brake fluid leak was detected.
4. Thoroughly clean the mounting areas of the wheel cylinder and brake pipe from dirt. You can use a fluid like WD-40 to make it easier to unscrew the brake pipe nut and cylinder mounting bolts.
5. Unscrew the nut that secures the brake tube to the wheel cylinder.
6. Disconnect the brake hose from the cylinder.
7. Plug the hose hole using improvised means (for example, a cap from a bleeder valve).
8. Unscrew the 2 bolts securing the wheel cylinder itself. To do this, you need to hold it on the other side.
9. Remove the wheel cylinder from the brake shield.
10. Install a new wheel cylinder. The procedure for installing it is the reverse of removing it.
11. Next, you need to bleed the brake system. It is enough to bleed the replaced wheel cylinder.
12. Do not forget to install the cap (protective) on the bleeder valve.
Video about replacing rear brake cylinders on a VAZ 2109:
For Hyundai Accent 2:
Probably no one needs to explain the importance of a car's braking system to ensure maximum safety while driving. The system consists of many elements, each of which performs a function. Today we will dwell in detail on such a detail as the front brake cylinder for the VAZ 2114 . Structurally, the element is located in the brake caliper (right and left).
Replacing the front brake cylinder on a VAZ 2113, VAZ 2114, VAZ 2115
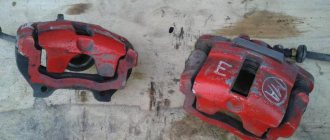
Welcome! Front brake cylinders - there are only two of them, each of their cylinders is located in a brake caliper, their real name is: “Brake wheel cylinders”, their operating principle is as follows: when you press the brake pedal, the fluid presses on the pistons, which are located in the brake cylinders, and the pistons in the meantime, the pads are pressed against the brake disc, when the foot is removed from the brake pedal, the fluid returns and the pistons stop applying pressure to the brake pads (Braking stops).
Note! To carry out the work, stock up on: Wrenches, copper O-rings for brake hoses (take about 4), as well as brake fluid, something to plug the brake hose with, hex heads, different types of screwdrivers, and spanners and of course, the tools needed to remove wheels from a car!
Summary:
Where is the brake cylinder located in the caliper? The easiest way to see the cylinder is when the caliper is removed from the car, but by simply pulling out the brake pads, the cylinder can be fully seen, the cylinder itself is sold and replaced as an assembly, it consists of several but very important things, firstly, the piston is located inside the cylinder and walking back and forth, thereby pressing and moving the brake pads away from the disc and of course the cylinder has a bleeder fitting, it is closed with a cap in the small photo with a blue arrow and the last element is indicated, this is the boot at the piston of the brake cylinder, it is indicated with a green arrow, thanks to it, the brake fluid is not squeezed out and into the cylinder, dirt, sand and moisture do not get in, they are very destructive for the cylinder and if they get inside, they will wash out all the lubricant (If it is water) or the lubricant will mix with sand (If sand gets in into the cylinder), and as a result the piston will barely move (braking efficiency will therefore drop).
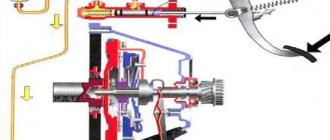
The operating principle of the GTZ in simple words
The process is activated by pressing the brake pedal. The result of mechanical force is a load inside the cylinder, carried out using a rod. It directs the pistons along the desired path, overcoming the force of the return spring. The movement of the pistons is accompanied by the closure of the compensation channels, which causes the opening of the bypass channel and sealing of the entire circuit.
At the same time, pressure is created that drives the caliper. Part of the liquid flows into the pipelines, activating the vehicle, the other pushes the second piston, which, when moving, performs the same functions.
This is interesting: Test drive and photos of the BMW 4-Series Gran Coupe 2015
The calipers compress the brake discs with the help of the pads, and the car stops. The pistons return through the compensation hole to the initial position after depressing the brake pedal. The initial mode of the pistons inside the circuits is established by the action of springs. Having returned to their original position, the pistons again open the compensation channels, thereby equalizing the pressure in the vehicle. The waste liquid slowly flows back into its reservoir.
How to replace the brake cylinder on a VAZ 2113-VAZ 2115?
1. Remove the wheel first from the side on which you will change the cylinder (Read the article on “Replacing wheels on modern cars”, it describes how to remove the wheels correctly), when the wheel is removed, remove the brake hose from the bracket to which it is attached (the location is indicated by a red arrow) and using a wrench, tear off the nut that secures the brake hose to the brake cylinder (see small photo).
2. Now the brake caliper bracket assembly with the cylinder will need to be removed, to do this you will have to unscrew two bolts, but when unscrewing them, hold the guide pins with a second key so that the bolts in the guides do not turn (see photo 1), after which the bolts are removed from the guide pins and the bracket assembly with the brake cylinder is removed from the caliper, but the bracket cannot be completely removed, and the fault is the brake hose, which will have to be disconnected from the brake cylinder. To do this, completely unscrew the hose mounting nut (While unscrewing, hold the nut with a wrench and rotate the caliper assembly in the brake cylinder by hand, counterclockwise) and disconnect the hose, as soon as you disconnect it, immediately plug the hose with some kind of plug so that the brake fluid does not pour out through it, then firmly tighten the brake cylinder with the caliper you need a vice, but you can do without them, in general you will have to unscrew the two bolts that attach the brake cylinder to the caliper, they need to be unscrewed with a hex key or hex heads, after unscrewing, the caliper and the cylinder must be separated.
Note! When the brake hose is disconnected from the cylinder, the copper o-ring will fall, you don’t have to worry about it at all and don’t look for it on the floor, because this ring will need to be replaced with a new one!
3. A new front brake cylinder is installed in the reverse order, the copper rings must be replaced with new ones. If you decide to try to repair the brake cylinder, then in this case, read the article entitled: “Repairing the caliper on a VAZ 2109.”
Note! We also recommend that you lubricate the brackets assembled with the brake cylinder and the guide fingers of the bolts before installing them; you need to lubricate them by removing the boot from them, as shown in the photo below, lubricate the fingers with UNIOL-1 grease, when you assemble everything, bleed the brakes on a family car with an assistant Samara 2, detailed bleeding instructions, are on our website under the title: “Bleeding brakes on a VAZ 2114”!
Additional video clip: Below is a video about replacing the brake cylinder with a new one, familiarize yourself with it and you will clearly understand how to replace it.
Note! If you don’t yet know how the brake system works and works, then in this case, be sure to study the interesting video that we posted just below, after watching it, you will immediately understand why brake fluid is needed and why the car stops braking when the fluid pours out!
Replacing the front brake cylinder on a VAZ 2114
Replacing front brake cylinders on a VAZ-2115
Replacing the front brake cylinders of the front 2115 with your own hands. I am writing as I did.
- Remove the wheel
- Remove the brake hose from the holder on the rack
- The brake cylinder can be held to the caliper either by bolts with a 10mm hexagon socket or by TORX bolts. Yes, yes, in all the repair books, it is precisely “bolts with a hexagon socket” that are described, but in reality it turned out that I had Torx sockets. You need to unscrew the TORX bolts a little and loosen them. You need a TORX E14 head (buy a high-quality, good branded head!). If it doesn’t work out, it’s easier to go to a service center. Remove the bolts: head + knob, unscrew: head + cardan (or small extension) + ratchet. Access to the bottom bolt is good, to the top is difficult due to the brake hose
- Clamp the brake hose (you can use a small vise)
- Loosen the brake hose on the caliper with a wrench (14mm)
- Bend the plates, unscrew the bolts from the guides (hammer + screwdriver/punch, 13 socket, 17 wrench), remove the bracket with the cylinder
- Unscrew the TORX completely (head + ratchet), disconnect the cylinder from the bracket, it can be placed on the brake disc
- Twist the cylinder from the hose, place it in a plastic bag (because brake fluid will pour out of the removed cylinder)
- Change the washer on the brake hose, screw on a new brake cylinder, tighten it a little with a wrench
- Connect the brake cylinder and caliper. Tighten a little TORX
- Place the bracket in its place, insert the bolts into the guides, tighten them, bend the plates
- Fully tighten TORX
- Tighten the brake hose on the cylinder
- Loosen the bleeder valve (with the 8-head), screw it back in (I replaced it with the valve from the old cylinder, I liked it better)
- Remove the clamp (vice) from the brake hose
- Check whether the brake hose is kinked; if it is kinked, then loosen the brake pipe nut at the top with a special wrench, straighten the hose as necessary (I was lucky, the hose was not kinked)
- Put the hose back in the holder
- Bleed the brake fluid
Replacing the front brake cylinder on a VAZ 2113, VAZ 2114, VAZ 2115
Welcome! Front brake cylinders - there are only two of them, each of their cylinders is located in a brake caliper, their real name is: “Working brake cylinders”, their operating principle is as follows: when you press the brake pedal, the liquid presses on the pistons, which are located in the brake cylinders, and the pistons in the meantime, the pads are pressed against the brake disc, when the foot is removed from the brake pedal, the fluid returns and the pistons stop applying pressure to the brake pads (Braking stops).
Note! To carry out the work, stock up on: Wrenches, copper O-rings for brake hoses (take about 4), as well as brake fluid, something to plug the brake hose with, hex heads, different types of screwdrivers, and spanners and of course, the tools needed to remove wheels from a car!
Where is the brake cylinder located in the caliper? The easiest way to see the cylinder is when the caliper is removed from the car, but by simply pulling out the brake pads, the cylinder can be fully seen, the cylinder itself is sold and replaced as an assembly, it consists of several but very important things, firstly, the piston is located inside the cylinder and walking back and forth, thereby pressing and moving the brake pads away from the disc and of course the cylinder has a bleeder fitting, it is closed with a cap in the small photo with a blue arrow and the last element is indicated, this is the boot at the piston of the brake cylinder, it is indicated with a green arrow, thanks to it, the brake fluid is not squeezed out and into the cylinder, dirt, sand and moisture do not get in, they are very destructive for the cylinder and if they get inside, they will wash out all the lubricant (If it is water) or the lubricant will mix with sand (If sand gets in into the cylinder), and as a result the piston will barely move (braking efficiency will therefore drop).
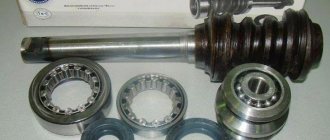
When should a brake cylinder be replaced? The cylinder can be changed as an assembly, or it can be repaired by replacing parts in it such as the piston and boot separately, but we do not recommend going down this path, because firstly, the assembled cylinder does not cost that much money, but secondly, if you assemble something incorrectly (for example, don’t fasten the pin well), it will fly off and the brake fluid, if it’s missing, will all leak out (you’ll be left without brakes), so it’s better to change the entire assembly, the signs that indicate that the cylinder needs to be replaced are as follows: The bleeder fitting has broken and you cannot unscrew it in any way, also if the boot is torn, the cylinder must be replaced, if the piston in the cylinder becomes sour (This happens from time to time), it will also need to be replaced, but the piston can become sour in different positions, namely in braking mode (The wheel will constantly brake) or in its calm state (This wheel will not brake at all and the car will pull to the side when braking).
Causes of malfunction in the GTZ device
If there is a leak in one of the circuits, the pressure between the primary and secondary cylinders is lost. This leads to the fact that the GTZ functions as if it had only one circuit. The pusher will begin to move both pistons in the good circuit until the piston of the faulty one reaches the end of the cylinder body. Accordingly, the required pressure will be ensured in the depressurized chamber. If the idle mechanism is properly adjusted, the vehicle will effectively slow down the vehicle even in conditions of its inferiority.
Here are some signs of a malfunction in the GTZ device:
- depressurization of the cylinder is determined by the presence of a leak in the body and a specific smell;
- brake pad wear is characterized by a characteristic squeak and leakage of brake fluid;
- jamming of the regulator, which distributes the brake force. In this case, it is necessary to clean the cylinder body. There is a low threshold of sensitivity of the brake pedal; it has to be literally “sunk” into the floor;
- the pedal falls to the floor - this damage occurs due to non-working pistons. If they are not able to generate the required pressure, then the pads cannot compress normally;
- An increase in the brake pedal travel is a sign that the vehicle has become airy. Operating a car in this condition is dangerous, since there is a high risk of overheating the vehicle to the point of boiling. Pumping will help eliminate this problem.
If any of the above happens constantly, we can talk about damage to the vacuum booster valve or a complete loss of tightness in the system. If the metal housing itself is damaged or there are scuffs on the piston, a complete replacement of the turbocharger is required. When the gasket wears out, all components of the repair kit (sealing collars, rubber gaskets, springs) are changed.
How to bleed the master brake cylinder? You need to unscrew the air release valve in the cylinder body and press the pedal until a perfectly uniform liquid flows out, without any air. Upon completion, the valve returns to its place and the reservoir must be refilled with liquid. The sequence of bleeding the mechanisms is as follows: 1 - rear right; 2 — front left; 3 — rear left; 4 - front right.
This is interesting: How to re-register a license plate for a car when buying or selling
A common cause of malfunction of this element is loss of housing tightness and leakage of brake fluid. The defect that causes brake fluid leakage is a rear cuff leak, which can be determined by the presence of oil at the junction of the turbocharger and the vacuum booster. This may occur due to the breakdown of flexible tubes due to friction with the rotating wheel.
It’s good if, in the area where the highway passes through the arch, it is protected by a special spring that prevents the wheel from rubbing the element. If the fluid level is low, you need to check the tightness of the entire vehicle and replace the damaged tube.
How to replace the brake cylinder on a VAZ 2113-VAZ 2115?
1. Remove the wheel first from the side on which you will change the cylinder (Read the article on “Replacing wheels on modern cars”, it describes how to properly remove the wheels), when the wheel is removed, remove the brake hose from the bracket to which it is attached (the location is indicated by a red arrow) and using a wrench, tear off the nut that secures the brake hose to the brake cylinder (see small photo).
2. Now the brake caliper bracket assembly with the cylinder will need to be removed, to do this you will have to unscrew two bolts, but when unscrewing them, hold the guide pins with a second key so that the bolts in the guides do not turn (see photo 1), after which the bolts are removed from the guide pins and the bracket assembly with the brake cylinder is removed from the caliper, but the bracket cannot be completely removed, and the fault is the brake hose, which will have to be disconnected from the brake cylinder. To do this, completely unscrew the hose mounting nut (While unscrewing, hold the nut with a wrench and rotate the caliper assembly in the brake cylinder by hand, counterclockwise) and disconnect the hose, as soon as you disconnect it, immediately plug the hose with some kind of plug so that the brake fluid does not pour out through it, then firmly tighten the brake cylinder with the caliper you need a vice, but you can do without them, in general you will have to unscrew the two bolts that attach the brake cylinder to the caliper, they need to be unscrewed with a hex key or hex heads, after unscrewing, the caliper and the cylinder must be separated.
Note! When the brake hose is disconnected from the cylinder, the copper o-ring will fall, you don’t have to worry about it at all and don’t look for it on the floor, because this ring will need to be replaced with a new one!
3. A new front brake cylinder is installed in the reverse order, the copper rings must be replaced with new ones. If you decide to try to repair the brake cylinder, then in this case, read the article entitled: “Repairing the caliper on a VAZ 2109.”
Note! We also recommend that you lubricate the brackets assembled with the brake cylinder and the guide fingers of the bolts before installing them; you need to lubricate them by removing the boot from them, as shown in the photo below, lubricate the fingers with UNIOL-1 grease, when you assemble everything, bleed the brakes on a family car with an assistant Samara 2, detailed bleeding instructions, are on our website under the title: “Bleeding brakes on a VAZ 2114”!
Checking the serviceability of the amplifier
In this section we will tell you how to check the performance of the vacuum brake booster on a VAZ-2114. All of the recommendations given can be used when checking the unit, both on the thirteenth and fifteenth car models.
To check, follow these steps:
- Press the brake pedal all the way about 5 times with the engine off. This action will create uniform pressure in both components of the VUT. When the brake is pressed, the valve will immediately release itself. If you notice a squeak, this is a clear signal that the part needs to be replaced.
- As soon as the pressure is uniform, you need to start the car while holding the brake pedal to the floor. If everything is fine with the unit, the pedal will rise after starting the internal combustion engine. Otherwise, repairs will need to be made to replace the device.
- When you have already realized that the part needs to be replaced, you need to additionally check how well the hose is fixed, as well as the condition of the flange. If these elements are in a condition that does not meet the standard, this may affect the performance of the amplifier. Accordingly, in this case, you may need to tighten the fastenings and the problem will solve itself.
We recommend: How to clean the air conditioner in your car yourself
Replacing the front brake cylinder
The main malfunction of the front brake cylinders on cars such as VAZ 2109-2108 is either jamming or leakage of brake fluid. In both cases, you should not expect normal operation of the braking system.
If it begins to leak fluid, then naturally the braking efficiency drops, since normal pressure is not created in the system.
Usually, only the cylinder itself is replaced, although stores sell assembled calipers, even with pads. If desired, you can buy and install the mechanism assembled. To replace the front brake cylinder on a VAZ 2109-2108 you will need the following tool:
- Socket head 13
- Ratchet handle
- Open-end wrench or socket wrench 13
- Hexagon 10
- Special split wrench for loosening brake pipes and hoses
First, we tear off the bolts of the front wheel, after which we lift the car with a jack and finally remove the wheel. Then unscrew the two hex bolts that secure the cylinder to the caliper:
And the top cover-bracket is now removed, and at the same time we take out the pads:
Next, you need to unscrew the brake hose, as shown in the photo below:
If it starts to rotate together with the fitting, you can unscrew it later, after removing the cylinder - it will be more convenient. Now you need to unscrew the two bolts to the caliper guide bracket:
Now you can remove the front wheel brake cylinder without any problems, since nothing else holds it. If the hose did not unscrew earlier, now you can safely unscrew it together with the cylinder:
If a replacement is required, then a new part for a VAZ 2109-2108 can be purchased for about 450 rubles, although stores most often only have assembled calipers at a price of 1,600 rubles. The installation will take place in the reverse order, after which you will need to bleed the brake system.
Front brake cylinder VAZ 2114
Probably no one needs to explain the importance of a car's braking system to ensure maximum safety while driving. The system consists of many elements, each of which performs a function. Today we will dwell in detail on such a detail as the front brake cylinder for the VAZ 2114 . Structurally, the element is located in the brake caliper (right and left).
Inside the unit there are pistons, which, when you press the brake pedal, are activated under the pressure of the brake fluid and press on the pads. The latter rest against the brake disc, thereby preventing the rotation of the front wheels.
Functionality check
This instruction will be relevant when checking the vacuum booster on VAZ models from 2113 to 2115. So the technique is clearly universal.
- Press the brake pedal all the way to the floor about 4-5 times. In this case, the engine should not be started. Due to these presses, you will create equal pressure in two sections of your vacuum booster. The valve will report problems as soon as you start pressing the pedal. If you hear squeaks while pressing, this indicates a serious malfunction.
- Once the pressure is even, start the engine while keeping the brake pedal to the floor. If the brake booster system is working properly, then the pedal will rise by itself after the engine is started. If this does not happen, then you will definitely have to face repair work.
- If the check shows problems with the amplifier, do not forget to additionally check the quality of the hose fastening and the condition of the flange. When the mount is abnormal, this may result in the brake pedal not lifting.
We recommend: Removing the rear seats on a VAZ-2110 with a backrest
Sometimes poorly fixed fasteners cause quite expensive and actually unnecessary repairs or replacement of the vacuum booster. Conduct a preliminary check so as not to complicate your life.
When to change the amplifier
Brakes are a whole system that consists of many elements. Each of them must function correctly and efficiently.
In addition to checking the vacuum booster itself, you should inspect the condition of the brake fluid pipes, make sure there are no brake fluid leaks, and look at the current condition of the brake pedal.
If no faults were found in the braking system, you can think in more detail about the issue of replacing the vacuum booster.
There is no point in repairing the element. It's easier to start replacing right away. The functionality of the car and the power that your engine is capable of producing depend on the quality and timeliness of the work performed. Lack of power negatively affects the speed and comfort of movement around the city and beyond.
Replacement
To replace a vacuum booster you will need a certain set of tools and materials. It includes:
- Screwdriver Set;
- Pliers;
- Socket wrench for 13 and 17 millimeters;
- Special wrench for brake pipes;
- New plugs;
- New fittings.
Replacement procedure
Let's get straight to work.
- Removing the vacuum booster can be difficult due to the brake cylinder. Therefore, we advise you to remove it first. Another option is to disconnect the pipes from the brake cylinder and move them to the side for a while. Here you decide for yourself what is more convenient for you.
- The cylinder is not the main problem. It is difficult to cope with the mounting of the vacuum booster. It's just not very convenient to do this. This is the design of the VAZ 2114.
- Start with the valve - remove the hose fasteners from it, remove the support bush, after which you can pull out the brake pin.
- Next, using a 13 mm wrench, all four fasteners of the vacuum booster are dismantled.
- After all the inconveniences of the work done, you can remove the element and get ready to install a new amplifier in its place.
- To do this, you will have to install a special mounting frame. The frame is tightened with a 17 mm wrench, after which the new component is installed inside the car.
- If you want to make your work as easy as possible, do not forget to first connect the brake pedal to the booster with your finger when reassembling it. After this, it is much easier to cope with putting the vacuum seal back into place.
When replacing the vacuum booster, be sure to change the old vacuum hose at the same time. This element is far from eternal, therefore, as it wears out, it will negatively affect the quality and efficiency of the new vacuum seal.
How to determine the moment of replacement?
The operation of the brake system as a whole can be affected by many different components that have a malfunction. But each element has its own individual characteristics, by which one can “calculate” this or that problematic detail. It is quite easy to track problems that are specific to the brake cylinder system; here are some of them: 1. Soured piston. This is a fairly common phenomenon on cars with high mileage and service life. Indirect signs indicating this problem are stalling of the drive wheels (the piston is jammed and it constantly presses on the block) or the brake does not work when the pedal is pressed. 2. Damage to the seal or breakage of the fitting or boot (brake fluid may leak out in various volumes).
If you notice the above symptoms, immediately carry out a thorough diagnosis.
Self-repair or purchase of a new unit
Let's start with the fact that incorrect or poor-quality repair of the front brake cylinder of a VAZ 2114 can lead to disastrous consequences, so if you are not a professional auto mechanic, we do not recommend doing the work yourself! In addition, the meaning of repair is not always justified for the following reasons: 1. The cost of the assembled part is affordable for most car enthusiasts. 2. When using an old, modified (repaired) product, there is a high probability that the unreplaced, worn parts will fail at the most inopportune moment. Therefore, the most rational, safe, and correct solution is to completely replace the unit.
Replacing the vacuum brake booster
To ensure the safety of using the car, if necessary, the vacuum brake booster is replaced on the VAZ 2110 and 2112. After all, this auxiliary design element not least affects the braking efficiency. Timely repairs will allow you to keep your nerves safe and sound. After all, unstable brakes have a negative impact on the driver’s state of mind. The work itself to replace this device is not difficult.
But, during its implementation, you will have to tinker a little with some design elements that will interfere with you. Design Features Replacing the vacuum brake booster on a VAZ 2110 and 2112 is not a very frequent job, but still, sometimes you have to deal with it. The purpose of this part is to reduce the pressure required to operate the brakes. For this purpose, the vacuum that forms in the intake manifold is used. The amplifier itself is made in the form of a sealed metal can.
We recommend: Polishing car headlights with toothpaste – is it worth it or not?
It is divided into 2 parts. In one of the halves there is atmospheric air, in the other a vacuum is created. Also, there is a rod with a return spring. When you press the pedal, air is admitted into the first chamber. It presses on the rod, which is in the other half. Thus, under the influence of atmospheric air, the pressure on the pedal required to operate the brakes is reduced.
After the end of the air supply (action on the pedal), the return spring presses the rod back. This circuit only works when the engine is running, which is why the brake pedal of a stopped car is so hard. Diagnostics In fact, the failure of the vacuum brake booster is not very harmless. Especially if the failure occurs unexpectedly. The first sign of a breakdown is the brake pedal becoming sticky.
If this pedal has become much harder than it was before, then it makes sense to check the amplifier. Most likely, he simply cannot cope with his responsibilities. Often, when you press the brake, you can hear a hissing sound. Diagnosing such a malfunction is very simple. To do this, with the engine turned off, press the brake pedal 5-6 times and leave it pressed. After this, we start the engine. The pedal should go down a little, this indicates that the brake vacuum is fully operational.
If the brake pedal does not go away, then most likely there is a problem with the booster. First, check all hoses and fittings for air leaks. After that, run the diagnostics again. If nothing has changed, then it makes sense to replace the entire booster. Article on the topic “How to check the vacuum brake booster?” ReplacementAs already mentioned, the job of replacing an amplifier is not very difficult.
But you will need to remove some parts, they will interfere with your work. Before starting work, it is imperative to prepare the car. Place it on the handbrake, remove the terminal from the battery. If you have central locking, leave at least one window open. Replacement is carried out in the following order:
- The block leading the wires to the brake fluid level sensor is removed;
- The vacuum hose is removed from the branch pipe (amplifier check valve). Be sure to hold the valve with one hand;
- Unscrew the 2 nuts securing the main brake cylinder. There are washers underneath, so don’t lose them;
- Carefully move the removed cylinder to the side. Do not damage the air supply pipes of the system. Otherwise, you will have to change them, which will complicate repairs;
- At the bottom of the instrument panel, locate and remove the 4 nuts holding the brake vacuum in place. If you installed additional noise protection, you will have to remove it; Go under the hood and remove the vacuum booster from the car;
- Using a slotted screwdriver, the stopper (finger ring) is removed. Next, you can disconnect the pusher from the control pedal;
- All that remains is to tighten the nuts securing the vacuum booster to the bracket. Using a screwdriver, they are separated.
The vacuum booster is not subject to repair or restoration work. Therefore, you will have to supply a replacement part. Assembly is carried out in reverse order. It shouldn't cause any particular difficulties. Don't forget to reconnect any hoses you removed. After installing all the parts in place, check the operation of the new part. Sometimes, during work you have to unscrew the brake pipes.
In this case, you will need to bleed the brake system to get rid of air pockets. Conclusion. Proper brakes are an important safety feature. But, unfortunately, they can sometimes fail. Therefore, work such as replacing the vacuum brake booster on VAZ 2110 and 2112 may be required at any time. Although, it should be noted that this design element can be called perhaps the most reliable of this model.
Replacing the front brake cylinder on a VAZ 2114
- To gain access to the work area, first remove the wheel on the side where you want to replace it.
- After removing the wheel, use a hexagon to loosen the brake caliper cylinder. To do this, you need to slightly unscrew two bolts, one on top, the other on bottom.
- Unscrew and disconnect the brake hose. To prevent liquid from leaking out of it, lift it vertically, or insert a sealed plug into the passage hole.
- Next, using a flat-head screwdriver, pry up the fastening washers and use an adjustable wrench to unscrew the next 2 bolts.
- Now the cylinder body can be easily detached along with the bracket.
- Fully unscrew the previously loosened hexagon bolts. We disconnect the bracket from the body of our product.
- Reinstallation is done in the same order, except that the brakes will need to be bled. This must be done in order to remove accumulated air from the system.