Design and removal of the rear bumper on a VAZ 2107
The design of the VAZ 2107 car provides for the presence of a rear bumper that performs different functions. During operation, it is often subjected to mechanical impact from third-party objects on its plastic structure, which leads to the need for repair or replacement. How to remove and install the rear bumper on a VAZ 2107 is described step by step in the material.
About the design of the rear part of the VAZ 2107 body kit
The rear body kit on the seven has a similar design to the front, so its dimensions are also 160x20x15 cm. The device is made entirely of plastic, and on top there is a decorative chrome plated metal trim, which stands out significantly and emphasizes the contour of the car body.
This is interesting! The rear unit does not have a place to attach a license plate, which is the main difference from the front bumper.
Like the front, the rear bumper of the seven is necessary to perform the following tasks:
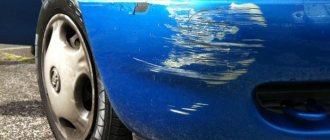
- Protects the paintwork from scratches and impacts. Such consequences may arise due to a collision with obstacles.
- Improving the appearance of the VAZ 2107 car.
- Protection of the body from dents and impacts in light collisions with other cars.
When mechanical impact is applied to the device, it becomes deformed. If this happens, then it is necessary to restore the integrity of the body kit, for which you need to find out the specifics of its removal.
Removing the rear body kit of the seven
The photo in the material shows what the assembled rear bumper on a VAZ 2107 looks like. It is in this form that the device is removed from the car. It should be noted right away that if you had to remove the front body kit, then removing it from the rear will not be difficult. The devices have absolutely identical fastenings, therefore the dismantling algorithm is the same.
The instructions for removing the part in question from the seven look like this:
- To dismantle, you will need to open the trunk and find both bracket fastenings located on the sides on the trunk floor. If there is a trough there, then you will need to get it out.
- First you will need to unscrew the fastenings of the brackets, using “22” wrenches.
- If the connections are dirty and cannot be unscrewed, then they must be cleaned and treated with WD-40 lubricant.
- After 5-10 minutes, unscrew them on both sides, and then pull the bumper towards you, removing the brackets from the bushings. Remove the device by disconnecting it from the body.
- The fasteners are also removed from the body to clean them or replace them if necessary.
After removal, you can begin repair, modernization or replacement. If necessary, the brackets can be detached from the bumper structure by unscrewing the four nuts.
Self-installation of the bumper
After removing the part in question, various manipulations are performed - repair or modernization, restoration of integrity or replacement. Buffer tuning is very popular, which allows you not only to improve the part, but also to transform the appearance of the seven.
If you are replacing the rear bumper, you must do the following:
- Clean the holes in the body, as well as the places where the brackets are fixed.
- Attach the brackets to the part being installed, and then proceed with the installation in the reverse order of removal.
- Secure the part using threaded brackets with a key “22”.
- If you cannot fit the rubber bushing into the hole, it is recommended to treat it with a soap solution.
So that next time you don’t have to spend a lot of time breaking fasteners, it is recommended to treat them with lubricants such as Litol or Solidol. If you plan to paint the chrome trim, then it is not at all necessary to remove the bumper from the car to do this. You can try to remove it by reaching the nuts securing it to the bumper, which are located inside the bumper. Paintwork manipulations can also be done using fabrics or paper, using them to cover the plastic part of the part.
provaz07.ru
Replacing the bumper!) — Lada 2107, 1.6 l., 2006 on DRIVE2
Hello everyone!) I immediately apologize that I didn’t post the recording on time, I didn’t have time at all to sit at the computer (I was all in work and music) And now closer to the point!) In the last entry I wrote that my brother started the car at speed and broke it bumper, I bought the bumper right away, well, I changed it pretty quickly, but one thing happened, the cops started getting behind the fogs with xenon (although everything is allowed, there are no prohibitions, and besides, I broke one glass (cracked) so I decided Discard them for now. Actually, here’s what we have:
Broken bumper(
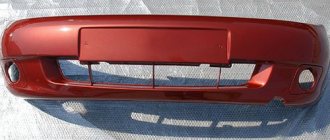
new bumper
new bumper
I bought the bumper for 1400) the kit also came with side fasteners, but I didn’t install them, it’s more hassle (Let’s get started, it’s quite easy to remove it) the first thing I did was take off the number:
The view is not very good(
We unscrew 6 more bolts and the bumper is removed: I wonder what happened to it? Everything is sad: (broken almost from hole to hole And on top of everything, one saber fastener came off: But it’s okay, there’s a new bumper) We put everything in the reverse order, tighten 6 bolts) Also, I also replaced the upper part of the radiator grille, the old one was peeling off from Karcher:
Everything is quite simple here, unscrew or loosen the 5th bolt, take it out, and put the new one back!)
The view is much better)
All that remains is to install another grille and it will be beautiful)
That's all with the bumper) As for the music. Yes, the front is already ready, all that remains is to cover it, I don’t know what to cover it with, the wiring is almost done, the amplifier is waiting in the wings) You’ll see everything for yourself soon, I’m afraid that you’ll have to create several parts, the photos won’t all fit) Wait very soon, the first part will be coming very soon) most likely there will be 2) although even 3, one part will be entirely devoted to the front components)
Good luck to everyone) and smooth roads!) Now I’ll try to update the BZ as often as possible
how to remove, which ones can be installed, instructions with photos and videos
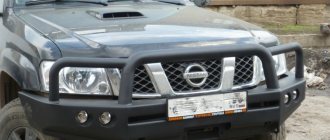
Classic Zhiguli cars were equipped with unsightly old-style bumpers that protruded beyond the body. Unlike the early models - “kopeks” and “sixes”, the elements of the VAZ 2107 body kit have changed and began to look more presentable. Many years of experience in operating the “Seven” have shown that standard parts can be improved in various ways or replaced with bumpers of a different shape. Moreover, modernization and installation are carried out by the car enthusiast independently, without unnecessary calls to a service station.
Purpose and dimensions of the "seven" body kits
On the vast majority of modern cars, the front and rear bumpers are a continuation of the body and serve as a decorative element. The exception is some SUV models equipped with power body kits. The name “buffers” is more appropriate for the VAZ 2107 bumpers, since they are extended beyond the body parts and are designed to perform 3 functions:
- Protect vehicle body parts from dents in the event of minor collisions.
- Protect the paintwork of the front and rear fenders from scratches in the event of hitting an obstacle or another vehicle (for example, while parking).
- Improve the appearance of the vehicle.
made entirely of plastic, with a thin decorative overlay placed on top
Unlike previous “classic” models, the VAZ 2107 body kits are made of plastic and equipped with decorative chrome inserts. The side plastic trims retained their similarity with similar parts of the “six”, but increased in height.
Practice shows: the nice bumpers of the “Seven” have lost their protective function for the following reasons:
- The buffer material can withstand really light impacts;
- from an average impact load the plastic cracks and breaks into pieces;
- the body apron is easily damaged by a broken body kit;
- when the front hits the wall, the chrome radiator grille is also destroyed - the VAZ emblem attached to it is flush with the bumper.
There is a platform on the front bumper for installing a license plate
Previously, VAZ 2101-06 models were equipped with chrome-plated buffers made of metal about 2 mm thick. So-called fangs were attached to each, additionally protecting the body kit itself.
The factory rear bumper measures 1600 x 200 x 150 mm (length / width / height). On the front element, the manufacturer provides a platform for attaching a license plate, so its width is 50 mm larger. The remaining dimensions are identical.
The design of the rear body kit of the VAZ 2107 is distinguished by the absence of a platform for a license plate
Bumper Upgrade Options
In order to improve the design of factory body kits, owners of “sevens” practice the following improvements:
- perforation of the frontal plane of the part;
- reinforcement of the front and rear buffers with stiffening elements;
- replacing standard bumpers with tuning products made in a factory or garage with your own hands;
- installation of an additional “lip” at the bottom of the body kit;
- refreshing the appearance of standard parts by painting.
Installing a plastic apron makes the appearance of the factory body kit more attractive
Perforation is the simplest way to change the appearance of the mounted elements of the VAZ 2107. There is no need to dismantle the buffers. Modernization is carried out in the following order:
- Buy a core drill with a diameter of 30-45 mm.
- Mark the front planes of the body kit on the sides of the license plate - there should be 4 holes on each side.
- Place the drill bit in a regular drill and make 8 holes. Tuning is complete.
It is enough to make a few holes to make the hinged part look more original
Perforated bumpers for the VAZ 2105-07 car can be purchased ready-made. The products look better than their homemade “brothers”.
An alternative solution is to buy ready-made parts with perforations
Refinement by strengthening method
Since the standard elements of the “Seven” began to protect the body only from minor damage, but did not acquire much beauty, many car enthusiasts will improve the bumpers by reinforcing them with a metal insert. This is a steel profile - a corner 1300 mm long with a shelf width of 7 cm, metal thickness - 1.5-2 mm. For fastening, prepare 4 M8 bolts with nuts and the following tools:
- electric drill with a drill with a diameter of 8 mm;
- a set of spanners and open-end wrenches;
- pliers;
- hammer;
- aerosol lubricant such as WD-40.
If necessary, you can use a hand drill instead of an electric drill.
First, remove both bumpers from the car according to the instructions below. Take this opportunity to clean the parts from dirt and replace the chrome lining if they have become unusable. The black shine of plastic can be restored using a hair dryer - just treat the surfaces with a stream of hot air.
The color of the plastic becomes brighter after heating with a hairdryer
Before unscrewing, treat all threaded connections with WD-40 aerosol, then wait 5-10 minutes until the lubricant dissolves the rust.
Applying an aerosol makes it much easier to unscrew threaded connections.
The amplifier is installed as follows:
- Attaching the steel angle to the mounting flange of the bracket, mark and drill 2 holes in it. Place them closer to the edge of the profile.
- Secure the corner by inserting standard bolts through the prepared holes. Repeat the operation on the second bracket.
- Drill 2 pairs of holes close to the outer shelf, using the removed body kit as a template.
- Screw the profile to both brackets using standard fasteners.
- Secure the bumper to the corner with the prepared bolts and nuts. Since the buffer has moved forward, there is no need to install side mounts - just screw the standard bolts into the holes and tighten.
The steel profile serves as a spacer between the brackets and the plastic frame
Installation of tuning elements
The proposed modernization option allows you to change the appearance of the VAZ 2107 for the better by getting rid of the bulging standard buffer. Instead, a streamlined body kit of a different shape is installed, imitating a continuation of the body. During installation, factory fasteners are used.
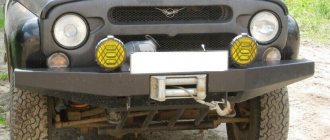
An example of installing a PRESTIGE front bumper - the appearance of the car changes dramatically for the better
List of the most popular models of tuning body kits for the “seven” available for sale:
- PRESTIGE;
- SNIPER;
- ROBOT;
- VFTS from the ABS plastic brand.
A less expensive and time-consuming option is to install a “lip” from the bottom of the standard bumper - a plastic apron that protrudes slightly forward. The element covers the “beard” of the body, usually damaged by pebbles and corrosion, and also creates the appearance of a continuation of the body kit. Installation of the part is extremely simple - the apron is screwed to the car body with self-tapping screws.
Manufacturers usually sell tuning body kits complete with thresholds
Is it possible to install homemade parts?
Current legislation interprets the installation of homemade bumpers unambiguously as unacceptable interference in the design of the car. True, patrol officers pay attention mainly to SUVs equipped with power bumpers - “knuckle bumpers”.
If the owner has installed a homemade body kit without proper permitting documentation, employees have the right to issue a fine or detain the car at the impound area. The last resort is to deregister the car.
Some parts significantly increase the dimensions of the body
To avoid encountering the problems described after replacing bumpers, consider a number of recommendations:
- Do not install attachments made of metal. According to the law, such parts pose an increased danger to pedestrians and other vehicles in the event of an accident.
- The edges of the installed body kits should not extend beyond the vehicle dimensions specified in the attached technical documentation.
- Purchase and install factory-made tuning parts. The seller is required to provide a certificate of conformity confirming that the bumper is made taking into account safety requirements.
Some garage craftsmen practice making body kits from fiberglass. From a technical point of view, such spare parts do not pose a danger to other road users, but from a legal point of view they are illegal. To obtain permission for installation, you must undergo a special examination, which is much more expensive than any factory bumper.
Homemade bumpers are made from fiberglass mats
Restoring appearance by painting
To paint, remove the body kits from the car, wash and dry thoroughly. It is better to dismantle the chrome trim and replace it, but this is not always feasible for a number of reasons:
- the threads of the mounting bolts are heavily rusted;
- the bolt heads rotate inside the lining along with the nuts, it is impossible to get close and grab it with a wrench;
- The chrome plating is in good condition; there is no need to remove the trim.
Before painting, all surfaces are cleaned with sandpaper.
For painting, it is enough to purchase a degreaser, primer, rags and a can of paint of the desired color (usually black or to match the car). Also prepare masking tape and sandpaper No. 800-1000. Further procedure:
- If the chrome trim is not removed, cover it with masking tape.
- Clean the surface to be painted with sandpaper. The goal is to get rid of smoothness and ensure adhesion of the coloring composition, experts say - “to put it at risk.”
- Thoroughly treat the part with a degreaser and dry for 5-10 minutes.
- Apply a layer of canned primer and let it dry.
- Apply spray paint in 2 coats, leaving a break of 15-20 minutes between coats. (exact time is indicated on the packaging).
If desired, the body kit can be painted directly on the car
Dry the painted body kit in a warm garage for at least a day, then install it on the car. If desired, the paint can be additionally protected with two layers of varnish (also sold in cans). If you need to update the trim, cover the painted plastic with tape and apply a compound of a different color.
Video: how to paint an old body kit
Removing the front bumper
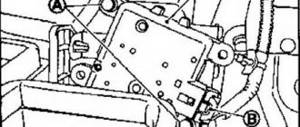
To remove and disassemble the body kit, you need to understand how the mount works. The buffer consists of the following parts (positions in the list and diagram are the same):
- Chrome trim.
- Side plastic pads.
- Inner nut.
- Side cover fastening screw.
- Bracket holding the main bracket.
- Front bracket.
- Body kit mounting bolt.
- Same.
- The bolt that holds the main bracket to the bracket.
- Rubber bushing.
- Bracket mounting bolts.
The hanging elements of the “seven” are attached at 4 points - in the middle and on the sides
The easiest way is to remove the “seven” bumper along with the front brackets, and then completely disassemble it (if necessary). For dismantling you will need the following tools and materials:
- standard set of wrenches - box or open-end wrenches;
- anti-corrosion aerosol lubricant, WD-40 is suitable;
- laundry soap solution.
This is what the front body kit of a VAZ 2107 looks like, removed along with the brackets
To dismantle the front buffer, you need to unscrew 4 threaded connections - 2 on each side of the car. The order of operations looks like this:
- Turn the car steering wheel to the right all the way.
- Apply lubricant to the threads of the two mounting bolts located under the left wheel arch - on the bracket and the side trim. Wait 5-10 minutes.
- Using a 22 mm wrench, loosen the bracket bolt and unscrew it completely.
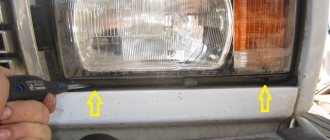
The end of the bracket is attached to the body with a special bracket located inside the wheel arch
- Unscrew the nut with a 13 mm wrench that presses the side plastic trim.
The bumper is held on the side by a bolt screwed to the fender.
- Treat the rubber bushing with soapy water.
- Repeat the above operations on the opposite side.
- Grab the bumper with both hands and pull it out of its sockets along with the brackets.
The unscrewed bumper can be easily removed from its sockets
If further disassembly is necessary, re-spray the threads of the bolts holding the brackets and top plate in place. To separate the body kit from the flanges, unscrew 4 nuts, two more press the decorative trim. Assembly and installation of elements is carried out in the reverse order.
During the assembly process, it is strongly recommended to generously lubricate the threaded connections with grease in order to avoid difficulties the next time the buffer is dismantled.
Video: how to remove attachment parts of VAZ 2105-07
Removing the rear body kit
The algorithm for disassembling the rear buffer completely repeats the removal of the front part, since the mounting method is the same. Accordingly, identical tools are used. Two internal connections are unscrewed on each side, then the element is removed from the bushings.
To completely disassemble the body kit, simply unscrew the 6 mounting bolts.
There is one difference in dismantling the rear bumper - the wheels do not turn, and access to the bolts and nuts is difficult. The problem can be solved in two ways - by removing the wheels one by one or by unscrewing the fasteners from the inspection ditch. If the threads are heavily rusted, it is preferable to use option one.
Video: how to improve the rear buffer
Since the era of the “classic” VAZ is gradually becoming a thing of the past, the production of spare parts for the Zhiguli is declining. Factory bumper assemblies are sold on the market and in car stores, but chrome trim is becoming more difficult to find. This creates the need to repair and paint existing parts; buying tuning body kits is unacceptable for many car enthusiasts.
bumper.guru
Removing and installing the rear bumper on a VAZ 2107
We remove the rear bumper from a VAZ 2107 car to replace its parts or perform body repairs on the rear of the car.
Removing the rear bumper from a VAZ 2107 car
1. We prepare the VAZ 2107 car for operations (see “Preparation of the VAZ 2107 car for maintenance and repair”).
2. Using a slotted screwdriver, pry up and remove the four rubber clips for the front fastening of the trunk mat.
3. Using the same tool, remove two plastic clips for the rear fastening of the trunk mat from the holes in the body of the VAZ 2107 car (one clip is shown in the photo).
4. Remove the mat from the trunk.
5. Using a Phillips screwdriver, unscrew the seven screws securing the trim to the left side member and remove the trim.
6. Having unfastened the cover, remove the spare wheel from the trunk niche.
7. Using a 13 mm wrench, unscrew the nut of the rear bumper mounting bracket on the left side.
8. Remove the fuel tank trim and unscrew the fuel tank clamp bolt (see “Fuel tank - removal and installation”), (see “Fuel tank - removal and installation”). To access the rear bumper mounting bracket nut on the right side, move the fuel tank forward and unscrew the nut using a 13 mm wrench.
9. Using a 22 mm wrench, unscrew the bolt securing the rear bumper bracket to the body bracket of the VAZ 2107.
10. Similarly, unscrew the bolt securing the bumper bracket on the other side.
11. To reduce the friction of the brackets on the rubber seals when removing the bumper, apply penetrating lubricant or soap solution to the brackets.
12. Removing the bumper pipes from the seals in the body, remove the rear bumper from the VAZ 2107.
13. We disassemble the rear bumper in the same way as the front one (see “Front bumper of a VAZ 2107 - removal and installation”).
Installing the rear bumper on a VAZ 2107 car
Assembling and installing the rear bumper on a VAZ 2107 car is performed in the reverse order.
portalvaz.ru
Replacement and disassembly of bumpers of a VAZ-2107 car
Car bumpers (buffers) are not only protection for other parts of the car, but also a kind of airbag.
Therefore, car bumpers are generally not very durable. In the event of an impact, they must soften the blow and protect the driver of the car, as well as the pedestrian.
With various frontal impacts, the bumper is crushed.
Replacing the front bumper
We hang out the front of the car. We recommend removing the front wheels.
From the inside of the front fender, use a 13mm wrench to unscrew the bolt for the side fastening of the bumper.
Holding the bolt securing the tubular connector of the bumper to the bracket with a 22mm wrench, use a second same wrench to unscrew the nut and remove the bolt from the hole.
In the same way, unscrew the two bumper mounting bolts on the opposite side of the car.
We remove the bumper from the car using a “toward” motion
We install the bumper in the reverse order, having first removed the rubber seals from the bumper and installed them in the holes of the body.
Bumper disassembly
Using a 13mm wrench, unscrew the lower fastening bolt
Using a 13mm wrench, unscrew the nut of the upper fastening of the tubular connector
We take out the bolt with a chrome head and remove the connector from the bumper
Similarly, remove the second connector
Use an 8 wrench to unscrew the three nuts.
Remove the chrome bumper trim.
Using a 13mm wrench, unscrew the nut securing the side bumper bracket
Remove the bracket with its fastening parts
We assemble the bumper in reverse order.
Replacing the rear bumper
Remove the right and left trunk trim (see Replacing trunk trim).
Using a 13mm wrench, unscrew the two bolts on the side fastening of the bumper (the second bolt is located behind the fuel tank).
Using a 22mm wrench, unscrew the bolt securing the tubular connector between the bumper and the bracket.
Similarly, unscrew the bolt of the second tubular connector.
Using strong jerks, we remove the bumper, pulling its tubular connectors out of the rubber seals.
If necessary, use a 13mm wrench to unscrew the four bolts and remove the two bumper brackets from the body
Install the bumper in reverse order.
Removing and installing the rear bumper on a VAZ 2107
The rear bumper is removed from the car to replace its parts or to prepare the bumper for painting yourself. And the procedure for removing the rear bumper from a VAZ 2107 is as follows:
1. First, use a slotted screwdriver to pry up and remove the four front rubber clips that secure the trunk mat.
2. Then, using the same screwdriver, remove the two rear plastic clips securing the trunk mat from the holes in the body. (Only one lock is visible in the photo).
3. Remove the carpet from the trunk.
4. After this, unscrew the seven fastening screws of the trim to the left side member using a Phillips screwdriver, and then remove the trim from the car.
5. Next, unfasten the cover and remove the spare tire from the trunk niche.
6. Using a 13 mm wrench, you need to unscrew the nut of the rear bumper mounting bracket on the left side.
7. Then remove the fuel tank trim and unscrew the bolt securing the fuel tank clamp. To get to the rear bumper mounting bracket nut from the right side, you need to move the fuel tank forward and unscrew the nut using a 13 mm wrench.
8. Unscrew the rear bumper bracket mounting bolt to the body bracket using a 22 mm wrench.
9. Similarly, on the other side, the fastening bolt of the bumper bracket is unscrewed.
10. In order to reduce the friction of the brackets on the rubber seals when removing the rear bumper, it is necessary to apply a soap solution or penetrating lubricant to the brackets.
11. Next, remove the bumper pipes from the seals in the body and remove the rear bumper from the car.
13. When finished, assemble and install the rear bumper on the car in the reverse order.
Tools:
- 13 and 22 mm wrenches or sockets,
- slotted and Phillips screwdrivers.
(Visited 664 times, 1 visits today)
Similar articles:
autofixit.com
About the design of the rear part of the VAZ 2107 body kit
The rear body kit on the seven has a similar design to the front, so its dimensions are also 160x20x15 cm. The device is made entirely of plastic, and on top there is a decorative chrome plated metal trim, which stands out significantly and emphasizes the contour of the car body.
This is interesting! The rear unit does not have a place to attach a license plate, which is the main difference from the front bumper.
Like the front, the rear bumper of the seven is necessary to perform the following tasks:
- Protects the paintwork from scratches and impacts. Such consequences may arise due to a collision with obstacles.
- Improving the appearance of the VAZ 2107 car.
- Protection of the body from dents and impacts in light collisions with other cars.
When mechanical impact is applied to the device, it becomes deformed. If this happens, then it is necessary to restore the integrity of the body kit, for which you need to find out the specifics of its removal.
Removing the rear body kit of the seven
The photo in the material shows what the assembled rear bumper on a VAZ 2107 looks like. It is in this form that the device is removed from the car. It should be noted right away that if you had to remove the front body kit, then removing it from the rear will not be difficult. The devices have absolutely identical fastenings, therefore the dismantling algorithm is the same.
The instructions for removing the part in question from the seven look like this:
- To dismantle, you will need to open the trunk and find both bracket fastenings located on the sides on the trunk floor. If there is a trough there, then you will need to get it out.
- First you will need to unscrew the fastenings of the brackets, using “22” wrenches.
- If the connections are dirty and cannot be unscrewed, then they must be cleaned and treated with WD-40 lubricant.
- After 5-10 minutes, unscrew them on both sides, and then pull the bumper towards you, removing the brackets from the bushings. Remove the device by disconnecting it from the body.
- The fasteners are also removed from the body to clean them or replace them if necessary.
After removal, you can begin repair, modernization or replacement. If necessary, the brackets can be detached from the bumper structure by unscrewing the four nuts.
VAZ 2107 bumper tuning: strengthening and production of body kits
The purpose of car tuning is to improve its technical, operational or aesthetic characteristics. Tuning the VAZ 2107 bumper is one of the most popular ways to add individuality and significantly improve the appearance of the “seven”. Modification of bumpers does not require expensive equipment or special skills, so it is often carried out by the car owners themselves. This can be either a modification of a standard bumper or the creation of new parts from fiberglass, plywood and foam. Refinement of the bumper begins with its removal from the car.
Removing the VAZ 2107 bumper
To dismantle the front and rear bumpers of the VAZ 2107, you will need a minimum of tools - just spanners are enough.
Removing the front bumper is done as follows:
turn the steering wheel all the way to one side;- unscrew the nut of the bracket holding the bumper from the side where the wheels are turned out;
- remove the fastening bolt;
- lubricate seals made of rubber with soapy water;
- turn the wheels the other way;
- unscrew the nut and remove the fastening bolt;
- lubricate seals made of rubber with soapy water;
- free the bumper from the decorative bolts securing the side parts of the bumper to the flat mounting brackets;
- Remove the decorative bolts and remove the bumper from the car.
The rear bumper of the VAZ 2107 is removed in the same way. The only difference is that there is no need to turn the wheels to unscrew the nuts of the supporting bolts.
Modification of the standard bumper of the VAZ 2107
The rear and front bumper of the VAZ 2107 are not very durable when compared with older VAZ models. The plastic base, reinforced with a chrome plate, does not withstand even light collisions, and does not look particularly elegant. You can strengthen the structure by inserting a metal L-shaped profile into it. To do this, you need to cut a piece of the profile of a suitable length, drill holes in it and bend it slightly so that its shape follows the shape of the standard bumper. All that remains is to insert the amplifier inside the standard bumper and install it on standard mounts. To prevent corrosion, the amplifier must be painted.
Tip: for painting it is convenient to use an aerosol can with dark-colored paint. The paint from such cans is sprayed evenly, without leaving drips or streaks on the surface.
Both the front and rear bumpers can be modified in this way. The result is a massive, durable bumper that will not bend or break in minor collisions.
Such alterations are not enough to radically change the appearance. To achieve an original design, you can make a new VAZ 2107 bumper yourself.
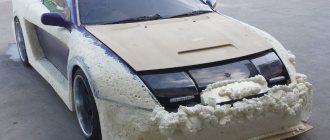
Self-production of a VAZ 2107 bumper
Body kits, including tuned bumpers, can be made quite cheaply and simply from fiberglass. To develop the design of a new bumper, you can use programs to create 3D models or simply make a base from foam and plywood. parts of this design can be connected to each other with gypsum putty or glue.
You can also use plasticine to create a bumper template.
To make a bumper you will need fiberglass or glass mat and polyester resin.
Pieces of fiberglass (fiberglass mat) are laid on the finished matrix, made of plasticine, plywood or polystyrene foam. The pieces must be impregnated with polyester resin with a thickener, which will connect them into a single whole.
The thickness of glass mats must be selected based on the shape of the surface. It is better to make small parts and bends from thin glass mat; thick, massive glass mat provides greater structural strength. Most often, glass mat with a density of 300 grams per square meter is used to make a bumper.
The body kits for the VAZ 2107 are made of several layers of glass mat. Laying the first layer must be done especially carefully, thoroughly impregnating it with resin. The internal corners should be laid out with thin “sausages” of slightly thickened resin, and the laid glass mat should be compacted with a flat brush. The laid first layer should be left for a day to allow the resin to harden. After hardening, the surface of the layer must be sanded with coarse sandpaper.
On the first layer of glass mat, two more layers must be applied using polyester resin. After a day, when the resin has hardened, the bumper can be removed from the model.
The finished matrix should be treated on top with polyester resin to obtain a smooth surface. If there are deep shells, they should be filled with plasticine.
Do-it-yourself VAZ 2107 bumper tuning is completed. All that remains is to paint it with a spray gun or spray can and cut the mounting holes.
semerkavaz.ru
How to Remove the Rear Bumper on a VAZ 2107 ~ TOP-GEER.RU
Tuning bumper VAZ 2107
The purpose of car tuning is to improve its technical, operational or aesthetic characteristics. Tuning the VAZ 2107 bumper is one of the most popular ways to add individuality and significantly improve the appearance of the “seven”. Modification of bumpers does not require expensive equipment or special skills, so it is often carried out by the car owners themselves. This can be either a modification of a standard bumper or the creation of new parts from fiberglass, plywood and foam. Refinement of the bumper begins with its removal from the car.
Removing the VAZ 2107 bumper
To dismantle the front and rear bumpers of the VAZ 2107, you will need a minimum of tools - just spanners are enough.
Removing the front bumper is done as follows:
- turn the steering wheel all the way to one side;
- unscrew the nut of the bracket holding the bumper from the side where the wheels are turned out;
- remove the fastening bolt;
- lubricate seals made of rubber with soapy water;
- turn the wheels the other way;
- unscrew the nut and remove the fastening bolt;
- lubricate seals made of rubber with soapy water;
- free the bumper from the decorative bolts securing the side parts of the bumper to the flat mounting brackets;
- Remove the decorative bolts and remove the bumper from the car.
The rear bumper of the VAZ 2107 is removed in the same way. The only difference is that there is no need to turn the wheels to unscrew the nuts of the supporting bolts.
Modification of the standard bumper of the VAZ 2107
The rear and front bumper of the VAZ 2107 are not very durable when compared with older VAZ . The plastic base, reinforced with a chrome plate, does not withstand even light collisions, and does not look particularly elegant. You can strengthen the structure by inserting a metal L-shaped profile into it. To do this, you need to cut a piece of the profile of a suitable length, drill holes in it and bend it slightly so that its shape follows the shape of the standard bumper. All that remains is to insert the amplifier inside the standard bumper and install it on standard mounts. To prevent corrosion, the amplifier must be painted.
VAZ 2104 bumper assembly
For the use of obscene words and/or insults in the comments - a ban without warning.
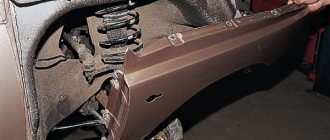
Replacement of the rear panel on a VAZ 2107. Body repair.
Car body repair in the garage. A channel about car repairs and more. Details on my website
Tip: for painting it is convenient to use an aerosol can with dark-colored paint. The paint from such cans is sprayed evenly, without leaving drips or streaks on the surface.
Both the front and rear bumpers can be modified in this way. The result is a massive, durable bumper that will not bend or break in minor collisions.
Such alterations are not enough to radically change the appearance. To achieve an original design, you can make a new VAZ 2107 bumper yourself.
Self-production of a VAZ 2107 bumper
Body kits, including tuned bumpers, can be made quite cheaply and simply from fiberglass. To develop the design of a new bumper, you can use programs to create 3D models or simply make a base from foam and plywood. parts of this design can be connected to each other with gypsum putty or glue.
You can also use plasticine to create a bumper template.
To make a bumper you will need fiberglass or glass mat and polyester resin.
Pieces of fiberglass (fiberglass mat) are laid on the finished matrix, made of plasticine, plywood or polystyrene foam. The pieces must be impregnated with polyester resin with a thickener, which will connect them into a single whole.
The thickness of glass mats must be selected based on the shape of the surface. It is better to make small parts and bends from thin glass mat; thick, massive glass mat provides greater structural strength. Most often, glass mat with a density of 300 grams per square meter is used to make a bumper.
The body kits for the VAZ 2107 are made of several layers of glass mat. Laying the first layer must be done especially carefully, thoroughly impregnating it with resin. The internal corners should be laid out with thin “sausages” of slightly thickened resin, and the laid glass mat should be compacted with a flat brush. The laid first layer should be left for a day to allow the resin to harden. After hardening, the surface of the layer must be sanded with coarse sandpaper.
On the first layer of glass mat, two more layers must be applied using polyester resin. After a day, when the resin has hardened, the bumper can be removed from the model.
The finished matrix should be treated on top with polyester resin to obtain a smooth surface. If there are deep shells, they should be filled with plasticine.
Do-it-yourself VAZ 2107 bumper tuning is completed. All that remains is to paint it with a spray gun or spray can and cut the mounting holes.
top-geer.ru