Design and main malfunctions of VAZ stoves
The standard radiator of the VAZ 2106 stove, despite its small size, copes with its task of cooling the liquid and warming up the interior quite well. The design of the interior heater can be seen more clearly below.
The operating principle of this device is shown in the figure.
The “six” type of heating system is one of the most common designs based on the use of liquid from the cooling system of the power plant. It consists of three main components - the stove itself, the price of which is acceptable for Russian car enthusiasts, mounts with control devices in the form of taps and air ducts with a radiator.
The air intake damper and valve of the VAZ 2106 stove are connected to control devices using flexible and elastic rods. The maximum right position of the upper device means the maximum opening of the tap and the greatest flow of coolant through the radiator into the heating system. If the lower device occupies this position, then this means the maximum opening of the air intake damper, which directs the greatest air flow through the stove further into the heating system.
Plastic deflectors with a variable angle of airflow into the cabin make it possible to change the direction of air flow and direct it in the desired direction. Structurally, sometimes called the air flow distribution cover, it is not connected in any way to the system central stove control switch. This damper is adjusted to open and close using a lever device mounted for comfort on the driver's side of the seat.
The volume of air moved through the VAZ 2106 stove, a video about which can be watched on the Internet, is regulated by a three-position toggle switch. With this switch you can set 2 fan speed ranges, both the lowest and highest levels. It is strictly not recommended to start the electric heater fan with the air intake damper retracted and the tap in the “open” position.
The main defects of the VAZ 2106 stove include the following:
- defects in the stove motor, as a result of which it does not start;
- depressurization of the radiator heating system or pipelines, which is why the stove in the VAZ 2106 does not heat well and the cabin becomes cool;
- sometimes the stove blows cold when there is not enough coolant in the system, and if, when adding it to the norm, the defect is not eliminated, you need to cover the front part of the radiator of the cooling system with thick cardboard and the situation should improve.
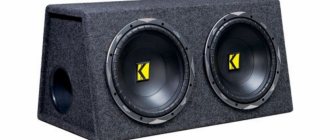
Heater fan VAZ 2106
On VAZ 2106 cars and other models from the “classic” series, electric fan motors of the ME-255 type are installed.
These electric motors cannot be repaired and if they break down they are replaced with new ones. The only possible repair is cleaning the manifold and lubricating the bearings. We go to the VAZ 2106 salon and there, having first unscrewed the bolts securing the bottom panel (where the radio is installed), we take it out. Before doing this, you can also remove the gearshift lever to make all this more convenient.
And unscrew and also move the lower air duct to the side:
After this, remove the latches, which are located on both sides of the stove body closer to the car interior:
The second one is on the driver's side. Next, we try to lower the body all the way down, applying a certain force:
Now we take it out through the right side, only more carefully so as not to damage it and the parts of the instrument panel:
Now turn it over to the bottom side and lift the flap:
And having previously disconnected the power wires from the fan, we remove it from its seat, since it is mounted on rubber inserts that sit tightly in the stove body:
The installation process is performed in reverse order. The price of a new fan at a car market or store is about 300 rubles.
How to remove the instrument panel follow the link.
To remove the electric motor we will need: a screwdriver and a 14mm wrench. If everything is there, then we will begin the repair.
The first step is to remove the lower console; to do this, unscrew the two screws that secure the lower part to the car body.
Remove the storage shelf located under the dashboard. The shelf is secured with four screws.
After removing the shelf, unscrew the screw securing the console to the front of the body.
Next, remove the additional instrument panel from the console and unscrew the two screws securing the console.
Remove the console while holding the additional panel with your hand.
Remove the air duct by unscrewing the two screws securing it.
Disconnect the four radiator and fan shroud holders and, moving slightly to the side as far as the wires allow, disconnect the fan shroud.
Remove the fan motor switch from the instrument panel, disconnect the wires going to the electric motor from it, and label them before disconnecting them. Next, push the wires into the switch hole.
Now we need to remove the fan impeller casing and disconnect the wires from the resistor.
Unscrew the nut located on the right under the instrument panel where the casing is attached to the car body and remove the ground wire.
Now you can remove the fan motor cover from the car.
How to connect
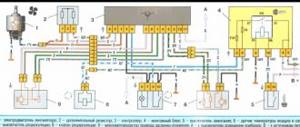
The connection diagram for the electric motor of the interior heater fan is shown in the figure. 9.24. When additional resistor 6 is connected to the power supply circuit of the electric motor, the armature shaft rotates at a reduced frequency. The resistor is fixed by two spring washers in the heater fan casing. The resistor resistance is -1.5 Ohm at 20 °C. It is proposed to replace the damaged electric motor of the interior heater fan with a new one. The only possible repair is cleaning the collector and lubricating the bearings
measurement data
Rated voltage, V 1.
Rated power, W 2.
Shaft rotation frequency when the electric motor is loaded with an impeller at a voltage of 12 V and a temperature of (25+10) °C, min 3000±15.
Current consumption at the prescribed load and speed, A, no more than 4
Low rotation speed of the armature shaft with the impeller, min, not less than 2200±15.
Current consumption at armature rotation speed 2200 min, A, no more than 2
Drawing. 9.24. Connection diagram for the electric motor of the interior heater fan of the VAZ 2106: 1 - generator; 2 - battery; 3 — ignition switch VAZ -2106; 4 - main fuse block; 5 — toggle switch for interior heater fan; 6 - auxiliary resistor; 7 — electric motor of the interior heater fan
To eliminate noise, you must first remove the fan and clean it from dirt and dust. Please note that such work is connected to the car’s electrical network, so before you start it, you need to turn off the ground. I won’t go into more detail on how to remove the fan, but rather I’ll go straight to the main thing.
Of course, the main task is to eliminate the axial play of the fan motor. You can do this using washers made of fluoropolymer or similar material. Necessary condition: minimal friction must be created between the materials. It will be very good if you lubricate the bearings with a thick lubricant that does not react to temperature. For example, you can use MS-1000 lubricant.
The next step is to disassemble the fan motor. After this, you need to make the required number of washers and lubricate them all, then assemble the electric motor back. Surely another option has come to your mind: eliminate fan noise using engine oil. However, remember that in this way you will only improve the situation for a while, but later it will be what it was at first. The problem is that motor oil is liquid and will quickly leak and dry out.
But after lubrication, things will be different. You will notice that the fan will work better, it will rotate quieter and faster, and in cold and low temperatures there will be no trace of the usual squealing.
The casing with the motor and airflow is snapped off onto the driver's and front passenger's feet (there are 4 iron fasteners), the negative wire of the motor is unscrewed (to the left of the heater under the dashboard, it is better to do this with a set of sockets with extension cords, you will need a 10-socket head), then from the power button of the heater fan, you disconnect either the 2 outer wires or all three at once (this is optional, since the middle one there is +12V and it remains in place when you remove the motor). And you pull out all this lower plastic along with the motor, the only thing I have is a 7-wheel console and it didn’t really interfere with pulling out the casing on the passenger side. (I don’t know how to remove a 6-wheel console, but it should be written in the books). Then you remove the old motor (it is mounted again on 2 iron brackets), put a new one (it’s better to buy a motor with bearings (the kit costs 480 rubles) in place of the old one, pass all the wires through the holes intended for them, put everything back and you will happiness.
Replacement of individual stove elements
Car enthusiasts often ask about the VAZ 2106 car, how to remove the stove for maintenance or service work. Such questions arise in connection with the need to repair the stove and subsequent assembly. To replace the heater radiator and heater tap, you need to prepare a set of plumbing tools and new spare parts for the heating system to be replaced:
- Moving the lever to the right, open the heater tap, and then drain the coolant from the system.
- In the mechanical compartment under the hood, unbend the fastening bracket for the vacuum type hose and the wiring kit that goes to the panel, put them aside so that you can get to the heating hoses.
- We slightly unscrew the fasteners of the hoses to the heating radiator tubes and dismantle them.
- We unscrew the 2 bolts securing the seal to the shield, and then slowly dismantle it, remembering that spacer-type bushings are installed there.
- We dismantle the fan device of the stove.
- We dismantle the heater radiator, leaving it hanging on the heater faucet rod and remove the tubes from the hole in the shield.
- We unscrew the fasteners of the stove tap rod and disconnect it.
- We remove the heater radiator from the “six” along with the pipes and the heater tap.
- Having removed the fasteners, we remove the pipe from the heater radiator and the flange gasket from it.
- Having removed the fasteners, remove the stove valve along with the gasket and the pipe from the heating radiator.
- Having unscrewed the fasteners, we remove the pipe from the stove faucet along with the gasket.
- If necessary, after a visual inspection of the gaskets, they must be replaced.
- We are installing the stove.
If a car owner, in order to improve the functionality of the device, decides to modify the VAZ 2106 stove, then this will require its dismantling. The determining technological operation will be a change in the installation angle of the bulkheads with the preliminary production of updated configurations followed by installation.
All implementation of such operations will significantly change the direction of the air flow, and the stove will begin to operate with increased efficiency. To create such a “tuned” stove, you need a standard set of tools, as well as carpentry tools and a cutting torch to give the updated bulkheads the required configuration.
PROCEDURE FOR REPLACING THE VAZ 2106 HEATER
The vehicle interior is heated by engine coolant. The heater design details are shown in the diagram.
Many car enthusiasts only think about the heating system when it gets cold. But sometimes the heater can remind you of itself with an unpleasant smell in the cabin and the appearance of puddles of antifreeze under the feet of the driver or passenger in the front seat. This means that the heater core is leaking and needs to be replaced. This work can be done with your own hands.
To do this you will need:
- open-end wrenches for 7 and 10;
- flat and Phillips screwdriver;
- Antifreeze supply is approximately 1.5 liters;
Replacing the heater radiator VAZ 2106
Open the heating valve and remove the vacuum hose and wiring harness
- Having moved the heater control lever to the right all the way, open the heating tap and drain the Antifreeze from the heater radiator;
- in the engine compartment, release the fastening of the vacuum hose and wiring harness and move them to the side, thereby providing access to the heater hoses;