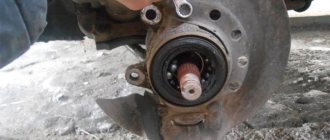
Removing the crankshaft pulley
Someday, every car enthusiast who is accustomed to doing everything with his own hands is faced with the need to dismantle the crankshaft pulley. Most often this is due to the replacement of seals, which over time become old, crack and begin to leak oil. For an experienced motorist, removing the crankshaft pulley is not particularly difficult, however, as online forums show, ordinary motorists who decide to save money often encounter great difficulties here.
This is what the crankshaft pulley looks like
Step-by-step procedure for removing the crankshaft pulley on a VAZ-2114
Before you begin dismantling the crankshaft pulley, you need to unscrew some of the components and parts on the VAZ-2114.
- First of all, we delivered the car and ensured that it was stable.
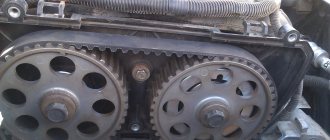
- Then loosen the belt tension bolt and completely break the lock.
All bolts are indicated by red arrows.
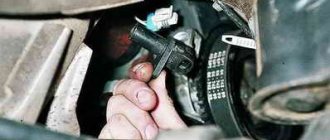
The screwdriver is inserted into the hole indicated by the mark.
With the flywheel secured, you can begin removing the crankshaft pulley .
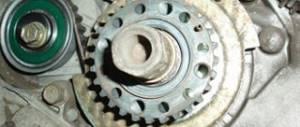
The signs are indicated by red arrows.
Carry out this work very carefully.
It is more convenient to secure the crankshaft by mounting it.
What's stopping you from removing the crankshaft pulley?
The vehicle's owner's manual and repair manual describe the procedure for removing the crankshaft, including removing the pulley, in a nice, concise manner that makes it seem easy to do. But in reality, everything turns out to be not so simple. There are several reasons for this:
- The location of the pulley in the engine compartment is inconvenient for work. It is hidden behind the generator and access to it is limited by elements of the body structure. Pulleys come in regular and damper types, which have an additional outer ring with a rubber seal to absorb vibration. To get to the pulley fastening elements, you need to loosen the tension bolts and remove the generator and power steering belts. And even after this, when performing dismantling work, special care should be taken in applying forces so as not to accidentally damage surrounding nearby parts and the paintwork of the body.
- When installed at the factory, the crankshaft pulley is clamped with a high-tension bolt or nut to ensure a secure fit. During engine operation, the right-hand mounting thread further strengthens the clamping force. High temperatures and environmental influences aggravate this process over time through oil coking and metal corrosion. As a result, the fastening nut or bolt firmly adheres to the pulley body, and it is not easy to break this bond of metals without knowledge of special methods.
- When the clutch is disengaged, the crankshaft rotates freely using any wrench. Therefore, before unscrewing the crankshaft pulley, you should resolve the issue of securely fixing its position in order to prevent rotation when unscrewing the nut. In workshops, special devices are used for this, which are bolted to the pulley into the technological holes and create a reliable stop against rotation. In the absence of such devices, this problem can be solved by installing reliable stops under the wheels and setting the 4th speed of the manual transmission. You can also fix the crankshaft flywheel by resting a pry bar against its teeth or holes.
Why contact specialists
Replacing the camshaft pulley is not only a purely mechanical operation. It is necessary to fine-tune the engine. An error of one degree will cause big problems with the motor. Many hobbyists believe that it is enough to buy the necessary tools and be guided by the marks on the spare parts when replacing them. But there are a number of other important nuances. Don't want a minor problem to turn into an expensive repair? Entrust the work to specialists.
MT-AVTO car service has the necessary resources to provide quality services:
- Qualified auto mechanics with many years of experience.
- Modern equipment, professional tools.
- A quality control system that allows you to monitor every stage of work.
As a result, our clients receive not only a serviceable car, but also a guarantee of the quality of the services provided.
How to unscrew the crankshaft pulley?
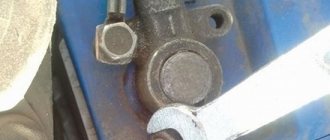
Removing the pulley. Unscrew the nut
The pulley can be secured to the end of the crankshaft using a power bolt or nut. The nut is found on most rear-wheel drive cars. It may have special protrusions for engagement with the “crooked starter” handle, the so-called “ratchet”. To remove the nut, workshop technicians use a 36 or 38 socket wrench with a welded long handle and a locking device placed on the pulley. How to unscrew the crankshaft pulley ,
secured with a nut, at home? To do this you can do the following:
- put the car on a “pit” or overpass;
- engage 4th gear to prevent the crankshaft from turning when unscrewing the nut;
- raise the parking brake handle all the way up to prevent the wheels from turning and the vehicle from moving forward;
- tap the edges of the fastening nut with a wooden hammer;
- Using a socket wrench that matches the size of the nut and a handle extension in the form of a metal pipe, try to move the nut with a sharp counterclockwise movement from its stuck position.
Video: How to unscrew the nut on the yoke pulley and replace the oil seal
If successful, you can, by changing the position of the key head, gradually unscrew the nut to the end. If this attempt is unsuccessful, then the following method can be used:
- put the gear knob in neutral position;
- remove the caps from the spark plugs to prevent sparking and engine starting;
- place the head of the wrench on the nut and rest the end of the lever against the ground or spar so that the pulley cannot turn to the right;
- briefly turn on the ignition to give the crankshaft a rotation impulse. Usually one or two attempts at starting will help the nut come out of place, and then it can be easily unscrewed with a wrench.
On most front-wheel drive cars, the pulley is secured with a bolt. Before removing the crankshaft pulley ,
tightened with a bolt, the following operations should be performed:
- lift the right side of the car from the front and install it on a trestle or stump, remove the wheel;
- remove the air filter unit, protective casing, loosen and remove the drive belt of the electric generator, remove all parts that prevent free access to the pulley;
- to lock the crankshaft, you need to remove the plug in the clutch housing and insert a pry bar into the hole, resting it against the flywheel teeth;
- Having placed the head of the wrench over the bolt, using the lever extension, apply several sharp forces in the direction of left rotation to tear the bolt from its initial position. Most attempts are successful. If that fails, you can try the method given above for unscrewing the nut, briefly running the starter.
You should also keep in mind the experience of the common people, which allows you to reduce the adhesion of the nut and bolt to the pulley. If you lubricate a bolt or nut with vinegar essence, brake fluid or WD type grease in advance, they will unscrew more easily. Here is information about where the crankshaft sensor is located and how to check it.
Video “How to unscrew the crankshaft pulley on a Toyota”
Shows how easy it is to unscrew the nut from the crankshaft pulley and replace the oil seal on a Toyota Town Ace Noah 3S-FE / Crankshaft Pulley Removal
Every second car enthusiast who tries to repair his favorite four-wheeled friend with his own hands has encountered the problem of how to remove the crankshaft pulley. After reading the instructions in the maintenance and repair manual, at first glance, the procedure does not seem complicated, however, when you first try to unscrew the ill-fated bolt, it turns out that this is not so easy. It is completely unclear how to fix the crankshaft so that it does not rotate. Another problem is where is the best way to get to the treasured bolt. Removing the crankshaft pulley causes a lot of trouble because it is too tight. There is a high probability of damaging many parts of the engine compartment or the paintwork of the body.
The problem is that the crankshaft pulley bolt (or nut, depending on the model) is tightened with great force during installation. This is done so that it does not unwind spontaneously, since if unscrewed, serious damage and expensive repairs cannot be avoided. The degree of tightening gradually increases as the engine operates and is aggravated by sticking, coking, and corrosion.
In reality, the entire dismantling process can take 10-15 minutes, but there are some techniques you need to know and use. Different motor models use either a bolt or a nut to secure the pulley. Each option should be considered.
How to unscrew the crankshaft pulley nut?
The nut at the end of the crankshaft holding the pulley is a sign of the engine of a classic rear-wheel drive car like VAZ from model 2101 to 2107, Niva and the like. Such a nut is also called a “ratchet”, since it can have ledges for a “crooked starter”.
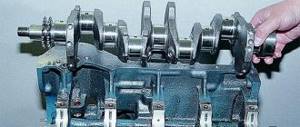
How to remove the crankshaft pulley
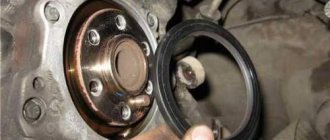
After unscrewing the fastening, you need to remove the pulley. It sits tightly on the hub and is secured with a key, so you won’t be able to simply pull it off the shaft by hand. It is best to use a special puller for this, which has two legs that grip the edges of the pulley and a central twisting screw stop that rests against the shaft axis. If you don’t have a puller, you can use pry bars for this, which you need to evenly pry the pulley from opposite sides, applying force in the direction from the shaft.
You should try to choose the point of application of force as close as possible to the shaft. Before removing the crankshaft pulley, you can gently tap it with a wooden hammer to eliminate any possible distortion. Particular care must be taken not to deform the locking key and groove. Reinstallation of the pulley on the shaft should be done after treating the mounting points with grease, so as not to apply great forces leading to misalignment.
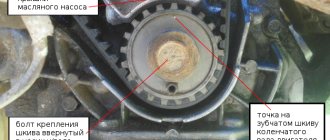
Checking the condition and replacing the timing belt
We check the condition of the timing belt on a cold engine (15–35 °C) every 15 thousand kilometers.
Use a 5mm hex to unscrew the four screws securing the front upper timing cover...
...and remove the cover. We hang the right front wheel and engage fifth gear in the gearbox. By rotating the wheel clockwise, we turn the engine crankshaft and inspect the timing belt. With normal belt tension...
What kind of service is this?
A torsional vibration damper (also called a crankshaft damper), connected to the engine crankshaft, reduces engine vibration and acts as a pulley for the drive belts.
An absorber or damper consists of two elements: a massive body and an element that dissipates energy. The massive body prevents vibration from building up, and the energy dissipating element (rubber) absorbs vibration. Damper failure usually occurs due to rubber aging from exposure to heat, salt or ozone. Wear and impact loads also have an impact. Replacing the crankcase ventilation hose cannot be ignored. Replacing the crankshaft pulley is not provided for in many modern cars. The fact is that, as conceived by the designers, this element has a certain service life, which should be equal to the period of the warranty issued for the power unit of the machine. If the operation is carried out in European countries and the USA, this most often happens. In our country, problems with this unit often arise, which is associated with fairly harsh conditions and a huge number of factors that cause the need for repairs.
The part must be replaced if it loses its own mechanical qualities. The most common problems are:
- delamination;
- the outer ring “slipped” towards the plastic cover;
- traces of overheating were found directly on the tracks;
- the element is heavily worn or quite noticeably damaged.
The crankshaft pulley should be replaced if these problems are visually noticeable. In the Russian climate, it is advisable to change this element once every 120 thousand km. mileage After passing this mark, you should diagnose the condition of the crankshaft and decide whether it needs to be replaced with a new one or not. The replacement procedure is quite complex, so it is best to order it from experienced technicians at a service station.
How to remove a crankshaft pulley bolt: why is everything so complicated?
A knowledgeable motorist usually spends no more than a quarter of an hour on the process of dismantling the crankshaft pulley. But inexperienced drivers, when trying to remove this part on their own, are faced with many problems that they often simply cannot solve. The instructions for carrying out repair work and maintenance of any modern vehicle contain comprehensive information about the dismantling process, but, unfortunately, it does not help car enthusiasts.
First of all, difficulties arise with fixing the crankshaft. It is very difficult to dismantle it if the part is constantly rotating, “slipping” out of your hands. It is also not clear to many from which side to approach the bolt that holds the pulley. And its strong tightening usually makes the process of removing the unit very, very difficult, since dismantling under such conditions is fraught with damage to the body covering or elements of the car’s engine compartment.
All car manufacturers and car service specialists use great force to tighten the nut or bolt of the crankshaft pulley (on some vehicle models the mechanism is supported by a bolt, in others by a nut).
This is done specifically to avoid self-unwinding of this part during vehicle operation. If a bolt (nut) falls out while driving, it will not be easy to bring the car back to life in order to continue driving it, and the repair itself will cost, believe me, a pretty penny. In addition, the described fasteners increase their tightening level independently when the engine is running. And the final “indestructibility” of the bolt is given by the phenomena of coking, sticking, and corrosion.
Our recommendations
If it is necessary to replace the crankshaft pulley, it is best to give preference to original and new parts. They do not allow us to achieve positive and long-term results and the maximum level of reliability. When replacing a pulley, the pulley key, hanging belts, front oil seal and crankshaft pulley mounting bolt must be changed.
Crankshaft pulley removal process
Replacing the crankshaft pulley
Crankshaft pulley operation
How to unscrew the crankshaft pulley bolt - solving the problem
The pulleys of front-wheel drive cars are usually secured with a bolt. In such vehicles, the pulley is oriented perpendicular to the axis of the machine, which, of course, complicates repair work (it is very difficult to get to the fastening). In order to unscrew the bolt as quickly and easily as possible, it is advisable to prepare in advance:
- set of auto tools;
- the so-called “stump” (or “tragus”);
- car jack;
- head (socket) with a lever and extension (the head must be selected according to the size of the bolt).
The process with these devices is as follows:
- remove the wheel (of course, before doing this you need to lift the front right part of the car with a jack);
- we install the vehicle on the “stump”;
- remove the engine shield, which protects it from dirt, the air filter (they are located on the top side of the hood) and the generator belt;
- open the plug on the clutch block so that you can fix the crankshaft, and wedge the flywheel teeth using a pry bar;
- We put the head on the bolt and begin to unscrew it (if it does not give in, we slowly increase the length of the lever).
I think there is no need to talk about how to tighten the crankshaft pulley and return the car to its pre-repair condition. All operations are performed in reverse order.
What tools are needed to remove the crankshaft pulley bolt?
As noted above, when trying to unscrew the pulley from the crankshaft, the part constantly rotates, which makes it almost impossible to do this without locking means. In addition, getting to the crankshaft pulley bolt is not so easy, given that it is located perpendicular to the axis of the car.
Before you begin work on separating the pulley and crankshaft, you must prepare the following tools:
- A socket to the size of the bolt or a socket wrench (most often the connecting bolt has a “head” of 36 or 38 millimeters);
- Lever for key or socket, as well as extension;
- Standard set of automotive tools;
- Mount (or something similar);
- Jack for raising a car;
- “Stump” or “Trest”, which can be installed as a safety net for the jack.
When all the tools are ready, you can proceed directly to the procedure of twisting the bolt and separating the parts.
How to unscrew the crankshaft pulley nut?
This procedure is easier to perform using a lever and an extension for it (you can use a relatively long piece of pipe), as well as a socket or socket wrench (38 or 36). A nut, called a “ratchet,” is usually used to secure pulleys on rear-wheel drive vehicles. Such a nut usually has special ledges.
To remove it, you need to get under the car and try to unscrew the element with a wrench and extension. In cases where it absolutely does not lend itself, the gearbox should be put in neutral, the spark plugs should be removed, the key and lever rested on the side member or floor, and an impulse should be given by turning the ignition switch. After this procedure, the nut easily comes off on the first or second try.
Let us add that a device for removing the crankshaft pulley makes the dismantling process easier. It consists of a nut with a pin with 2-3 grips attached to them (the pin rests on the center of the shaft, the grips are placed over the edges of the pulley). Such a “folk” puller makes it possible to pull the pulley off the shaft without any problems by turning the device clockwise.
How to remove a crankshaft pulley and not stop loving your car
Every second car enthusiast who tries to repair his favorite four-wheeled friend with his own hands has encountered the problem of how to remove the crankshaft pulley. After reading the instructions in the maintenance and repair manual, at first glance, the procedure does not seem complicated, however, when you first try to unscrew the ill-fated bolt, it turns out that this is not so easy. It is completely unclear how to fix the crankshaft so that it does not rotate. Another problem is where is the best way to get to the treasured bolt. Removing the crankshaft pulley causes a lot of trouble because it is too tight. There is a high probability of damaging many parts of the engine compartment or the paintwork of the body.
The problem is that the crankshaft pulley bolt (or nut, depending on the model) is tightened with great force during installation. This is done so that it does not unwind spontaneously, since if unscrewed, serious damage and expensive repairs cannot be avoided. The degree of tightening gradually increases as the engine operates and is aggravated by sticking, coking, and corrosion.
In reality, the entire dismantling process can take 10-15 minutes, but there are some techniques you need to know and use. Different motor models use either a bolt or a nut to secure the pulley. Each option should be considered.
How to unscrew the crankshaft pulley nut?
The nut at the end of the crankshaft holding the pulley is a sign of the engine of a classic rear-wheel drive car like VAZ from model 2101 to 2107, Niva and the like. Such a nut is also called a “ratchet”, since it can have ledges for a “crooked starter”.
It is better to do the work above the inspection hole. The crankshaft should be secured by placing the gearbox in 4th gear and applying the parking brake. You should stock up on the following tools in advance:
- socket or socket wrench 36 (or 38);
- lever extension in the form of a piece of pipe.
While under the car, try to unscrew the nut with a wrench with a sufficiently long lever. If the attempt is unsuccessful, put the gearbox in neutral and proceed as follows:
- the candlesticks are removed;
- while in the pit, install the key and extension so that the end rests on the floor or spar as the shaft rotates;
- turning the key in the ignition switch gives a short-term impulse.
As a rule, on the first or second attempt the nut comes off and is then unscrewed with a regular wrench. Don't forget to loosen and remove the alternator belt.
How to unscrew the crankshaft pulley bolt?
The bolt holding the pulley predominates in engines in front-wheel drive cars, when the block is located perpendicular to the axis of the car. In this case, you will have to tinker more, since it is more difficult to get to the bolt. To work you should prepare:
- jack;
- “tragus” (stump);
- a socket to the size of the bolt with an extension and lever;
- set of automotive tools.
In search of an answer to the question of how to remove the crankshaft pulley, many car enthusiasts begin to look for an opportunity to do this without prior preparation. By definition, such attempts cannot be successful.
In order to correctly remove the pulley, you must perform the following manipulations::
- the right front part of the car is lifted, the wheel is removed;
- the car is installed on a “tragus”;
- From the top side of the hood, all parts that impede access are removed: the air filter and the engine mudguard;
- the alternator belt is removed;
- to fix the crankshaft, the plug on the clutch block is opened and a pry bar is inserted into the resulting window to jam the flywheel teeth;
- under the wheel arch, a head with an extension and a lever is put on the pulley bolt;
- the bolt is unscrewed counterclockwise.
In the vast majority of cases, the bolt can be unscrewed. If it does not give in, then you can add the length of the lever. If this does not help, then you should use the help of the starter as described for the pulley nut in the “classic”.
We remove the pulley using folk automotive experience
Any threaded connection, even if tightly tightened. can be untwisted with less effort if you use some folk-automotive tricks. The problem of how to unscrew the crankshaft pulley ceases to be such if you moisten the bolt head or nut in advance with special WD oil, vinegar or brake fluid. Sometimes lightly tapping the edges of the nut helps.
Unscrewing a bolt or nut does not always solve the problem, since the pulley is held quite firmly on the shaft. You can remove the pulley using a regular pry bar, carefully prying it off from different sides. It is important that the force application point is as close to the shaft as possible. For hopeless cases, it is necessary to use a crankshaft pulley puller. This is a special device, which is a pin with a nut on which 2-3 grips are attached. The ends of the grippers are secured to the edges of the pulley, and the end of the pin rests against the center of the shaft. By twisting it clockwise, you can gradually pull the pulley off the shaft.
You should not be sure that in all cars, without exception, the crankshaft rotates clockwise.
For example, in some Honda cars the crankshaft rotates counterclockwise. It follows from this that the thread on the pulley nut (bolt) will be left-handed.
What is the problem when unscrewing the crankshaft pulley?
Even a person far from cars knows that the crankshaft rotates while the car is moving. Based on this, we can conclude that it will also rotate when you try to unscrew the bolt that connects the pulley and the crankshaft. The problem is that the direction of rotation of the unit and the thread of the bolt are the same. This means that by applying force to unscrew the bolt, it also affects the crankshaft, which rotates.
It should also be taken into account that while the car is moving, the bolt is strongly tightened, and this was not done by accident. It is important that in no case does the pulley move away from the crankshaft while the car is moving, which can be dangerous not only for the car, but also for the people in it.
There are other factors that do not allow you to easily unscrew the crankshaft pulley, in particular: corrosion, burning, coking, sticking, etc. Based on this, we can conclude that separating the parts is not so easy, and this will require not only special knowledge, but also a number of specific tools that are not available in every garage.
Article on the topic: Car battery polarity: forward and reverse