The average service life of a Niva camshaft is 100–150 thousand km, depending on operating conditions and the quality of the purchased spare part. Signs of its breakdown may include a constantly stalling engine, loss of power and knocking valves. Although, before replacing the Niva camshaft with a new part, you should make sure that the old one cannot be repaired.
This article will describe in detail the most important aspects related to the malfunction, repair and replacement of the camshaft for the famous domestic SUV NIVA.
Camshaft device for Niva 2121
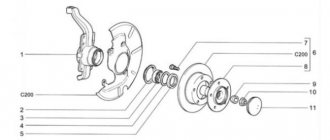
The camshaft is cast iron, rests on five journals and rotates in an aluminum bearing housing mounted on the cylinder head. The main dimensions of the camshaft and bearing housing are given in Fig. 2-54
The cam surfaces are bleached to improve wear resistance. The camshaft is held against axial movements by a thrust flange placed in the groove of the front support journal of the shaft.
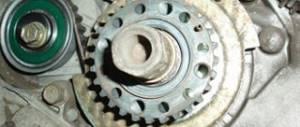
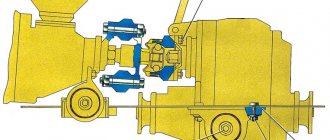
Camshaft drive. It is driven from the drive sprocket 5 (Fig. 2-55) of the crankshaft by a double-row roller chain 2. The same chain also drives the sprocket 4 of the oil pump drive shaft. The chain drive has a semi-automatic tensioner 8 with a shoe 7 and a chain guide 3 with rubber linings.
A limit pin 6 is installed in the lower part of the cylinder block, which prevents the chain from falling into the crankcase when removing camshaft sprocket 1 from the vehicle.
"Niva Tuning 24/7" - values every client
Trophy - a camshaft with improved performance characteristics in the entire frequency range for machines with hydraulic compensators.
According to personal feelings: the camshaft gives an increase in power of up to 10%.
The work is immediately visible, especially in the low range! The engine “grabs” at the very bottom, and the car begins to move after releasing the clutch pedal , without additional throttle application.
The speed on the highway does not decrease, it increases slightly.
Shafts No modifications are required to the cylinder head (cylinder head). The camshafts are narrow-range with stable idle speed. Installed on standard engine.
Easy to install (if you forget to tell the mechanic that these are tuning camshafts, he will simply put them “on the marks” and they will work)
Our Recommendations:
1. Buy a camshaft bed with an individual fit, lowering 0.6 mm (available in product options).
2. Replace the valve discs with modified ones (available in product options).
3. Install the split gear.
Review:
“Easy, fast, accurate launch. XX is stable , the exhaust is “soft”. First start on XX, but it’s not MM80, but it’s nicer than MM48. As I move, I notice that I’m going one gear higher without experiencing any discomfort in driving. The engine has turned into a rubber one, it reacts calmly and leisurely to the gas pedal, both when released and when pressed, as if a huge flywheel had been added, there are fewer knocks and jerks.”
Comment: After correctly installing the Trophy series camshafts to the standard 83 hp. add from 9-12 hp (10%-14%) . Maximum recorded increase: +30 hp.
Technical characteristics of "Trophy City"
Valve lift H = 10.9 / 9.8 mm.
Phase width (degrees PCV): 258/256*.
Intake valve lift (overlap) at TDC 1.05 mm
Good (excellent shaft) for high-speed driving on the highway! However, there is less comfort than in “Trophy 4*4”; here, in order for the car to start moving, you need to press the gas pedal!
Installation recommendations:
1. Split camshaft gear for the timing sensor (with bar) - Required!
2. We set the camshaft half a tooth forward from the standard position!
3. The controller firmware remains unchanged (chip tuning of the controller is not required).
Technical characteristics of "Trophy 4x4"
Valve lift (mm) intake/exhaust: 11.00/10.00 mm
Phase width (degrees PCV): 251
Intake valve lift at TDC is 0.80 mm.
The most comfortable camshaft for all-around driving! With its installation, releasing the clutch pedal, the car begins to move itself!
Installation recommendations:
1. Camshaft gear - standard
2. Camshaft position - standard
3. Controller operating programs - standard
Technical characteristics of “Trophy+”
Valve lift H=11.5/10.5 mm. Phase width (degrees PCV) 251/249*.
Intake valve lift (overlap) at TDC is 1.7 mm.
The most powerful camshaft, suitable for all occasions of engine operation.
Installation recommendations:
1. Split camshaft gear for the timing sensor (with bar) - Required!
2. It is advisable to do the installation of the camshaft in coordination between the motor mechanic and the programmer together in order to remove the maximum of the possibilities that came with the new shaft. (A programmer is a person who will change the operation of the controller program. Do “chip tuning”).
3. Controller firmware (controller chip tuning) is required!
Note: Camshaft timing determines the engine's operating range. The wider the camshaft phase, the more sporty the engine will be.
Niva 2121 – camshaft features
At first glance, the camshaft of a NIVA car is very similar to any other camshaft, however, there are some points by which you can easily determine that this part is specifically for the NIVA.
- Most camshafts have a hex key (usually 27) between the cams of the second cylinder. The camshafts that are manufactured for the NIVA car have two hexagons on their axis (between the cams of the second and third cylinders). Visually, this is the main distinguishing feature of this part.
- The next differentiating factor is the distance between the base and the top of the cam. If you need to make sure that the part is specifically for NIVA, and the presence of a second hexagon does not guarantee the authenticity of the product, pick up a caliper and start measuring. The basic camshaft cam size is the same in most cases and is 30 millimeters. But the distance from the base to the top of the Niva is 37 millimeters. Measuring any other camshaft, the distance will be no more than 36.3 millimeters.
If both of these points are met, rest assured that the spare part is genuine and you can begin installing the camshaft on your Niva.
Installation of camshaft VAZ 2107
The cylinder head camshaft is installed in the reverse order of removal. Before installing the part into the housing, it is necessary to lubricate the support journals with engine oil. When assembling, you should pay attention to two important points:
- correspondence of the marks on the camshaft and on the sprockets of its drive;
- tightening torque of the camshaft housing nuts.
First, you need to properly tighten the camshaft nuts. The nominal tightening torque of the nuts is 2.2 kgf•m. You cannot immediately tighten the fastening to such a torque. The VAZ 2107 camshaft is tightened in three to four stages so that the body is pressed evenly, without distortions. The nuts should be tightened from the center to the edges, in accordance with the “tightening chart” (see figure).
When the camshaft is installed, it is necessary to set its position relative to the crankshaft. There are marks on the camshaft bed, the front engine cover and the crankshaft and camshaft sprockets that should be followed. Even if the drive chain has been securely attached to the sprocket, when installing the camshaft, make sure that its position matches the position of the engine crankshaft. To correctly set the marks on the VAZ 2107 camshaft, you must perform the following steps:
- make sure that the mark on the crankshaft pulley is located opposite the long mark on the front engine cover (this corresponds to the top dead center of the fourth cylinder);
- install the sprocket on the camshaft and make sure that the mark on it matches the mark on the “bed”;
- put the chain on the sprockets without disturbing the position of the shafts;
- make sure that when the chain is tensioned, the marks match;
- tighten the camshaft sprocket bolt;
- turn the crankshaft two turns with the wrench;
- check the alignment of the marks on the camshaft and crankshaft;
- if necessary, change the position of the chain on the camshaft sprocket;
- Tighten the camshaft sprocket bolt and secure the lock washer.
After this, all that remains is to adjust the chain tension using the tensioner and complete the assembly by installing the cylinder head cover and other parts.
Camshaft knock on Niva 2121 - what's the problem?
Such a problem as crankshaft knocking on the Niva 2121 is familiar to many drivers, but not everyone understands the moment when the camshaft begins to knock. This is due to the fact that the sounds that the driver hears in such a situation are very similar. Determining that the crankshaft is knocking and not any other component of the car is quite simple:
- The camshaft knock can be called “dull”, and it appears when starting a cold engine;
- The sounds that a bad crankshaft makes, as noted above, are similar to the sounds that occur when there is a problem with the camshaft, but there are some differences. If the crankshaft knocks, then as the speed increases, the sound becomes much louder.
It should be understood that you can hear a knock in the camshaft only during a “cold” start of the engine, since during downtime the lubricant is completely removed from the rubbing parts. Once the engine starts running, the oil will begin to lubricate the bearings. After some time, they will receive the required amount of lubricant, and the camshaft knocking will stop.
The camshaft of the Niva 2121 car consists of a number of elements, and the malfunction of most of them leads to the appearance of a characteristic knocking sound during operation of the car engine. If you hear the camshaft knocking, you can assume one of the following reasons:
- Problems with the camshaft bed. In such a situation, independent repair is impossible. It will be necessary to boring or honing the camshaft bed or completely change the part;
- Lubrication system malfunction. Even a small deviation from the norm in the lubrication system can cause the camshaft to start knocking. In this case, the reason may be associated not only with the small amount of incoming oil, but also with its quality. If, as it passes through the units, coolant or other impurities enter the oil, it begins to cope with its tasks worse;
- Deformation of the camshaft or mechanical damage to it (its parts). The most common problems include broken camshaft bearings and broken journals; The fuel supply process adjustments are violated;
- The life of the cams has been exhausted. This malfunction can be diagnosed if you are sure that the camshaft is knocking. If it continues to knock while the engine is running hot, then the problem is with worn cams.
The above are just some of the problems that can lead to camshaft knocking. The sooner a specific malfunction is identified using diagnostic equipment or visual inspection by specialists, the greater the chance of eliminating the problem before it begins to affect other elements of the unit.
Do-it-yourself removal and repair of the Niva 2121 camshaft - step-by-step instructions
In order to remove and replace the camshaft on a Niva 2121, you must perform the following procedure:
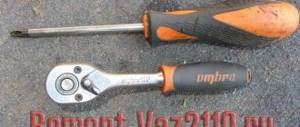
- Prepare the necessary tool Preparation for replacement consisting of: wrenches; torque wrench; chisels; socket heads for 10, 13 and 17.
- At the first stage of work on removing the shaft, the following actions are performed: Removing the negative terminal from the Niva 21213 car battery (2121 and any other domestic modification of this car); Removing the cylinder head cover; Install the camshaft in a position where the mark on its sprocket coincides with the corresponding protrusion on the bearing housing. And the mark on the pulley is with the protruding part of the shaft drive. Using a chisel to bend the blades around the lock washer of the bolt securing the sprocket.
- Next Unscrew the sprocket bolt of the part being removed (key “17”) and remove it from the hole;
- Dismantling the timing chain tensioner;
- Removing the camshaft sprocket (recommended tie a chain to it – this will ensure that there is no skipping;
- Uniformly unscrew (using a 13mm wrench) all the nuts securing the shaft bearing housing and remove it from the cylinder head studs along with the camshaft.
- Unscrewing, using a 10mm socket wrench, the fastenings of the thrust flange to the bearing housing;
- Removing the flange and then the camshaft.
- If it is necessary to replace the valve levers, these parts are also removed immediately after dismantling the shaft . To do this you should:
- Move the presser spring legs to the side;
- Remove the lever;
- Remove the spring.
- At the same stage, diagnostics of the condition is performed. If there are noticeable damages (cams are worn by 0.5 mm or more, scratches, grooves and nicks are visible on the surface), indicating the impossibility of repair, proceed to the process of installing a new part. The camshaft, which can be repaired, is brought back into working condition. If the question about the need to replace the camshaft of any Niva model (including 2131 and more modern versions) receives a positive answer, you should purchase a new part. As a rule, they are sold complete with cases. It is worth noting that installing a new shaft requires replacing its rockers and hydraulic compensators, which increases the cost of repairs by approximately one and a half times.
- Before installing the shaft inside the bearing box, lubricate the working surfaces of the journals and cams with engine oil. Now you should install the camshaft so that its pin is located exactly opposite a certain reference point - the upper hole of the thrust flange. The part is fixed and the fasteners are tightened, adhering to certain rules: the nuts must be tightened, trying to maintain a force of 19 Nm;
• twisting is carried out in a certain sequence, which can be seen in the diagram: - Now unfasten the wire that secured the timing chain to the sprocket (leaving marks for ease of installation), and install both of these parts on the shaft. Having unscrewed the fastening bolt, bend the petals of the lock washer. And as a final stage:
- installing a tensioner for the timing chain (observing the marks made);
- returning previously removed parts to their place in the reverse sequence;
- adjustment thermal gaps old or newly installed valves.
- The result of the replacement is a new camshaft installed on your Niva 21214, 2121 or 2131, which can last at least another 100 thousand km - without the appearance of knocking and most other problems with the engine. At the same time, funds are saved that could have been spent on paying for repair services, and relatively little time is spent.
How to remove the camshaft of a VAZ 2107
Replacing the VAZ 2107 camshaft begins with its dismantling. To do this you need to do the following:
- place the car on a level surface;
- wait until the engine cools down;
- clean the engine head cover from dirt;
- remove the air filter, disconnect the cable, tip and rod of the throttle valve drive, remove
- fuel hose from the bracket (on a car with a carburetor engine);
- disconnect the air supply hose, vacuum hose and remove the fuel filter from the bracket (on a car with an injection engine);
- Using a 10mm wrench, unscrew the nuts securing the cylinder head cover;
- remove the washers from the cylinder head cover;
- release the wiring harness, crankcase exhaust and power steering hoses, and the headlight hydraulic adjustment tube from the bracket mounting;
- remove the cylinder head cover from the studs;
- remove the gasket;
- set the camshaft position so that it corresponds to the end of the compression stroke in the fourth cylinder;
- Use a chisel to bend the petal of the camshaft sprocket lock washer;
- engage first gear to prevent crankshaft rotation;
- Using a 17mm wrench, unscrew the camshaft sprocket mounting bolt;
- remove the bolt together with the lock washer;
- Using a 10mm wrench, unscrew the two nuts securing the chain tensioner;
- remove the tensioner;
- tie the chain to the camshaft sprocket with wire so that it does not jump off;
- remove the sprocket and chain, move it forward;
- Using a 13mm wrench, unscrew the nuts securing the camshaft bearing housing (this must be done evenly so that the housing does not “lead”);
- remove the bed along with the camshaft from the studs;
- use a 10 mm wrench to unscrew the two nuts securing the thrust flange;
- remove the flange from the groove in the front journal of the camshaft;
- pull the camshaft out of the bed (bearing housing).
If signs of wear are visible on the camshaft journals or cams, the camshaft needs to be replaced. It also needs to be changed if cracks or deformation appear. Sometimes the cause of a knocking noise may be wear on the camshaft housing bearings. In this case, it is enough to replace only the bed.