Most owners of passenger cars of the Lada Samara 2 family are wondering how to remove the front bumper on a VAZ 2114/2113/2115 on their own. For drivers who are well versed in technology, removing and replacing the part is not difficult. If the bumper is damaged, they do not go to specialized auto repair shops or service stations; such repair work is performed with their own hands.
This review is intended for new car enthusiasts who want to understand the mechanics of a car, save money and carry out minor repairs on their car themselves.
How to replace a bumper VAZ 2114 2115 2113
The VAZ bumper is an energy-absorbing device in the form of a bar, located in the front and rear parts of the Lada Samara 2 car. This important safety element is a mandatory part of the body and gives the car a beautiful appearance.
Body kits have 2 functions:
- Decorative. The car looks more improved. The manufacturer developed inflated body elements as styling for the VAZ 2114. They look aesthetically pleasing and at the same time increase downforce when driving at high speeds, which improves safety.
- Protective. The bumper protects the car from light impacts and damage, protects the reinforcing beam, body and other parts.
VAZ 2113/2114/2115 models are equipped with 2 bumpers:
Body kits are made from 2 types of plastic material:
Thermoplastic plastic can be easily softened and is combined into a homogeneous structure during repairs. Thermosets cannot be repaired by welding.
The material marking is located on the inside of the body element.
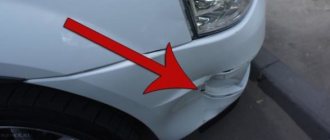
As the vehicle is used, various collisions and obstacles may occur, followed by deformation of the body kit. Replacing the front bumper of the VAZ 2115 in this case is mandatory.
If you leave the damaged part, then with a possible next impact, all the energy will be directed to the car body, as a result of which many mechanisms will fail:
- radiator, its grille;
- fan;
- wheel arch liners
In case of minor damage, such as scratches, small cracks, the body kits can be glued, puttied and painted. The reasons for removing this part are as follows:
- deformation of an element as a result of a collision or impact;
- engine repair, reinforcement beam, radiator replacement;
- installation of a protective mesh, decorative lining;
- replacement of headlights, installation of optics.
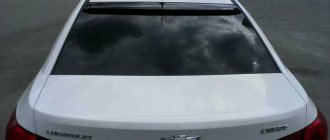
The rear body kit of the VAZ 2114 differs from the front one in the absence of holes for the vehicle registration number.
The reasons for repairing and replacing the rear bumper of a VAZ 2114 are the same as for the front element:
- integrity violation;
- body deformation;
- chips, cracks.
Design Features
The design and method of attaching body kits on Lada 13-15 series cars differs from other models of the “tenth” VAZ family. Design features are as follows:
- Additional metal brackets for fastening to the body are installed inside the plastic elements;
- the brackets are held on by threaded connections and screwed to the bumper with self-tapping screws;
- plastic latches appeared on the central part of the front bumper;
- the edges of the rear body kit are pulled to the body by nuts hidden behind the wheel arches;
- It is easier to remove the front and rear parts together with the amplifier, and then unscrew it if necessary.
Front bumper design
The listed features make it somewhat difficult to dismantle elements from the machine, since the threads located next to the wheels become covered with dirt and rust during operation. Over the years, corrosion also eats away at bare metal brackets that are not protected by any coating.
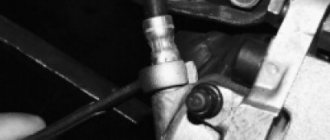
The rusted bracket needs to be replaced
This is interesting: How to tighten and adjust the handbrake on a Lada Kalina
Front bumper
Replacing the front bumper of a VAZ 2114 with your own hands takes a little time. If it is necessary to replace the radiator or grille, the procedure takes longer. Removing the body kit for all VAZ 2113-2115 models is carried out in the same way.
Tool
To replace the body kit you will need the following tools:
- Screwdriver Set;
- open-end wrenches 8 and 10 mm;
- 13 mm ratchet head with crank.
Step-by-step removal
To remove the front bumper of a VAZ 2114, place the car on a viewing hole or a lift. The algorithm for dismantling the body kit is as follows:
- The electrical connections to the license plate and fog lights must be turned off before any work can be done.
- The fastening bolts and nuts are treated against rust, as well as for better loosening, with VD-40 aerosol.
- Unfasten the front wheel fenders.
- Unscrew the fender liner mounting plate with a 10 mm wrench.
- Remove the 3 screws that are attached to the body kit.
- Using a 8 key, remove the 6 screws securing the fender liner to the front fender.
- Pull back the fender liner.
- Remove the radiator and headlight trims.
- Using a 10 mm wrench, unscrew the 2 nuts securing the left side of the bumper.
- Pull it a little to the side so that the studs come out of the body bracket.
Removal and replacement
Now let's talk directly about how to remove and replace the front bumper on a VAZ 2114 car. We advise you to first watch the training video, which will give you a visual idea of the upcoming work.
To work you will need a certain set of tools. It includes:
- A set of screwdrivers or a Phillips screwdriver;
- Open-end or socket wrench 10 by 8 millimeters;
- Head with a 13 mm collar;
- Free time;
- Pit or lift.
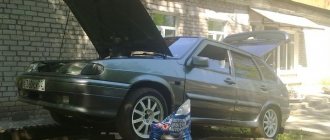
Clearly in need of restoration
On average, the replacement job takes about an hour. But if you are new to this business, then get ready to spend a little more on the procedure. Regardless of the time spent, you can save a lot on car workshop services. In addition, you can never be completely sure that specialists will do a better job than you could do with your own hands.
Amplifier
The sequence of work is now as follows.
- Unscrew the protection on the front wheels. To do this, remove three screws using a screwdriver.
- Move the protection aside and give yourself access to the inside of the bumper.
- Using a 10 mm wrench, unscrew the two mounting nuts located inside.
- Carry out dismantling work on the side of the second wheel in the same way.
- Remove the license plate. Everything is simple here. Unscrew two screws under the number and two more of the same screws in the windows just below the license plate.
- Using a little force with your hands, remove the front end.
- The assembly procedure is performed in reverse order. You can first repair the damaged bumper, or immediately install a new body element. The choice is yours.
Amplifier replacement
In the case of the front bumper, everything is very clear with the fasteners and their dismantling. But before installing a new body element, be sure to check the condition of the amplifier. If it is damaged, we strongly recommend that you replace the front end component.
To replace the amplifier yourself you will need:
- Remove the front bumper following the instructions above.
- Remove the two mounting nuts using a 13mm socket. In the case of the VAZ 2114, there are two such nuts on each side.
- Leave the adjusting washers on the studs.
- Unscrew the brackets located on the sides from the old bumper and install them on the new one. There are a total of three screws on each side.
- Adjust the new amplifier to the required height, set the gaps between the amplifier, fender and headlights. This is done through slits.
- Put the entire structure back together.
Obviously, removing the front bumper is not that difficult. This must be done if this element of the front part of the car is damaged. Operating a car with a damaged bumper can lead to serious consequences.
Rear bumper
In the VAZ 2114, as in other models 2113 and 2115, it is not difficult to remove the rear bumper, but outside help will be useful. The amplifier is removed along with the body kit to check the condition.
Dismantling
The rear bumper on VAZ 2115, 2114 and 2113 is mounted on the rear beam using brackets. To remove the rear bumper of a VAZ 2114, you must perform the following steps:
- Remove the rear wheel fenders.
- Use a metal brush to clean off dirt, grease, and oil, and inject VD-40 aerosol while working.
- Using a 10 mm socket with a wrench, unscrew the 4 bolts on which the bumper should be attached, 2 bolts on each side.
- Unscrew the 3 nuts of the bracket for fastening the reinforcement beam using a 13 mm wrench.
- The beam with the bumper must be dismantled.
- Unscrew the screws and disconnect the beam.
The damaged bumper is ready for repair or replacement.
We install it in place
After the rear body kit has been repaired or replaced, it must be put back in place. All procedures for installing the rear bumper on a VAZ are performed in the reverse order of removal. The bumper is attached carefully so as not to damage it. Structural elements must be installed correctly, without changes in the gaps between parts. When performing work, be careful, follow the recommendations and you will be able to complete the procedure without special skills and knowledge.
Dismantling and installation
We have discussed all the preliminary points, so we can proceed directly to solving the issue of a deformed, damaged rear body element.
- Raise the car using a jack.
- Using a Phillips screwdriver, unscrew all the screws that hold the fender liners. After this you can easily remove them.
- Using a 10 mm wrench, unscrew the mounting bolts located on the wing arch. There are two of them in total and they secure the bumper.
- We proceed in the same way with fasteners on the other side.
- Now take a 13 mm wrench (preferably a socket) and remove the three bracket nuts. It holds the reinforcing beam.
- Next, you can remove the entire bumper along with the beam.
- The bumper on the amplifier is held on with self-tapping screws. If you unscrew them, you can separate the two elements.
- The reinforcing beam can be put aside for now if there are no signs of damage on it. If there are any, think about what would be the best course of action - repair or replace with a new one.
Dismantling works
- Assess the condition of the plastic part. Some cracks can be sewn up, puttied and covered with a new coat of paint. If the damage turns out to be more serious, then there is no point in repairing it. It's easier to simply purchase new plastic components for the rear of your car.
- After repairing or purchasing a new element, begin the installation procedure. To do this, simply follow the instructions in reverse order.
- At the same time, be sure to lubricate all mounting bolts with grease or regular machine oil.
- Carefully tighten the bolts. Make sure that the same gaps are maintained between the bumper and the body.
https://youtube.com/watch?v=6ZjYGLzagy8
The rear of the body should be inspected regularly, even in the case of minor impacts. Scratches will only lead to the need to paint the bumper, but cracks can lead to much more serious problems and financial costs.
If, as a result of a collision or a reversing collision, even a slight blow to the rear body element was caused to some object, we advise you to remove it and inspect the condition of the plastic, the reinforcing beam and the body of your car itself. Small dents may not seem dangerous, but they can become a source for the development of corrosion and cover an impressive part of the body with rust. Is it worth the risk?!
Replacing the rear bumper on a VAZ 2115 with your own hands
The first step is to unscrew the screws securing the rear fender liners to the end of the bumper. On the one hand, this is clearly shown in the picture below:
We perform the same procedure on the other side of the car. Next, you need to unscrew one fastening nut on each side of the rear bumper - from the inside. This is clearly shown in the photo below, and it is more convenient to get to these nuts using an extension and a socket.
This can be seen more clearly below.
On the other side we do the same. After this, you need to unscrew two more mounting bolts in the central part of the rear bumper of the VAZ 2115. The license plate of the car will first need to be removed.
Of course, from the inside it is necessary to keep the nuts from turning using an open-end or spanner wrench. Then you can carefully move the bumper to the side, thereby completely removing it from the car.
The wiring from the license plate lamps must also be disconnected.
Installing a new bumper occurs in the reverse order. If replacement is necessary, then we first buy a new one at a price of 3,000 rubles and carry out the installation.
| In stock: | 5 pieces. |
Characteristics Side mount for VAZ 2115 rear bumper
| Factory number | |
| Manufacturer | |
| Original spare part for | |
| Applicability | 2115 |
| Product code | 105350 |
Accepting orders From 9:00 to 19:00 – Mon Tue Wed Thu Fri From 10:00 to 16:00 – Saturday
Delivery in Moscow
- By courier to the address
- No prepayment
- Payment upon receipt
Delivery across Russia
- Transport services
- C.O.D
- Business Line
- ZhelDor
- Post office