Why do you need to change the faucet?
In Niva cars, as in classic Zhiguli models, the heating intensity of the interior is controlled using a special tap. It is installed on the coolant supply pipe leading to the heater radiator. The stove tap is made in such a way as to open and shut off the flow in just half a turn of the rod. Thanks to this, the faucet can be controlled using a rod attached to a lever on the center console.
In reality, no one uses the heater valve as a regulator; more often it is used to cut off the heater from the Niva engine in the summer. This is where the following problems arise:
- the faucet jams in one position, it is impossible to close it;
- after a warm period, the tap turns sour and does not want to open;
- the part begins to leak at any time of the year.
If you do not shut off the fluid flow in the summer, then the interior of the VAZ-21213 will become very hot. In the Chevrolet Niva, the faucet is missing as a weak link, and the stove is constantly heating up. The design of a regular Niva is not designed for this and the problem needs to be solved somehow.
The situation is the same in the other two cases, and due to a leak, harmful antifreeze vapors will accumulate inside the car. Since the design of the heater valve does not provide for its repair, the part only needs to be replaced.
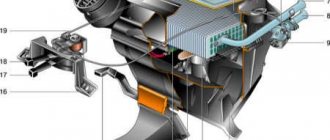
What is a stove tap, its functional features and location
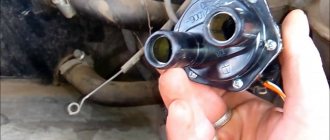
The stove tap is a metal part that resembles a regular water tap. Antifreeze (coolant or coolant) constantly flows through it.
In the Chevrolet Niva, the coolant can flow through 2 cooling circles: winter and summer. The heating tap gives the driver the opportunity to switch to one of them. For example, with the onset of summer, when the tap is fully open, it is almost unbearable to be inside the car due to the heat, so it is closed for this period of time, and with the onset of cold weather, the tap is opened again. Due to active use, the part eventually becomes unusable and leaks coolant.
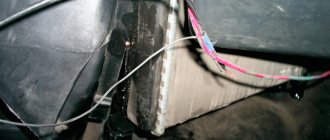
It is very easy to determine whether a part is faulty - lift the cover in the Chevrolet Niva interior. If there are obvious signs of leakage, the unit must be replaced.
In the diagram you can see where the heater tap is located and the circulation of antifreeze in two circles
It is best to replace the metal faucet of the stove with a ceramic one, which will increase its service life several times.
Read more: Automatic transmission oil 01m
What to put in place
Before rushing to the store for a new part, you should first disassemble the assembly and make sure that the faucet is to blame for all the troubles. It often happens that the seal between it and the heater radiator, where the rubber gaskets are located, leaks. They become limp and begin to leak coolant. The cause of jamming may be the rod attached to the element.
Also interesting: What kind of diesel engine can be installed on the Niva?
Faucets made of metal or ceramic are available for sale. In terms of price, they are approximately the same; in terms of reliability, motorists praise ceramic ones more. In addition, you need to purchase 2 new gaskets and high-temperature sealant (usually red).
For reliability, some VAZ-21213 owners prefer to install a regular plumbing faucet with a diameter of 15 mm (DN 15), connecting it to the stove with flexible pipes. The option is reliable, since plumbing fittings are more durable than car parts. But then it’s better to forget about convenient controls, because every time you have to dive under the glove box on the front passenger side to open or close the valve. It is also installed on the engine side, under the hood, resulting in the same “conveniences”.
Preparatory stage
To change the heater tap, you need to perform 2 preliminary operations: partially drain the coolant and remove the glove box.
Antifreeze is drained in the following sequence:
- The operation is carried out on a cooled engine to avoid burns. Under the engine on the left side (in the direction of movement) you need to place a basin or a cut plastic canister.
- Fully open the stove tap (if possible).
- Having prepared a 1 m long hose, unscrew the plug on the cylinder block (key 13), move it to the side and place the hose directed into the basin.
- Hold the hose and smoothly open the expansion tank cap. Be careful as the antifreeze stream will become larger.
- Loosen the clamp of the carburetor heating pipe or the injector throttle valve block and remove it from the fitting.
- When the fluid has drained, screw the plug back into the block and tighten.
The glove box is removed by unscrewing several screws holding it in place. Some of them are located immediately under the glove compartment lid, the other part is in the depths of the box.
Procedure for installing a new part
Due to the fact that the heater radiator is located above the engine, part of the coolant does not flow out of it when it is emptied. And even more so it is full when the old tap is stuck closed. So before disassembling the unit, you need to stock up on a plastic bag without holes: it is convenient to place it in places with limited access.
Also interesting: Chevrolet Niva pinouts. Wire diagrams
Disassembly and removal of the tap are carried out in the following order:
- From the engine compartment, you need to loosen the clamps of the pipes leading into the cabin, and then remove them from the fittings.
- Unscrew the screws holding the sealing gasket (key 8) and remove it.
- From the interior of the Niva, you need to get to the tap and disconnect the rod by unscrewing the clamping bolt (key 7). Place a plastic bag to catch the remaining antifreeze.
- Loosen the bolts securing the faucet to the stove (key 10), unscrew them and pull out the part along with the metal pipe. If the heater radiator is copper, of the old type, then instead of bolts there will be nuts.
- Separate the metal pipe from the old faucet by unscrewing 2 nuts (10 wrench). Remove the traction mount from it.
The rod mount and pipe must be installed on the new element using fresh gaskets coated with sealant. Then the crane is mounted in place and the unit is reassembled.
Taking this opportunity, it wouldn’t hurt to check the tightness of the connection of the second pipe to the radiator and, if necessary, change the gaskets there. It is also recommended to install new clamps on the hoses.
To avoid air locks when filling the system with liquid, you need to fill it slowly until antifreeze flows from the carburetor heating pipe. In this case, the heater valve must be open.
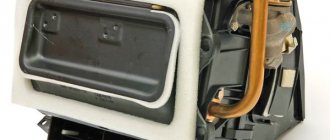
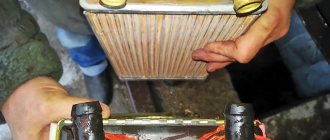
When disassembling the heater, a large number of tree leaves and insect remains were found in the air intake casing and in the honeycombs of the heater radiator grille, which also reduced the efficiency of the heater. Therefore, after cleaning and flushing the heater core, I took measures to prevent the radiator from clogging.
To do this, I bent a wire frame to the size of the air intake inlet, covered it with a nylon mesh with a 1x1 mm cell, and installed it at the bottom of the rubber seal of the air intake inlet. It was perfectly fixed there in the fold, like an accordion, without additional fastening.
All work to modify the heater took me about 4 hours of time and did not cost a penny of additional costs. Unfortunately, during work I didn’t think to take a photo, but from the attached drawing and picture everything should be clear. I'm happy with the result, now the stove heats better.
How to remove and install the stove tap
To replace a part, you must initially prepare the appropriate consumables, as well as tools:
- open-end and socket wrenches;
- pliers;
- flat screwdriver;
- a five-liter tank into which you will need to drain the liquid from the radiator;
- new faucet.
After preparing the necessary tools, you can begin replacing the tap, and the sequence of actions should be as follows:
- We install any container with a volume of about five liters under the radiator and unscrew the cap on it. Wait approximately 10 minutes until all the coolant has drained.
- Next, open the hood of the car and loosen the pipe clamp on the tap pipe.
- We take pliers, carefully bend them and pull out the short cotter pin.
Remove the heating tap clamp using pliers
Unscrew the screws securing the seal using a 7" wrench
Remove the sealing plate from the faucet
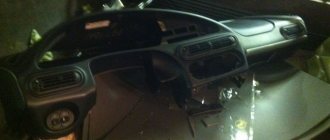
In order to get to the stove tap, unscrew the nuts and remove the glove box
Read more: How to understand short passing
Using an open-end wrench, loosen the nut fastenings to remove the traction cable
Unscrew the heating tap mounting bolts
A pipe is installed on the part, as well as rod fastenings; in this case, new gaskets must be used, which are pre-coated with sealant.
Sealing plates are coated with sealant to reduce the risk of coolant leakage
The tap is put in place as follows:
- We tighten the two nuts on the pipe with the rod using a “10” wrench.
- We put the part in place and tighten the fastening bolts located on the tap.
- We install the rod and tighten the clamping bolt using the key to “7”.
- We tighten the self-tapping screws that hold the sealing gasket with an “8” wrench.
- We insert the pipes into the fittings and tighten the clamps.
The new heating tap is installed in the reverse order
Check whether the second pipe is tightly connected to the radiator; if not, then replace the gaskets there too. In addition, we strongly recommend installing new hose clamps.
When filling the system with liquid, fill it slowly to avoid air pockets. Antifreeze is poured in until it begins to flow out of the pipe. Moreover, the heating tap must be open.
Antifreeze must be poured into the heating system carefully, avoiding the formation of air pockets.
Video: how to install a heater tap on a Chevrolet Niva
Replacing a broken tap with a new one on a Chevrolet Niva is easy. To do this, you need to acquire the usual set of tools that are found in every car, and buy a new faucet. After which even an inexperienced driver will be able to install it on the car.
Many Chevrolet Niv car owners complain about the operation of the stove, blaming the engineers for their “crankiness”. If you are also one of those who are dissatisfied with the functioning of the heating system in your Niva, then we recommend that you surf the Internet. There, on specialized forums, you will find a lot of interesting proposals, based on which you can easily perform some actions yourself, while successfully modifying the stove. However, we understand perfectly well that not everyone likes to surf websites, some do not know how to carry out such searches, so we are ready to participate in solving your problem and share specific recommendations.
Most often, it is enough to perform three modifications, after which you will notice a clear improvement in the operation of the stove. The interior of your favorite car will warm up in a matter of minutes and delight you with a comfortable temperature regime. One of these improvements is the replacement of a heater tap that does not suit you in some respects.
LADA 4×4 URBAN Niva air conditioner and heater with cabin filter.
You will need: flathead and Phillips screwdrivers.
Also interesting: How to open the trunk door on a Chevrolet Niva - Auto repair school
1. Remove the window handle: remove the latch by prying it with a screwdriver between the latch and the washer.
2. Remove the door handle: take out the plug, prying it off with a screwdriver, and then unscrew the three fastening screws.
3. Remove the inner handle trim: pry it off with a screwdriver.
4. Remove the door trim (depending on the configuration and year of manufacture):
- Unclip the 8 plastic clips around the perimeter (two on each side and four on the bottom).
- Unscrew the door trim fastening screws around the perimeter (phillips screwdriver).
There are slight differences in the process of dismantling the door trim of the new model (different door handle and location of fastening screws).
Procedure:
- Remove the door handle: take out the plug, prying it off with a screwdriver, and then unscrew the two fastening screws.
- Remove the inner handle trim: pry it off with a screwdriver.
- (For rear door trim) Remove the window handle: remove the latch by prying it with a screwdriver between the latch and the washer.
- Unscrew the door lock.
- Unscrew the screws securing the casing (4 on top under the plugs and 3 on the bottom).
- Remove the door trim by unclipping the rivets around the perimeter.
Read news about the new Niva
- Air conditioning Niva Chevrolet - design and repair
- Clutch adjustment on Niva 21214 - Online reference book to help the car owner - looking for and fixing faults
- How to eliminate vibration of the VAZ-21213 transfer case
- Fuses and relays (location and purpose of fuses and relays) Niva Chevrolet "
- Mud tires for Niva 4x4: radius 15 and 16 - which one is better to install "
- Liquids used and filling volumes Niva VAZ 21213, 21214, 2131 lada 4×4
- Wheel stud M12x1.25x41 2121, 21213, 2131, 21214, 2123 rear
- Niva Chevrolet transfer case: device, connection diagram and how to use?
Faucet replacement process
Those car owners who have an amazingly developed engineering sense, and whom nature has endowed with design abilities, immediately notice that the weak link in the Chevrolet Niva heating system is the fan. They are also particularly unhappy with the design of the air ducts. It is for this reason that it is initially recommended to modernize these two components. Those who have already walked this path argue that it is completely unreasonable to stop at the achieved result, since, in addition, even the stove faucet is unable to do its job as efficiently as possible. The reason for this is its small internal cross-section. In such a narrow space, the coolant cannot move quickly, and accordingly, it is impossible to count on quickly heating the interior. It’s even worse when the heating becomes ineffective due to the failure of this tap. In this case, it becomes necessary to carry out certain repair work, during which many people have a question about how to replace the heater tap on Niva 21214. We will help you understand this issue.
Read more: Where is the Chevrolet Lacetti thermostat located?
Replacement algorithm
So, if you have a critical situation in which the stove faucet needs to be replaced, you will, of course, first need to decide which faucet is most suitable for you in this case. Experienced craftsmen recommend giving preference to cranes from foreign cars. They benefit from a longer service life as well as high operating efficiency.
By the way, if you want to minimize your financial expenses, and also not subject yourself to labor-intensive actions in the future, it is best to pay attention to cranes from budget Volkswagen or Opel models. So, after you have not only decided, but have already purchased the desired replacement option, you can begin to take immediate action.
Initially, you should disconnect the hose from the pipe. This action is quite difficult, since the hose sits tightly on the pipe. If you move incorrectly, your hand may slip and you may be injured. For this reason, we recommend that you wear gloves to avoid such unfortunate consequences.
Now, using a screwdriver, unscrew the screws that secure the seal, pressing it against the partition. After removing the screws, lightly pick up the seal and remove it completely. It will be more convenient for you to carry out the following steps from inside the car; they consist in the fact that you need to loosen the clamping screw of the faucet using an open-end wrench.
Next, remove the cable from the faucet lever. All that remains is to unscrew the fixing elements holding the radiator. They can be either screws or nuts. Now you can remove the tap; all that remains is to remove the pipe, freeing it from the fixing nuts.
Now the work ahead is to install a new crane. All actions are performed in exactly the same way, only in reverse order. We recommend that you use a little trick when attaching the radiator. Simply tightened nuts fall out almost instantly. To avoid this, take plasticine, place nuts on it and tighten them. When assembling, be careful with the cable. You cannot reduce its length, otherwise it will be difficult to perform some actions with the stove, in particular, adjusting the temperature or speed of the warm air flow.
So, don't be afraid to do some things yourself to improve the performance of certain parts of your vehicle. If you strictly follow our recommendations, you will be able to enjoy the results achieved.