Many motorists are sure that when buying a car, it is worth taking into account the cost of replacing the trim in advance, since when buying a car from a dealer, you can hardly count on expensive materials for the interior of the car.
When buying a car second-hand, the chance of getting a nice car upholstery is even less. At a minimum, the tastes of the owner and the buyer may differ greatly, which again will require replacing the car's interior.
The easiest option would be to take the car to a certified service center. But most services have a limited range of covers and do not work with non-branded covers that were purchased separately by the car owner.
Since the first generation of the Mazda 3 car has been produced since 2003, when buying a used car, you may often need a complete or partial change of the trim.
If you decide to clean the interior yourself, then it is important to follow all the instructions exactly so that the new “interior” of the car does not disappoint you.
Detailed disassembly of the VW Jetta door
Stage 1 – using keys, remove the plastic trim located at the bottom of the end of the door on the door lock side.
The pad itself is attached with mushroom clips. If the box is warm, then disassembling the Volkswagen Jetta door at this stage will take place without any problems. Stage 2 – disassembling the door handle. To remove it, after separating the lining, you need to find a hole in the end, located slightly higher in relation to the door handle. This hole contains a bolt that secures the handle lock cylinder. Using a 10 key, you need to unscrew it to the maximum. Don't worry about it crashing. Even when fully unscrewed, the lock will remain in place without flying out of the hole. With one hand, pull the door handle completely towards you, and with the other, remove the lock cylinder from the outside of the door. It takes a little effort, after which the larva falls into your hands without directly using a screwdriver.
Then use a screwdriver to carefully remove the cable from the handle. To carry out this action correctly, you must close the door. Next, you need to quietly, without jerking, pull the handle along the door with slight pressure. To do this, you will need to strain a little, followed by a soft click. Pull until the handle is released from the door. Under the handle there is a bolt that secures the door mechanism, which is also unscrewed with a star key.
Stage 3 – removing the bolts attaching the casing and disassembling the casing. There are two of them in the upper part - one each on the left and right, in the lower part - six, and on the sides - also six each. The top bolts should be loosened slightly so that they do not fall out by the time the bottom bolts are removed. All bolts differ not only in location, but also in their length. So, loosen the top bolts slightly, unscrew all the others, and then close the door. Unscrew the last two bolts and remove the Volkswagen Jetta door trim. It should be noted that after this the door itself is held “on word of honor” and further disassembly consists only of removing the door itself.
Stage 4 - after the door trim has been completely removed, you can carefully and slowly remove the almost completely disassembled door of the Volkswagen Jetta from the fastenings. The handle has already been removed, and the lock itself has already been removed.
Stage 5 - update the sound insulation and eliminate faults in the contact wires. Repeat the door assembly process in reverse order.
X
Disassembled door Volkswagen Jetta
When is it necessary to disassemble and remove a VW Jetta door?
The doors of the Volkswagen Jetta are vulnerable and are always the first to suffer in accidents or traffic accidents. Even a relatively small dent or scratch on them is quite difficult to remove.
It is much easier to purchase a new body element and simply replace it, so it is very important to know how to properly disassemble and remove the door on a Volkswagen Jetta with your own hands
As a result of simple manipulations with the tool and a careful attitude to work, you can independently disassemble any door of your Volkswagen Jetta car. As a rule, for car owners, the first stage of work is considered the most labor-intensive, since it is associated with work on the front part of the car and here disassembly is considered a more important task. Well, in the future, disassembling the VW Jetta door goes much faster and does not cause any particular difficulties. Thus, the car becomes not burdensome in terms of maintenance for the car owner and confirms its status as a car model, which is, in all respects, almost ideal in terms of price and quality ratio. VW Jetta is the best choice for those who value their time, money and effort, since it is in it that car owners find everything they need for a comfortable and high-status life.
Removing the headliner
It is important to remember that removing the casing is exactly the same important job as replacing parts of the chassis, turbine or crankshaft.
The best option would be if the work is carried out simultaneously by 2 or more people. With the same replacement of the ceiling trim, there is a high probability that the glass of the hatch will fall out and break, and in the worst case scenario, it will also harm you.
In addition, having a sender or iron with this function will be a plus. So, before stretching the fabric onto a car part, you can steam it, thanks to which it will look better and there will definitely be no folds or air bubbles under it.
It would also be useful to have additional or spare pieces of sheathing that can be tested in advance for ductility.
Removing the trim from the ceiling of a car is a primary task, and mechanics recommend changing the trim on the ceiling first, and only then moving on to the doors, trunk and floor. To replace the ceiling trim you will need:
- Using a Phillips screwdriver, unscrew the security handles that are located near the doors on the ceiling;
- If there is a hatch or window in the ceiling, remove it;
- Bend back the edges of the body frame and pull out the old trim.
Before installing the new trim, it is advisable to heat it with a hairdryer and only then cover the body with it. In order to put the trim on, you will need to follow the steps to remove it in reverse order.
Stages of removing the casing
Lada Kalina Station Wagon PORT WINE NOT LIKE EVERYONE Logbook Rear door lock
Before removing the trim from the clips, you need to remove all the bolts, clamps and fasteners that are located in different parts of the door. It is most convenient to do this in a certain order.
From the front door
To remove the door trim on a Lada Priora, you need to get rid of all the fasteners. To do this, follow the following procedure.
Unscrew the button responsible for locking the door and remove it. Unscrew the screw on the inside door handle. Remove the handle by carefully moving it away with a flat-head screwdriver. Find the two screws in the special pocket that secure the power window control module. They can be hidden under a rubber mat. Unscrew both screws and remove the ESP module. Now you need to disconnect the connector with wires from it. Locate the three screws at the bottom of the door that secure the trim to the door. Turn them inside out. This way you got rid of all the screws and fasteners. Now you need to take a flat-head screwdriver and carefully pry off the casing at the bottom. Unsnap all eight clips, which are indicated in the diagram, starting from the bottom of the door
Be careful at this stage: broken fasteners are quite difficult to repair. Carefully remove the trim. If done correctly, you should encounter almost no resistance.
Location of the main screws that prevent the removal of the casing
As a result, your car door will look like this.
after you remove the trim, your door will look like this
To install the trim in place, place it against the door. Make sure the fasteners are in place. Insert and tighten the lock button. Thanks to this, you can pre-fasten the door components. Make sure the handle fits into its hole. Now you can snap all the clips into place and screw the screws back in.
Video: how to properly remove the trim from a Lada Priora car with your own hands
From the back door
The procedure for removing the trim from the rear door of a Lada Priora is not much different from what was given in the instructions for the front door. The exception is when working with window lifters: here they have a slightly different mechanism.
- Unscrew the door lock button and remove it.
- Using the same screwdriver, carefully press out the window lifter handle lock.
- Pull out the handle itself and its lock.
- Remove the screw holding the inner door handle trim.
- Remove the trim using a flathead screwdriver.
- Remove the two screws located in the small pen pocket under the rubber mat, and then remove the pen.
- Starting at the bottom of the door, remove the trim from the clips. The operating principle is the same as for the front door.
The rear door is assembled in the reverse order.
As you can see, the process of dismantling both the front and rear door trim of the Lada Priora is not particularly complicated and does not require many tools. A set of two screwdrivers will be sufficient. To avoid damaging the door, follow the main rule: not only unscrew the screws, but also remove the parts attached by them. All additional elements, such as door handles or window lifters, will greatly interfere with the process of removing the trim. If you strictly follow all the instructions, you can easily disassemble and reassemble the door trim without resorting to the help of specialists from car services.
Removing the trim - general tips
No less important than the technology of car upholstery is the material with which you will cover the interior of the car.
There are 4 most popular car upholstery materials:
- Vinyl upholstery;
- Faux leather;
- Alcantara;
- Carpet.
Most modern cars, including Mazda 3, 2nd and 3rd series cars, have a vinyl wrap. This material is cheap and easy to use. There are even waterproof models. Carpet, on the contrary, is considered an outdated material and is now used only in budget class cars.
For the middle class, faux leather is also considered a good option. It is extremely simple to cover. Most Mazda 3 owners choose this material after purchase. The main disadvantage of artificial leather is its fragility in sunny conditions. If constantly exposed to direct sunlight, artificial leather may turn pale and fade.
The latest 2020 Mazda 3 models have a wood trim option. This option looks extremely prestigious and gives the car additional solidity. Most often, varnished oak or cherry is used for cladding. Often they are also impregnated with various substances that increase the amount of pigment in the wood. Then it looks more prominent and graceful.
How to remove a car's headliner with your own hands
How to install a Door Closer on a wooden or metal door or gate with your own hands Step-by-step instructions Video
The trim inside the car's interior plays not only a decorative role, but also a protective one. Various fastenings - lampshades, handles, visors, hidden under the finishing, will last much longer; in addition, the material that is selected for finishing has soundproofing properties.
Removing trim
It is necessary to remove the interior trim of a car in several cases. Moreover, as a rule, there is no need to remove all the material. Common reasons for dismantling are:
- damage to the skin - scratches, stains, abrasions and more serious defects. It is necessary to replace the material not only for aesthetic purposes, but also because the upholstery serves as protection against dust and dirt;
- loosening of fastenings - as a rule, is expressed in extraneous unusual sounds. The reason may be a loose antenna, wiring, even handles;
- the need to increase the noise and heat insulation qualities of the cabin. In passenger cars, VAZ, for example, a layer of foam rubber under the skin acts as a sound insulator. If desired or necessary, you can replace the material with a more effective option and install it again;
- changing the headliner - in such cases, the entire interior trim is usually replaced, although there are exceptions. You can dismantle the old upholstery yourself.
There are no particular difficulties in such repairs, so it is quite possible to disassemble the car ceiling and reassemble it yourself. Moreover, there is no need to dismantle the windshield, as many car owners fear.
Dismantling elements
How to remove the headliner in a car is described in some detail in the instructions. If the latter is missing, then you can use the general recommendations - there are no special differences in the interior trim.
Removing visors and front pillars
The first step is to remove the sun visors. They are usually fastened with 2-3 self-tapping screws. The latter need to be unscrewed with a flat screwdriver and the parts removed.
The front pads are fixed with 3 clips, so it’s even easier to do it yourself: the pads are picked up with a screwdriver and pulled back until the clips snap off. The photo shows the dismantling of the linings.
In the VAZ interior there are plugs installed above the driver's door. Both parts are removed with a screwdriver.
Removing Lighting Fixtures and Handles
The rearview mirror is removed - simply unscrewed.
Then you need to remove the lampshade. To do this, the part is pulled down until it comes out of the grooves. The wires are disconnected and insulated if major repairs to the car ceiling are to be done. The light above the rear seat is removed in the same way.
In some models, the lampshade is mounted with a sealing edging. The latter is secured with screws, and before dismantling the lamp they need to be unscrewed.
You can remove the handle in the “grip” position, that is, by pulling it strongly towards you. Use a flathead screwdriver to turn the fastener until the latch comes out. Then the handle is simply removed.
Removing the middle and rear pads
This will take a little more time.
First you need to dismantle the seat belts: to do this, pry up the plastic plugs with a screwdriver and remove them. Then, using a wrench, unscrew the fastening bolts and remove the belt. In a VAZ car, you will need a 17 key for this.
If there are fasteners on the racks, they are unscrewed. In some cases, in order to remove the ceiling trim, there is no need to completely dismantle the racks; you just need to snap off the upper clamps. Otherwise, pry off the linings with a screwdriver and remove them.
Removing the ceiling
Above the rear seats, the headliner is secured with holders. To remove them, you need to pry the latches with a screwdriver and then remove the holders.
The rubber seals on the doors are not fixed. It is enough to carefully pull them off the frame.
Since the headliner is quite rigid, to remove it, you need to lower both front seats and remove the product through the front door. Removing the windshield is completely optional.
The video explains in detail how to remove the trim on a car.
Replacing rear door glass
Replacing the rear door fixed glass
Install the sliding window to the bottom position
Remove the rear door trim as described above
Removing the inner seal
Removing the outer seal
Unscrew the lower mounting bolt
Unscrew the screw of the upper fastening of the sliding window guide
Removing the guide
Slide the fixed glass forward and remove it from the door
Install the rear door fixed glass in the reverse order.
Replacing the sliding glass of the rear door
Remove the fixed glass of the rear door, as described above
Press the latch
Lift the glass up, removing it from the frames
We remove the glass from the door, lifting it up and out
Install all parts in reverse order
Door block design
Operating and setting instructions for the Starline A93 alarm system
The interior door can be made in two versions: with and without a door frame. The second case involves installing the canvas into an old or simply ready-made frame, the first involves installing the entire block in the doorway.
The first option is preferable for many reasons.
- Deformation - the old box, even if the appearance was preserved, was deformed to some extent. The “native” canvas underwent changes along with her, which means that it somehow compensated. The new one does not contain suitable changes, and therefore it simply will not fit into the old door frame.
- Dimensions - opening parameters are rarely standard, especially after renovation. When installing a door, even a specially made one, difficulties arise. Fitting the box to the opening, and then to the canvas, means prolonging the installation work at least three times, and without guaranteeing the result.
- Load – the door frame, leaf, hinges and lock in the block are designed for certain loads. If the structure was manufactured as a single module, then the load distribution has already been calculated by the manufacturer and implemented. Otherwise, the owner will have to do it.
Such high demands are placed mainly on swing systems. Sliding structures are somewhat easier to install with your own hands, since, firstly, they are most often installed on the opening, and secondly, they are much more standardized.
Popular questions
Replacing rear springs
Posted: 12/04/2014 We have already changed the rear springs on an old car more than once, and now another car faces a similar fate. In fact, the process of replacing a spring is not technically that complicated, you only need to have...
More details
How to remove the clutch pedal
Posted: 07/21/2015 I drive a Ford Focus. After the car began to jerk when changing gears and the clutch pedal began to vibrate, began to stick and fall through, I decided to remove it and see what was the matter. Before…
More details
Replace cylinder head gasket
Posted: 06/17/2014 The head gasket requires replacement when antifreeze gets into the oil or combustion chamber. This causes the engine to overheat, which can lead to costly engine repairs. To replace the cylinder head gasket...
More details
Remove the steering wheel
Posted: 07/19/2015 Good afternoon. Many guys want to change the design of their car. Or if something goes wrong, a spare part gets damaged and has to be replaced. Don't panic and go to a car service center. The problem can be...
More details
Steering rack repair
Posted: 10/30/2015 I changed the rack myself. Toyota vista 30 body. To remove the rack, you need to move the exhaust system to the side. Unscrew the 2 engine mountings, jacking up the engine a little. Unscrew 2 rack fasteners from each...
More details
Remove left headlight
Posted: 07/19/2015Removing a headlight is not as difficult as it seems. Everything, of course, depends on the make of the car, but I will try to give universal advice. First, look to see if your headlights are fixed by the bumper. If yes - …
More details
Removing the driver's door trim
Posted: 06/25/2016 Can anyone tell me how to remove the door trim? If you have it with a picture, I will be very grateful. PS I want to understand that it is held on only by self-tapping screws or caps, or maybe something else...
More details
Replace the crankshaft oil seal
Posted: 06/18/2014 Replacing the crankshaft oil seal is one of the most common and simplest procedures when repairing an engine. The process itself is demonstrated very well in the last video, but if you are not a complete beginner, then...
More details
Replacing the timing belt
Posted: 03/31/2015 I have been the owner of Fiat Doblo for almost 3 years. One day, when I was visiting my mother in the village, I came across a very bad section of the road and didn’t notice one pothole, it hit me like that. After that, under the hood is something...
More details
Valve cover gasket installation
Posted: 11/27/2014When starting the engine of my Sobol, I heard a strong bang. I opened the hood and saw that there were tattered gaskets sticking out under the valve cover. Apparently gases had accumulated and squeezed out through the gasket. Caught...
More details
Advantages and disadvantages of updating
The main advantage of replacing door trim is a significant change in the interior, since European trim makes the interior more attractive. At the same time, owners of an expensive audio system will have the opportunity to install larger speakers in the opening for audio preparation. In addition, the fabric covering is reupholstered separately; the owner does not have to completely disassemble the door.
The main disadvantage of installing modern trim on a VAZ 2110 is the need to modernize the car's interior, since the new panels do not provide openings in the doors for ventilation. High-quality European cladding is not cheap, and more affordable panels are made too sloppily in the edge parts, where there are almost always noticeable flaws made during production.
If you want to replace worn upholstery with a new one, you must remember that although this process is simple, it takes a lot of time. The work is small and voluminous, since you will have to upholster each of the doors separately. You should decide to install Euro upholstery only if you are not bothered by the cost of the kit and the amount of time that needs to be spent on its installation.
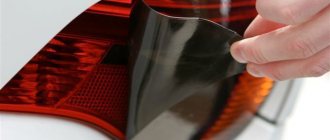
Removing trim from car door
Each car has its own design features of elements such as the door and its trim. But, regardless of this invisible moment, there is something in common between different car models. Let's consider these points.
- Before you begin the task of removing the door trim, you should completely turn off the car. In order to turn off the power supply to the machine, it is very easy to disconnect the negative terminal of the battery.
- After the car is left without electrical power, you need to use a Phillips screwdriver to unscrew the screws that secure the handle that has installed power windows.
- In case the trim
is removed from the front door, you must first remove the decorative trim of the mirror in which the background is displayed from the plastic clips. - If the car door is equipped with a glove compartment, it should also be removed by prying the plastic clips with a clip and unscrewing the bolts. To do this, the car enthusiast has the aforementioned Phillips screwdriver in his arsenal.
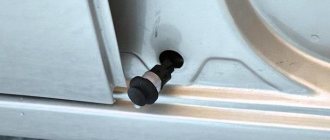
- The trim is secured to the car door with bolts that are located below the specified structural part. Again, they need to be confiscated using a screwdriver; otherwise, it will not be possible to remove the necessary component.
- The lock that blocks the door must also be removed because it represents an obstacle to the successful completion of the planned operation.
- After all of these parts have successfully left their permanent installation places, you need to arm yourself with a plastic clip-on clip, which is carefully placed between the trim and the car door. The process of separating plastic fasteners, or, as they are also called, clips, is carried out in a similar way.
The locations of the listed fasteners, as well as their number, are primarily indicated in the operating and repair instructions that any machine has. The thing is that these indicators are individual for each model.
The trim that adorns the car door and makes it quite functional should definitely not be removed at low ambient temperatures. This is due to the specific nature of plastic, which allows its properties to change slightly at different temperatures. So, if the air is not heated enough, the casing
A car door may burst if it is strongly influenced by external factors.
Sheathing
, put on the rear door, is removed similarly.
The photo shows parts of the car door trim.
Certain nuances that are associated with work.
It should be noted that in most car models, along with the casing, you will also need to remove the heat insulator
In any case, all these actions must be done as carefully as possible so as not to damage either the door or the trim.
Moreover, you need to pay great attention to small details that can easily be lost. They may fall under the seat or, worse, on the ground, where they are at risk of damage.
In the latter option, there will be a need to purchase new ones, and this is sometimes very difficult to do due to the fact that they are not cheap or do not appear on the market often.
You need to know that removing the trim is quite easy, but putting it back in place is sometimes very difficult. As you already know, the trim is attached to the doors using specialized PVC clips. In the process of dismantling the mentioned finishing element, you should be sure to understand the location of these clips. Only in this case the casing
will be fixed quickly and without much difficulty.
Eventually
Remove the specified vehicle door
It is recommended in a special room to avoid any unpleasant circumstances with the loss or damage of parts, as well as other problems that are associated with instability of the atmosphere.
This is not considered a rule, but by doing this, you can protect your own nervous system from unnecessary and completely unnecessary experiences. In addition, this way there is no fear that it will rain unexpectedly, stopping the process.
As for winter, in this case, which was mentioned above, must be observed.
Finally, you can watch a video that will give you answers to questions that might arise while reading the real text.
Replacing the rear door window regulator
The rear door windows are installed, depending on the configuration, with manual control or with electric drive.
The principle of replacing window regulators is no different. Only if electric rear windows are installed, do you need to disconnect the connectors from the electric drives from the gear motor and the control key.
Remove the rear door trim as described above
We disconnect the glass from the window regulator and fix it in the upper position.
Unscrew the three bolts securing the window regulator to the door panel
We take it out through the technological hole in the door panel
We install the window regulator and the removed parts in the reverse order.
Replacing the rear door lock
Remove the rear door trim as described above
We remove the piston for securing the shield
And remove the shield
Press the lock of the wiring harness of the door lock electric drive
And disconnect the block from the electrical locking drive connector
Unscrew the three screws securing the lock to the door
Remove the outer handle (will be described below)
We press the clamp of the bracket securing the outer handle to the door and use a screwdriver to push the bracket into the door cavity
We remove the door lock assembly with the base of the outer handle by removing it through the hole in the door panel
We remove the cable from the groove
Disconnect the cable from the base of the outside handle of the door lock drive
Install in reverse order
How to remove interior trim yourself
#1
The interior of the car suffers more than other parts of it. There people can eat, smoke or bring dirt from the street. Therefore, you need to know how to remove the interior trim in order to clean or replace it.
#2
There are two ways to replace the casing: use the nearest car service center or do it yourself. The second option is much more economical, and therefore it is preferable. First of all, for this you need to know, for example, how to remove the seat or door trim.
#3
This procedure is much more complicated than it might seem at first glance. You need enough time, special materials and tools. It must be remembered that the instructions on how to remove the trim on a Priora differ from the corresponding instructions for a Mazda or Renault. Therefore, before starting work, you need to consult with a specialist or find the necessary recommendations on the Internet.
#4
Perhaps it is planned to install any additional devices or devices, for example, sound insulation. The latter is usually installed on the car doors. Most often this may be needed for domestically produced cars. You need to search on special websites or forums for how to remove the Logan door trim in order to install soundproofing devices correctly. And, of course, when preparing for such a procedure, you should purchase a special professional set of tools. These tools are typically designed to remove trim from all makes and models of cars and can be found at any auto parts store. Here you also need a set of repair materials, such as plastic, leather or fabric.
#5
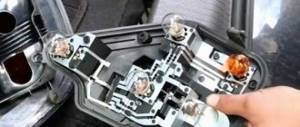
Using the specified kits and manufacturers' instructions, you can change or repair the interior trim of any car or learn how to remove the Mazda door trim to install seals or sound insulators. For example, for a Mazda, you need to lower the side window, move the grille away from the speakers in the direction of the door hinges and remove it without effort. Then you need to remove the plastic corner, prying it up a little, pull out the plugs and unscrew the screws that secured the casing. Next, the clips in the lower part of the trim are removed, the reflector of the dimensions of the open door is removed, and the control unit for mirrors and power windows is dismantled. Now you can completely remove the trim by slightly lifting its lower edge.
#6
To summarize, it should be noted that such procedures necessarily require a certain skill and practice, but they can be mastered easily and significantly save money on sheathing repairs.
Removing the floor covering
In most service workshops, fabrics of lower quality or with difficult-to-notice defects are used for floor coverings. This is done because a small number of people pay attention to the floor of their car, and many owners even use rubber mats, especially in spring and winter.
In order to remove the trim on the floor, you will need to unscrew more than 12 bolts and 4 brackets, which are located around the entire perimeter of the car. After this, having folded the fabric, it is enough to simply pull it out of the staples that hold it.
In the latest generation Mazda 3, the brackets holding the floor trim are also located near the gearbox and in the middle of the rear seat.
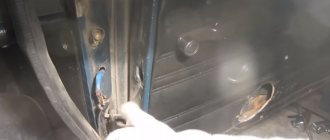
Removing the casing
After all the retaining elements are separated, you need to carefully insert a flat-head screwdriver between the door and the trim and carefully remove the plastic clips. Any instructions for the car should say in what places they are located
As a rule, they are located behind and above. At the bottom, screws act as fastenings. It should be remembered that you should not remove the casing in cold weather, since if you press hard and apply excessive force, the plastic may crack. The trim on the rear doors must be removed in the same way as on the front ones. Press out the element using a screwdriver and remove all the clips. Next, you can begin installing the replacement. In order to put everything back together, you need to repeat the recommendations in the opposite order. If any clip is broken, replace it with a new one.
These were just general instructions on how to remove the door trim. Since this procedure can be different for different brands of cars. If you can't do it yourself, it's best to turn to professionals.
Removing the door trim
Car enthusiasts advise that before deciding to replace the trim of the entire car, you first need to familiarize yourself with the question in as much detail as possible: “How to remove the door trim on a Mazda 3?” This is due to the fact that due to the relief of the door and the presence of a large number of devices on it, replacing the trim on the car door is the most difficult step in replacing the trim of the entire car.
- First of all, you need to securely secure the glass in the frame with masking tape. In the future, the part holding the glass will be removed. If not secured, it can break or even harm someone;
- It needs to be removed into the plugs. On the latest generation Mazda 3 they are chrome-plated. Under them there are 4 bolts that need to be unscrewed;
- It is extremely easy to remove the trim by pulling it towards the steering wheel.
- After dismantling the fabric, you can immediately install a new one, or place pieces of foam rubber in the door voids, which will significantly improve the sound insulation of the car.
Main reasons
Why might a driver need to remove the trim? There are several reasons, and the most important of them is damage to the casing.
If you are careless, you can easily scratch any parts or make a cut on the leatherette. All these defects will spoil the overall impression of the interior, and will also allow water and dirt to enter the door structure
The upholstery can be damaged during careless landing, for example, with sharp heels, when loading large items into the cabin, or careless parking with the doors open. Also, door disassembly is necessary if new speakers are installed in the door.
Standard acoustics do not always suit drivers, so they strive to improve the car in this regard, as well as supplement the audio system with better speakers.
Sometimes it is necessary to get to the power windows or door opener. This cannot be done unless the casing is first removed. To avoid breaking anything or damaging entire parts, it is recommended that you read the instructions before starting the process.
How to disassemble an interior door block
The door frame is installed taking into account the wall material. Accordingly, do-it-yourself dismantling will also require different tools and techniques.
- The door will be removed from its hinges - to do this, place the end of the pry bar under the door, which is as open as possible, and gradually lift it until the door comes out of the hinges. It is recommended to move the sash a short distance to the right and left.
- In order to disassemble the platbands, the edge of an ax is driven between the platband and the vertical post of the frame. Force is applied in the direction away from the box until a gap is formed. The photo shows the moment of separation of the casing.
- The same procedure is repeated at the attachment points, then the casing is removed. Usually it is not possible to disassemble the platband without damage, since thin strips are used for its manufacture.
- If nails can be found on the box - and under multi-layer painting this is not always possible, then they should be removed: a beam is cut out around the head to free up space, and then the nail is removed using pliers or a nail puller. If we are talking about a metal door frame, then it is necessary to cut off the pins.
- The vertical stand is sawn at a distance of 60–80 cm from the floor. If the attachment point is visually determined, then you should move 20 cm away from it. Then the tip of an ax or a nail puller is placed between the slope and the stand below the cut point, and the beam is pressed out with force. The top of the rack is also removed. The photo shows the separation of the lower part of the rack.
- The horizontal crossbar can be removed without sawing, by pressing down. You need to disassemble the second vertical stand in the same way as the first.
The metal box is removed in a similar way, but the effort required is much greater, since the racks in it are welded with staples. In this case, there is much more damage to walls and slopes.
How to assemble an interior door
The most difficult part of the assembly process is installing the door frame yourself. If the door frame is included in the kit in assembled form, then you can immediately begin installation after appropriate preparation of the opening. If the box is available as a set of stands, it must first be assembled.
It is recommended to install the door block after plastering and painting the walls, but before wallpapering them.
- After assembly and before installation, it is necessary to try on the door and frame - a gap of 3-4 mm must be maintained between the components of the frame and the sash. The length of the racks, accordingly, should be equal to the length of the leaf minus 10 mm - the sash does not touch the floor.
- The hinges cut into the rack. The fittings are located on a certain recess in the wooden beam in such a way that the required gap is maintained. The photo shows the placement of the loop in the rack.
- Before assembling the door, hinges and a lock are also installed on the door leaf.
- The box is mounted in the opening, strictly centered, and with the help of wedges that are driven into the gap between the posts and the slope, the position is adjusted until the posts are in an exactly vertical position and the horizontal crossbar is strictly parallel to the floor.
- The canvas is hung on hinges and adjustable. If the gap between the sash and the posts is insufficient, it is recommended to remove the leaf and adjust the position of the hinge.
- The gaps between the slopes and the frame are filled with foam. After drying, the foam is cut off and the trim is installed.
The process of assembling and dismantling an interior door is discussed in detail in the video.
How to install the trim yourself
First of all, it should be noted that there are two types of door linings: internal and external. Typically, these products differ in size and installation method. The differences in the installation of the two types of overlays will become clear during the work process, but to do this it is necessary to understand the general technology of finishing the door using these products.
The first step is to remove the fittings and lock from the door leaf. Then an adhesive composition is applied to the inner lining, which serves as an additional fastening and will give the structure reliability. Using glue is a kind of insurance. After this, you need to attach the trim to the door leaf, align it evenly and secure it with four clamps. Soft cloths should be placed under the fastenings to protect the pad. Now you need to drill holes in the door leaf from the outside, located vertically. There should be four rows of five holes in each.
Then you need to screw the inner trim through the prepared holes using wood screws. In this case, it is important to accurately calculate the length of the fasteners, because otherwise they can pierce and damage the lining on the front side. Now you need to remove the clamps and transfer them to the outer part of the door leaf in accordance with the holes and slots.
The installation of an external door trim is almost identical to the installation of an internal one. The difference lies in the location of the fastening screws. They must be screwed into the door leaf strictly along the perimeter of the lining in those places where the steel sheet extends beyond the frame of the leaf. Self-tapping screws should be screwed in increments of 20-25 cm. The specific screwing interval is selected depending on the weight of the lining. To close the screw heads after fastening is completed, sealing gaskets are used to prevent air from penetrating between the door leaf and the frame.
In conclusion, it can be noted that installing overlays on the front door for a private house is not particularly difficult. In the process of performing the work, it is quite possible to do it yourself, without involving a specialist in the installation. It is enough to prepare in advance the required tools and materials, understand the principle and sequence of installing door trims.