Piston dimensions
Defects of engine parts
When replacing parts of the connecting rod and piston group, it is necessary to select pistons to cylinders by diameter and weight, as well as piston pins to pistons by diameter and connecting rods by weight.
The following data is stamped on the piston bottom:
1
- piston class by pin hole (1, 2, 3)
2
- piston class by diameter (A, B, C, D, E)
3
- arrow showing the direction of installation of the piston
4
- weight group (normal - “G” , increased by 5 g - “+”, decreased by 5 g - “-“)
5
- repair size (diameter increased by 0.4 mm - D, by 0.8 - E)
The cylinder class (A, B, C, D, E) is stamped on the bottom plane of the block (the mating plane under the oil sump).
For the convenience of selecting pistons to cylinders by diameter, both are divided into five classes: A, B, C, D, E (every 0.1 mm). Spare parts include pistons of nominal sizes of three classes A, C, E and two repair sizes. The first repair size is increased by 0.4 mm, the second - by 0.8 mm.
Based on weight, pistons are divided into three groups: normal, increased by 5 g and decreased by 5 g. Pistons of the same group must be installed on the engine.
For repair size pistons, spare parts include repair size rings increased by 0.4 and 0.8 mm. The number “40” is stamped on the rings of the first repair size, and “80” on the second.
Nominal sizes of cylinder and pistons diameters, mm
When selecting pistons for cylinders, determine the gap between them as the difference between the measured diameters of the piston and cylinder.
The nominal gap is set to 0.025-0.045 mm, the maximum permissible is 0.15 mm. If the gap does not exceed 0.15 mm, you can select pistons from subsequent classes so that the gap is as close as possible to the nominal one. If the gap exceeds 0.15 mm, bore the cylinders to the next repair size and install pistons of the corresponding repair size. Both cylinders are bored to the repair size, even if the gap between the piston and the cylinder exceeds the maximum permissible in only one cylinder.
Piston pins are divided by diameter into three classes (1, 2, 3) every 0.004 mm. The class of the finger is marked on its end with paint. The piston pin class is stamped on the piston bottom, and the connecting rod pin class is stamped on the connecting rod cap.
Size classes of piston pins and pistons
Selection of crankshaft liners
Nominal diameter of crankshaft journals, mm:
main 50.799-50.819 connecting rod 47.830-47.850
The crankshaft journals can be ground to one of four repair sizes with a reduction in the nominal diameter of the journals, mm:
first by 0.25 third by 0.75 second by 0.5 fourth by 1.00
Nominal thickness of liners, mm:
main 1.824-1.831 connecting rod 1.723-1.730
The inserts are also supplied as spare parts in four repair sizes, increased thickness, mm:
Engine OKA-11113 (unit) buy inexpensively with delivery
Description
Dear Clients! You now have the opportunity to: 1. Grind the inlet and outlet +3,500 RUR. 2. Enlarged seats and guides (the valves are larger and lighter) +6,500 rub. Please make your selection when placing your order.
Engine 11113 Oka carburetor without attachments, third configuration. Used for installation on front-wheel drive vehicles manufactured by AvtoVAZ OJSC.
Installed on VAZ 11113 OKA car
Engine manufactured in Togliatti with all warranties. All primary documents are available!
For components, assemblies, engines and gearboxes, the warranty is 3 months due to the inability to control the operating conditions of the listed products, the replacement interval and the quality of fuels and lubricants.
Repair of VAZ 1111 (Oka) Replacement of engine oil and oil filter
- Repair manuals
- Repair manual for VAZ 1111 (Oka) 1988-2003.
- Changing the engine oil and oil filter
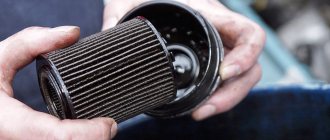
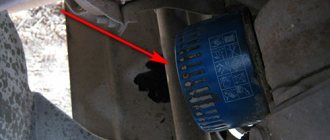
| Location of the oil filter on the engine |
The filling volume of the engine crankcase is 2.5 liters.
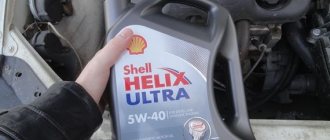
The list of oils recommended by the manufacturer is given in the Appendix “Fuels, lubricants and operating fluids”.
Drain the oil after driving while the engine is still warm. If the engine is cold, start and warm it up to a temperature of approximately 80 °C according to the coolant temperature gauge. It takes at least 15 minutes for the oil to drain completely.
It is recommended to fill in the same brand of oil as was in the engine. If you nevertheless decide to change the brand of oil, then flush the engine lubrication system with flushing oil or oil of the brand that will be poured into the engine. To do this, after draining the old oil, fill in new oil to the lower mark of the oil level indicator. Start the engine and let it idle for 10 minutes. Drain the oil and only then replace the oil filter. Now you can fill in new oil to the required level (top mark on the dipstick).
| Special wrench for removing the oil filter |
EXECUTION ORDER Download information from the page↓ Comments ↓1. Description of the car 1.0 Description of the car 1.1 Appearance 1.2 Engine compartment 1.3 General data 1.4 Technical characteristics 1.5 Passport data 1.6 Doors 1.7 Hood lock 1.8 Luggage compartment 1.9 Increasing the volume of the luggage compartment 2. Safety requirements 2.0 Safety requirements 2.1 Safety requirements 2.2 Preparing the car for operation 2.3 What you need to have in the car 2.4 Operating the car during the warranty period 2.5 Running in the car 2.6 Preparing the car for departure 2.7 Checking the wheels 2.8 Checking the coolant level 2.9 Checking the oil level in the engine crankcase 3. Maintenance 3.0 Maintenance 3.1 Checking the tightness of the cooling system 3.2 Checking the tightness of the cooling system 3.3 Checking the tightness of the power system 3.4 Checking the tightness of the brake system 3.5 Replacing the coolant 3.6 Checking the functionality of the thermostat 3.7 Replacing the engine oil and oil filter 3.8 Replacing the air filter element 3.9 Removing and installing the air filter 4. Vehicle storage 4.0 Vehicle storage 4.1 Maintenance during storage 4.2 Removal from storage 5. Chassis 5.0 Chassis 5.1. Front suspension 5.2. Rear suspension 6. Steering 6.0 Steering 6.1 Removing and installing the steering wheel 6.2 Replacing the intermediate steering shaft 6.3 Replacing the steering shaft bearings 6.4 Replacing the tie rod end and protective boot of the ball joint 6.5 Removing and installing the steering mechanism 6.6 Replacing the steering rod 7. Brake system 7.0 Brake system 7.1. Front brake mechanism 7.2. Rear brake mechanism 7.3. Brake system drive 7.4. Parking brake 8. Electrical equipment 8.0 Electrical equipment 8.1. Fuse and relay block 8.2. Generator 8.3. Ignition system 8.4. Lighting and alarm 8.5. Instrument cluster 8.6. Switches and switches 8.7. Windshield wipers and washers 8.8 Replacing the electric radiator fan motor of the cooling system 9. Body 9.0 Body 9.1 Removing and installing the front buffer 9.2 Removing and installing the rear buffer 9.3 Replacing the front fender 9.4 Removing and installing the radiator trim 9.5. Hood 9.6. Side door 9.7. Rear door 9.8. Rear view mirrors 9.9. Seats 9.11. Heater 10. Engine and its systems 10.0 Engine and its systems 10.1 Installing the piston of the first cylinder to the TDC position of the compression stroke 10.2 Adjusting the clearances in the valve drive 10.3. Camshaft drive belt 10.4. Replacement of engine seal parts 10.5. Cylinder head 10.6 Removing and installing the power unit 10.7. Engine repair 10.8. Lubrication system 10.9. Cooling system 10.10. Power system 10.11. Exhaust system 11. Transmission 11.0 Transmission 11.1. Gearbox 11.2. Clutch 11.3. Front wheel drives 12. Applications 12.0 Applications 12.1 Application: Tightening torques for threaded connections 12.2 Application: Fuels and lubricants and operating fluids 12.3 Application: Basic data for adjustments and control 12.4 Application: Filling volumes 12.5 Application: Lamps used in the car 12.6 Application: Bearing arrangement diagram rolling 12.7 Appendix: Oil seals 12.8 Appendix: Service book 12.9 Appendix: Vehicle electrical diagram automend.ru |
Payment methods for goods:
- It is possible to send cargo with a thirty percent (30%) advance payment with blocking and removal of blocking upon full payment.
- It is possible to send cargo without prepayment , provided that the buyer pays for the services of the transport company in both directions at the branch of the transport company.
- Sending by PEC by cash on delivery with the condition of prepayment of delivery in both directions (this way we are safe from fraudsters) - in PEC before payment you can inspect the goods received, PEC charges a commission for this service in the amount of: 1.5% for cash and 3% for non-cash calculation
You can make any changes (tuning/additions) to the standard engine configuration BUT the warranty will be 3000 km or 3 months of operation
You can also make any set of attachments (standard and non-standard) if you have some of the equipment - write what to add/exclude from the set, the manager will write a price change.
Working volume 0.75 l
Cylinder diameter 82 mm
Stroke 71 mm
Number of valves 4
Carburetor power system
What does the engine package include: Block, crankshaft, pistons, rings, connecting rods, bearings, half rings, oil seals, cylinder head assembly with camshaft, crankshaft pulley, flywheel, oil pump with oil receiver, iron oil pan (aluminum can be installed - check price with manager), valve cover, gas distribution mechanism with a closed cover, spark plugs. Sensors: oil, temperature, phase sensor (if injector), knock sensor, antifreeze drain plug, dipstick, break-in oil (10v40 semi-synthetic Lukoil, recommended after break-in 1000-1500 km, oil change).
Packaging: everything is mounted on a wooden stable pallet, screwed on, the engine itself is made of cardboard on all sides and wrapped with stretch film. The transport company is packed in a wooden box. At the request of the client, we can dismantle any component of the engine or replace it with a non-standard sports or tuned part.
Sending video:
Dispatch of six engines from 01/10/2020 to TC “PEK”
Tuning the Oka engine
Since the power of the power unit is small, tuning as such does not make much sense: you can achieve an increase of up to 10%, especially with flashing the ECU of the injection version of the engine, but against the general background it will not be noticeable. The technical characteristics of Oka engines do not allow them to extract much power.
As a “custom project”, the owners of these cars can install an injector from a VAZ-21083i engine with improved characteristics, but this is a rather labor-intensive and financially expensive operation. In terms of cost, it is approximately equivalent to installing the Chinese TJ376QE mentioned above. To continue tuning and extract more power, a compressor can be installed on an injection engine and other modifications can be made as desired.
Specifications
| OPTIONS | MEANING |
| Model | VAZ – 1111 |
| Type | Four-stroke, gasoline, carburetor |
| Number and arrangement of cylinders | Two cylinders arranged in a row |
| Bore and stroke | Diameter is 76 mm, piston stroke is 71 mm |
| Engine capacity, l | 0.649 |
| Compression ratio | 9.9 |
| Rated engine power at 5600 rpm | 21.5 kW, or 29.3 horsepower |
| Maximum power at 3200 rpm | 44 kW, or 4.5 horsepower |
| Octane number | From 92 to 95 |
| Ignition system | Contactless |
| Fuel supply system | Carburetor |
| Spark plug | A17DVRM, FE65CPR |
| Weight, kg | 63.5 |
| Consumption in the urban cycle, l | 6 |
| Combined cycle consumption, l | 3.9 |
The engine is installed on VAZ - 1111, VAZ - 1113
Description
The presented model is a type of four-stroke carburetor-based engine.
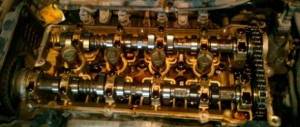
Its distinctive feature is that the camshaft is located at the top of the Oka engine. Not all modern and old power units are equipped with such a feature.
It is worth noting that all cylinders are in-line, which allows for very good technical potential. The designers of the Oka car took one half of the well-known VAZ 21083 and made it the basis. It follows from this that some parts and mechanisms are no different from their older brother.
As for the cooling system, there is a closed-type liquid circulation. Therefore, the Oka engine will be able to operate in any weather conditions, which is very good. He is not afraid of severe frosts and heat. Thanks to the combined lubrication system, all parts and mechanisms will work virtually without failure.
Replacement with flushing
The replacement sequence is described above if the same oil is poured into the engine as was previously used.
But some owners, for various reasons, have to switch to another brand of lubricant. And in this case, it is recommended to carry out the replacement with pre-washing. This operation is simply a two-stage lubricant change.
Its essence is this: after draining the lubricant, fill the engine with flushing liquid (but preferably with oil that will be filled) and change the filter. Next, we start the power unit, give it time to run (15-20 minutes), drain everything and pour new lubricant into the motor, and also change the filter element.
Therefore, if you plan a shift with flushing, you should stock up on double the amount of oil (5 l) and two filters. In this case, you can take the cheapest one filter, since it will only work for 20 minutes.
The Oka car is a unique mini-car project of its kind, which was supposed to become an accessible car for young people and people with physical disabilities. The Oka engine received mass production from the VAZ-2108, by modifying the latter, although there were other engine options.
Design
In fact, this is a standard engine from the VAZ 21083, which is very popular. The Oka engine is slightly modified and weighs half as much. Due to this, it was possible to obtain low fuel consumption and high efficiency.
It is based on a simple four-stroke power unit running on gasoline fuel. The main features include the overhead camshaft and in-line arrangement of the cylinders. Thanks to this, it was possible to obtain high power.
As standard, the driver receives a combined lubrication system:
Due to this, all parts and mechanisms will receive their portion of oil and will not fail. As for the cooling system, everything is standard. The designers installed a fluid system that circulates fluid throughout the entire circuit. Thanks to this, the Eye's engine will not overheat under the sun.
Now you can find only two modifications of the engine:
When to change, what and how much to fill
Changing the oil in the Oka engine versions 1111 and 11113 according to the manufacturer’s recommendations must be performed at every scheduled maintenance. The frequency between services is 10 thousand kilometers. But you shouldn’t strictly follow the frequency, and replace the lubricant a little earlier, after about 8-9 thousand kilometers.
Car enthusiasts may notice that replacement should be carried out quite often. But here it is worth understanding that the power plants for the Oka were developed a long time ago, so you should not expect high performance indicators from them.
The exception is the Oka modification 11116, equipped with a Chinese power unit. This engine has a more usual lubricant change frequency - 15 thousand km.
Service
This section includes not only changing the oil, but also adjusting the clearances in the valve mechanism.
The first step is to talk about the simplest thing, changing the engine oil. To do this you will need the following tools:
- key to 17;
- small container for waste liquid;
- new oil;
- screwdriver.
Before starting work, you need to turn off the car engine and install supports for the wheels. This is necessary for safety, so that no surprises happen during work.
Change of oil
If you want to completely change the oil type (if the oil type remains the same, then the following steps are not necessary):
- first flush the entire system with flushing oil;
- To do this, you need to pour in a little liquid to the lower mark and start the engine from the Oka. Experts recommend letting it run for 10 minutes. During this time, a special liquid will pass several times throughout the entire system and collect all the slag.
- After this, you can drain it and replace the oil filter. This is necessary to ensure that the new oil does not receive unknown substances while passing through the filter.
- Engine oil should be filled to the top mark, to the maximum. Next, wait about 10 minutes and add engine fluid if necessary.
- Turn the filler cap and remove it;
- Remove the drain plug under the car engine. This is necessary so that the old oil is drained into a special container;
- Screw the plug back;
- It is worth remembering that the oil is very hot during draining. Next, you can unscrew the oil filter and put it aside. It won't be needed anymore;
- To unscrew the filter, it is better to use a special wrench;
- Fill the filter cavity with new oil to the middle;
- Do not forget about lubricating the o-ring, which is located on the filter;
- Fill the filler neck with new engine oil to the maximum and screw on the cap;
- We start the engine and let it run for a few seconds. During this time, you can check for leaks and oil level. If necessary, it can be increased.
Gap adjustment
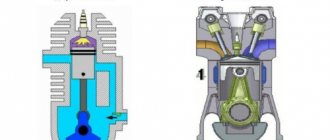
To compensate for the expansion of parts during operation, the designers provided a special gap between the valve stem and the cam itself. If the gap increases, the valves may not open, and if the gap decreases, they may not close. This needs to be monitored almost every day.
You only need to check the gap on a cold engine when all parts are in standard condition. The minimum clearance of the intake valve should be 0.2 millimeters, and the exhaust valve 0.35 millimeters. If this is not observed, the Eye's engine will operate unstably, with some noise and whistling.
The valves must be counted from the camshaft belt: the 1st and 4th valves are exhaust, and the 2nd and 3rd are intake. It is worth noting that the order of adjustment is not important. That is, adjustments can be made in any order.
For this job you will need a 10mm wrench, a set of screwdrivers, feeler gauges and tools for adjusting the gaps. If you cannot turn the crankshaft, you can use the following advice. Engage fourth gear and drive the vehicle very slowly until the cam is in position.
- Remove the air filter;
- Cover the carburetor with a special rag so that nothing gets in there;
- Unscrew the cylinder head cover;
- Turn the crankshaft several times using a special wrench. To simplify this action, you can engage the gear and remove the spark plugs;
- The marks on the alternator pulley and the front cover must match. If this does not happen, then you have not fully rotated the wheel. During this step, you can begin adjusting the car valves. It is worth paying attention to the fact that there are two marks on the cover. You only need to focus on the long mark;
- Next, measure the thermal gap using a flat feeler gauge. These values can be written down in a notebook and compared with the nominal values in a special manual;
- Attach a special device to the lid;
- Put on the washers and turn them;
- Press the lever and push the pusher down. Insert the clamp under the camshaft so that the protrusion fixes the pusher;
- Next, you can pry the adjusting washer and remove it. Record the thickness of the washer;
- We calculate the thickness of the new washer using the formula: H = B + A - C, where H is the thickness of the new washer; B - thickness of the old washer; A is the value of the measured gap; C—nominal clearance;
- We install it in the pusher and perform the actions in the reverse order;
- Rotate the crankshaft 360 degrees and adjust the thermal gap;
- We install the parts in the reverse order so that the Oka engine is in the same condition.
Changing the oil in the Oka engine
Eye machines have a mixed reputation. But one cannot deny the fact that these domestically produced cars continue to be actively used in many cities and countries. Depending on the engine type, cars are referred to as VAZ-1111 or VAZ-11113. There is no fundamental difference between them. It’s just that version 11113 is equipped with a more powerful motor. The Oka is a compact city car with a small engine in volume and power. This makes the car very economical. AvtoVAZ, which produced these cars, created the simplest possible design. Due to this, owners are able to independently carry out maintenance, change basic consumables and even carry out minor repairs. When choosing motor oils for Oka engines 11113 and 1111, you should proceed from the official recommendations of the automaker. The procedure for replacing the lubricant itself is simple, which allows you to do it yourself in a short period of time. If you follow all the rules and recommendations, no problems will arise during the work.
When choosing engine oil for replacement, you need to focus on the manufacturer’s recommendations.
When replacement is required
One of the key advantages of Oka cars of various modifications is their low cost. The machines are very cheap to maintain and do not require the use of expensive spare parts and consumables. But when choosing frankly low-quality parts, certain difficulties may arise. Therefore, when servicing and repairing, try to use the optimal consumables so that the machine can operate confidently, for a long time and reliably. To maintain engine performance, you should change the engine oil on time. The manufacturer's recommendations are taken into account here. The operating manual for Oka cars (versions 1111 and 11113) states that the engine fluid should be changed every 10 thousand kilometers, or every 6 months. Consider what comes first.
But there is an important amendment that provides for operation in difficult conditions. These include:
- short regular trips, the range of which is no more than 6 kilometers;
- short trips up to 15 kilometers in sub-zero temperatures;
- driving a car with frequent stops;
- regular trips accompanied by idling;
- operating the vehicle at minimum speed due to city traffic jams and heavy traffic;
- driving on dusty, unpaved, hilly roads;
- trips around the countryside, etc.
All this negatively affects the condition of the engine oil, reducing its service life and reducing the original physical and chemical properties. Therefore, under severe operating conditions, it is recommended to reduce the frequency of oil changes to 5 thousand kilometers or 3 months. Try to regularly monitor the level and condition of the lubricating fluid. This will allow you to understand when the oil begins to lose its characteristics and will require mandatory replacement. Although Oka is cheap to repair, you shouldn’t delay changing the oil. If the lubricant is changed in a timely manner, the engine will operate efficiently and reliably, and there will be no excessive friction with the formation of metal chips. Otherwise, engine repair will be required, which even on the Oka River is not that cheap.
Level and condition
During the period between services, when the machine is operated on changed oil, it is important to monitor the condition of the fluid and its level in the oil sump. To check the level, perform a few simple manipulations:
- remove the oil dipstick from the engine;
- wipe it with a clean, dry, lint-free cloth;
- insert back;
- lower it all the way into the engine crankcase;
- remove the dipstick again.
If the oil level is optimal, you will see an oil mark on the dipstick between the Min and Max marks. You can check on a cold engine, but this will not give an objective assessment. Therefore, it is recommended to place the car on a flat horizontal platform, start the engine, warm it up to a temperature of about 80 degrees Celsius, and then turn it off. After 5 minutes, when all the oil has drained back into the crankcase, you can carry out the above manipulations. You can visually check with a few drops the condition of the lubricant. A change in color, an uncharacteristic aroma, a burnt odor, or foreign impurities indicate that the liquid has almost lost its protective, lubricating and cooling properties. Therefore, further operation of the car with such oil is potentially dangerous.
If everything is fine with the oil, but the level does not correspond to the recommended level, it is necessary to change it. A lack of oil in the crankcase is just as dangerous as its excess. If the level is too high, when the dipstick shows a mark above Max, the engine will consume more lubricant, it will begin to burn out, and the spark plugs will become dirty. Carbon deposits will appear on the internal surfaces of the engine, which will entail serious changes in the characteristics and performance of the engine. If there is insufficient oil, add the required amount. But you can only use the same compounds that were previously poured into the engine. Otherwise, you will have to completely change the lubricant and flush the system.
Choosing engine oil
The primary question for car owners is what kind of oil to pour into their Oka. The best solution here is to consult the instruction manual. The manufacturer indicated which oil is best to pour into the engine in order to provide the Oka with the necessary lubricating and protective properties. But the problem is that it is not always possible to fill in any of the official oils presented. Some lubricants are outdated and no longer produced. Old oils have more advanced modern analogues. By pouring them into your car, you will only increase the efficiency of the engine installed on the Oka 1111 and 11113. AvtoVAZ recommends using certain types of oils that meet the following API specifications:
You should also separately determine which oil would be best to fill into the Oka from the point of view of its viscosity according to SAE. Here they mainly rely on climatic conditions, choosing a composition with an optimal temperature range. The OKA car allows you to fill the engine with the following lubricants according to viscosity:
- 5W30;
- 5W40;
- 10W30;
- 10W40;
- 15W40;
- 20W40.
It is better to pour universal all-season compounds into Oka. They have a wide range of operating temperatures, remaining equally effective in cold weather and during the summer heat. If we talk specifically about manufacturers, the following compositions are suitable for Oka cars:
Many of the motor oils presented are easy to find on sale. If for some reason the specified lubricants are not suitable for you, look for analogues that meet the specified characteristics and tolerances. Oka cannot be called demanding on the quality of oil. But it’s still better to opt for compounds of a good level, since with them the engine will operate in optimal mode and not provoke unwanted breakdowns.
Required volume
The most common modifications of the Oka car differ in the type of engine installed on them.
- VAZ-1111 provides for the use of a 0.65 liter engine. Documentation often uses the designation 0.6 liters. Its power is 28 horsepower.
- VAZ-11113 has a more powerful engine. This is a 0.75 liter engine. Although it is often called 0.8-liter. The increase in power is insignificant, because this internal combustion engine develops 32 horsepower.
Regardless of the type of engine, the volume of engine oil for Oka 1111 and 11113 remains the same. The crankcases contain 2.5 liters of oil. This allows car owners to buy cans for 4 - 5 liters of oil. This amount is optimal for filling and additional rinsing. If you buy a 5-liter canister, this should be enough to flush and completely fill the internal combustion engine with fresh fluid. The amount of oil you buy directly depends on whether you are going to flush the engine with the same composition or not. Knowing how much oil is in the Oka engine, as well as which manufacturer to give preference to, you can proceed to the next stage. To replace, you will need a standard set of tools, the required amount of lubricant and the Oka itself.
Replacement instructions
When changing engine oil, the main emphasis is on following safety rules. There is nothing complicated about draining and adding new lubricant to an Oka car engine. Therefore, very often replacement is carried out with your own hands, without the involvement of specialists and assistants. The work will take you a total of 2 – 3 hours. Start with preparation. In order for the oil to completely flow out of the pan, several conditions must be met:
- the machine must be warmed up to operating temperature;
- The car should be placed on a flat horizontal surface.
Warming up is carried out by starting the engine at idle for 5 - 10 minutes, or by driving several kilometers around the garage. This is enough for the oil to become sufficiently fluid and quickly come out of the crankcase when drained. The machine is warmed up and ready for subsequent operations. You need to place the car on an overpass, pit, or lift it using a lift. Focus on what you have available.
For tools and supplies you will need:
- fresh engine oil with the required characteristics;
- new oil filter;
- drain plug seal or new plug assembly;
- rags;
- empty container for drainage;
- funnel, watering can for pouring oil;
- spanners;
- screwdrivers;
- oil filter puller;
- workwear.
When everything is ready, you can start working on changing the engine oil in your Oka car.
- Having placed the car in the pit, align the wheels, put stops under them, engage first gear and the handbrake. For safety, remove the negative terminal from the battery. Under the hood, you can immediately unscrew the oil filler plug.
- Go under the car, taking with you the necessary materials. You can drain the oil only 15 - 20 minutes after you stop the engine. This way the engine will cool down along with the oil, plus it will drain into the crankcase.
- Take the key and loosen the drain plug. Do not unscrew completely until you place an empty container with a volume of at least 3 liters under it. Be careful, because immediately when the plug is removed, oil will begin to flow out in a strong stream.
- While the oil is draining, check the condition of the plug. If it is deformed, you will have to change the element completely. If the plug is in normal condition, only the sealing gasket needs to be replaced. It costs a penny, so you won’t have to spend a lot on this consumable.
- Let's move on to the oil filter. If your Oka has some kind of cover or hatch that blocks access to the filter, they need to be removed with the appropriate tool. Wipe the filter housing. This will allow you to grip it more tightly with your hand. They can often be dismantled without the use of special tools. If the filter fits tightly, use a special puller.
- Do not rush to completely unscrew the filter. It needs to be turned a few centimeters. After this, old oil will begin to come out, so keep a container near you for working off. When the lubricant stops flowing, carefully unscrew the filter completely, but do not turn it over. Place in the container where the waste was drained. It cannot be reused, so do not even try to wash the old filter with different cleaners. It will not be possible to restore the element for high-quality and efficient operation.
- Remove all dirt and try to clean the tray as thoroughly as possible. This is necessary to prevent dirt and debris from getting into the already fresh oil and new filter.
- If you need to use flushing fluid or flush the engine with engine oil, it is better to do this using another new filter. You can take a good element for long-term use, as well as some cheap Chinese option for one-time use.
- Experienced motorists note that on the Oka it is better to flush the engine with the lubricant that you will subsequently pour into the crankcase. Therefore, insert a new filter, tighten the drain plug, and pour the full volume of your chosen oil through the oil filler neck.
- Now close the filler hole, replace the negative terminal and start the engine at idle speed. Let the engine run for 15 - 20 minutes. This will allow you to collect all the sediment and remove contaminants. Some people believe that special flushes are much more effective, but their residues in the system are mixed with new oil, changing the properties and characteristics of the latter.
- When the set time has passed, turn off the engine. Wait about 20 more minutes, then repeat all the procedures completed. You need to drain the waste and dismantle the filter.
- The system has been cleared, so we are moving on to the final stage of work. Get a second new filter that has a higher level of quality. Lubricate its sealing gasket with oil, pour a certain amount of liquid into the housing, if provided by the manufacturer. Insert into the socket and tighten by hand. There is no need to use tools or apply too much force. Otherwise, you risk breaking the filter housing.
- Replace the seal on the drain plug and screw it into place with a wrench. Do not overtighten, otherwise you will strip the thread. Fixing this will be much more difficult. Professional help will be required.
- Fill in new lubricant through the oil filler hole to the required level. Control the quantity using a probe. If when the oil is cold it shows a level between Min and Max, that is enough for now.
- Close the oil filler plug and start the engine at idle. Run the engine to warm the fresh engine oil to approximately 80 degrees Celsius. Stop the engine and wait 5 minutes for the lubricant to drain into the crankcase. Reinsert the dipstick according to the instructions. If there is little oil, add the required amount. Initially, too much liquid was poured in; the excess will have to be drained.
Now the work of changing the oil on Oka is considered completed. There is absolutely nothing complicated here if you follow the instructions and adhere to safety rules. The main task for an Oka car owner is the correct choice of consumables. If you use high-quality oils and a filter, and periodically flush the system when signs of wear are detected, then the engine can serve for a long time and efficiently.
vibormasla.ru
Tuning
Many drivers want to make a real monster out of their iron horse.
This also applies to the small car Oka. If you want to increase power, you can tune the Oka engine.
This requires a special tool, workshop and experience:
- The first step is to replace the cylinder head, air filter, buy a new camshaft and carburetor. In fact, this is the bare minimum that can be done at the first stage.
- You know that Oka's car does not have a very large engine capacity, and there is no way to fix this. Of course, you can try to install a different engine, but this is very difficult and time-consuming. Less expensive is chip tuning, which allows you to slightly increase torque and compression. In addition, fuel consumption is reduced, which is very good.
- Many experts recommend grinding the manifold, lifter and camshaft. These actions relate to the main tuning of the Oka engine. With this you can not only increase power, but also make the engine run smoothly.
- Many drivers ask the question: what engines can be installed on an Oka car? And the answer is very simple. Only standard or slightly modified from VAZ 21083.
How much oil is in an Oka engine ~ VESKO-TRANS.RU
How much oil to pour into the eye and how to do it correctly
Many drivers are interested in how much oil to fill in the Oka. Naturally, this question is of greater concern to those who use the VAZ-1111 car and its other modifications. Or those whose loved ones (for example, someone from the older generation) purchased such a car.
The Oka car manufacturer recommends using certain types of oils.
Oka's car has a lot of modifications. Not all of them went into the general creation, but several hundred samples were still sold. Depending on which of them you are dealing with, you can accurately determine the engine size. For example, the first Oka cars (VAZ-1111 and similar) have a crankcase filling volume of 2.5 liters. What is a crankcase? This is the name given to a car part that protects its most important parts. This is a gearbox, various engine parts that are in motion, etc. The crankcase not only protects, but also lubricates those machine parts that are in motion.
Invented relatively recently (in 2007), Oka trucks need, of course, to be filled with more oil. About 4 liters. It is equally important to do it the right way. Let's consider the rules for pouring oil into a passenger car. According to the manufacturer's recommendations, you need to use certain types of this liquid. Let's consider, as an example, how to change it for a VAZ-1111 car.